Tactical Analysis: Disjointed Arsenal press leaves gaps Liverpool exploit

Another year another miserable opening day result. Three goals in a 15 minute span to open the second half gave Liverpool a lopsided 4-1 advantage and although goals from Oxlade-Chamberlain and Chambers made the final score look a little more respectable, they did little to mask what a humiliating afternoon this was for the club.

In his post match press conference Arsene Wenger put the loss down to three main factors: the psychological blow of Coutinho’s late first half equalizer, being physically not at peak levels, and inexperience. None of those feel like especially valid excuses and if anything reflect poorly on Wenger himself. Coutinho’s free kick was certainly a blow but doesn’t explain the total meltdown at the start of the second half that saw Klopp’s side score 3 in the span of 15 minutes. As for not being ready physically, Liverpool had more players at the Euros than any other club side so they shouldn’t have had an advantage there. Finally, the fact we were fielding an inexperienced side is solely on Wenger for not bringing in needed additional players this summer. Yes we’ve been unlucky with injuries but center back was a spot we’ve needed reinforcements at since the second half of last season.

Lineups

Klopp named a fairly unsurprising first 11 perhaps with the exception of Jordan Henderson given the nod at the base of midfield over Emre Can. They played a 4-3-3 with Adam Lallana to the right of Henderson and Georginio Wijnaldum to the left in midfield. Sadio Mane played on the right of the front three, Coutinho played on the left and Firmino started at striker. Across the back Alberto Moreno and Nathanial Clyne played left and right back respectively. Dejan Lovren and summer signing Ragnar Klavan partnered at center back.

Wenger opted not to play Monreal at center back to provide some experience there and instead gave the 19 year old Rob Holding his debut. Holding partnered Chambers with Monreal at his normal left back spot and Bellerin at right back. Wenger stuck with his policy of easing new signings into the squad by leaving out Granit Xhaka and went with Elneny and Coquelin in the holding roles of our 4-2-3-1. Alexis led the line as he had against Manchester City with Ramsey in the hole behind him in the #10 role. Alex Iwobi played on the left. Perhaps somewhat surprisingly Theo Walcott played wide on the right. Wenger has suggested he’s not good enough defensively to play wide but he performed there well in the friendly against City and was rewarded with a start here.

Arsenal press in midfield but keep deep defensive line, leaving big gaps

We started the match by pressing high up the pitch. I imagine the high pressing was designed with the thought of protecting our inexperienced center backs- do our defending high up the pitch with our midfielders and attackers so that Holding and Chambers have less of it to do near our own box. Liverpool were quite sloppy in possession in the first half which made our pressing look better than it actually was. But in truth our pressing was disjointed throughout- we were leaving too big of gaps between the first wave of players pressing and those in behind. The defense needed to step forward a few yards to prevent Liverpool from playing between our lines. The visitors struggled to keep the ball in the opening half but our defensive shape still wasn’t right. In the second half they would exploit us.

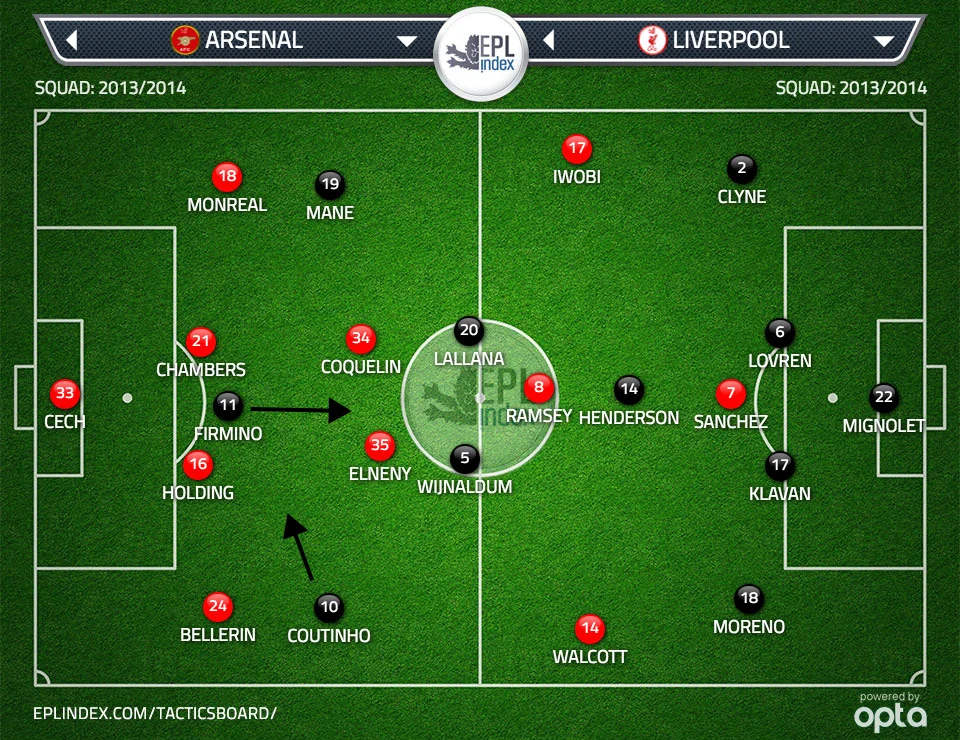
One of Coquelin or Elneny would push high up the pitch when Liverpool were in possession to close down Henderson when he got on the ball. As a result, our non-pressing deep lying midfielder was left alone behind to defend the width of the center of the pitch. When Coquelin pressed Henderson, Elneny was 1 v. 2 against Liverpool’s other two center midfielders Lallana and Wijnaldum. Coutinho also tucked inside from his attacking left midfield position which further overloaded Elneny. Liverpool were able to quickly combine through Arsenal’s far too open midfield to create chances. Once they got beyond our first line of pressing there was acres of open space to exploit.

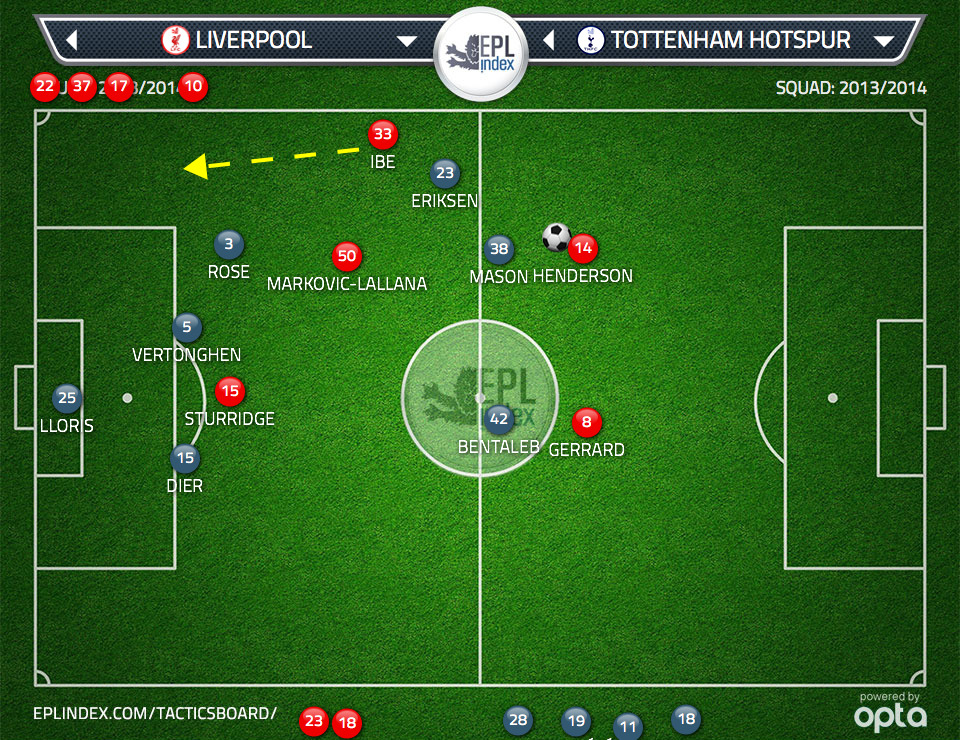
The image below is an illustration. Henderson receives the ball deep in midfield. Coquelin steps out of the defensive bank of four to press. Elneny is left to defend Lallana and Wijnaldum 1 v. 2. One simple pass from Henderson to Wijnaldum means Liverpool have broken our press, leaving Elneny in a world of bother to try to slow down Wijnaldum and Lallana on his own. From this position it’s two passes- from Henderson to Wijnaldum and Wijnaldum to Lallana- and Liverpool are at our back four.

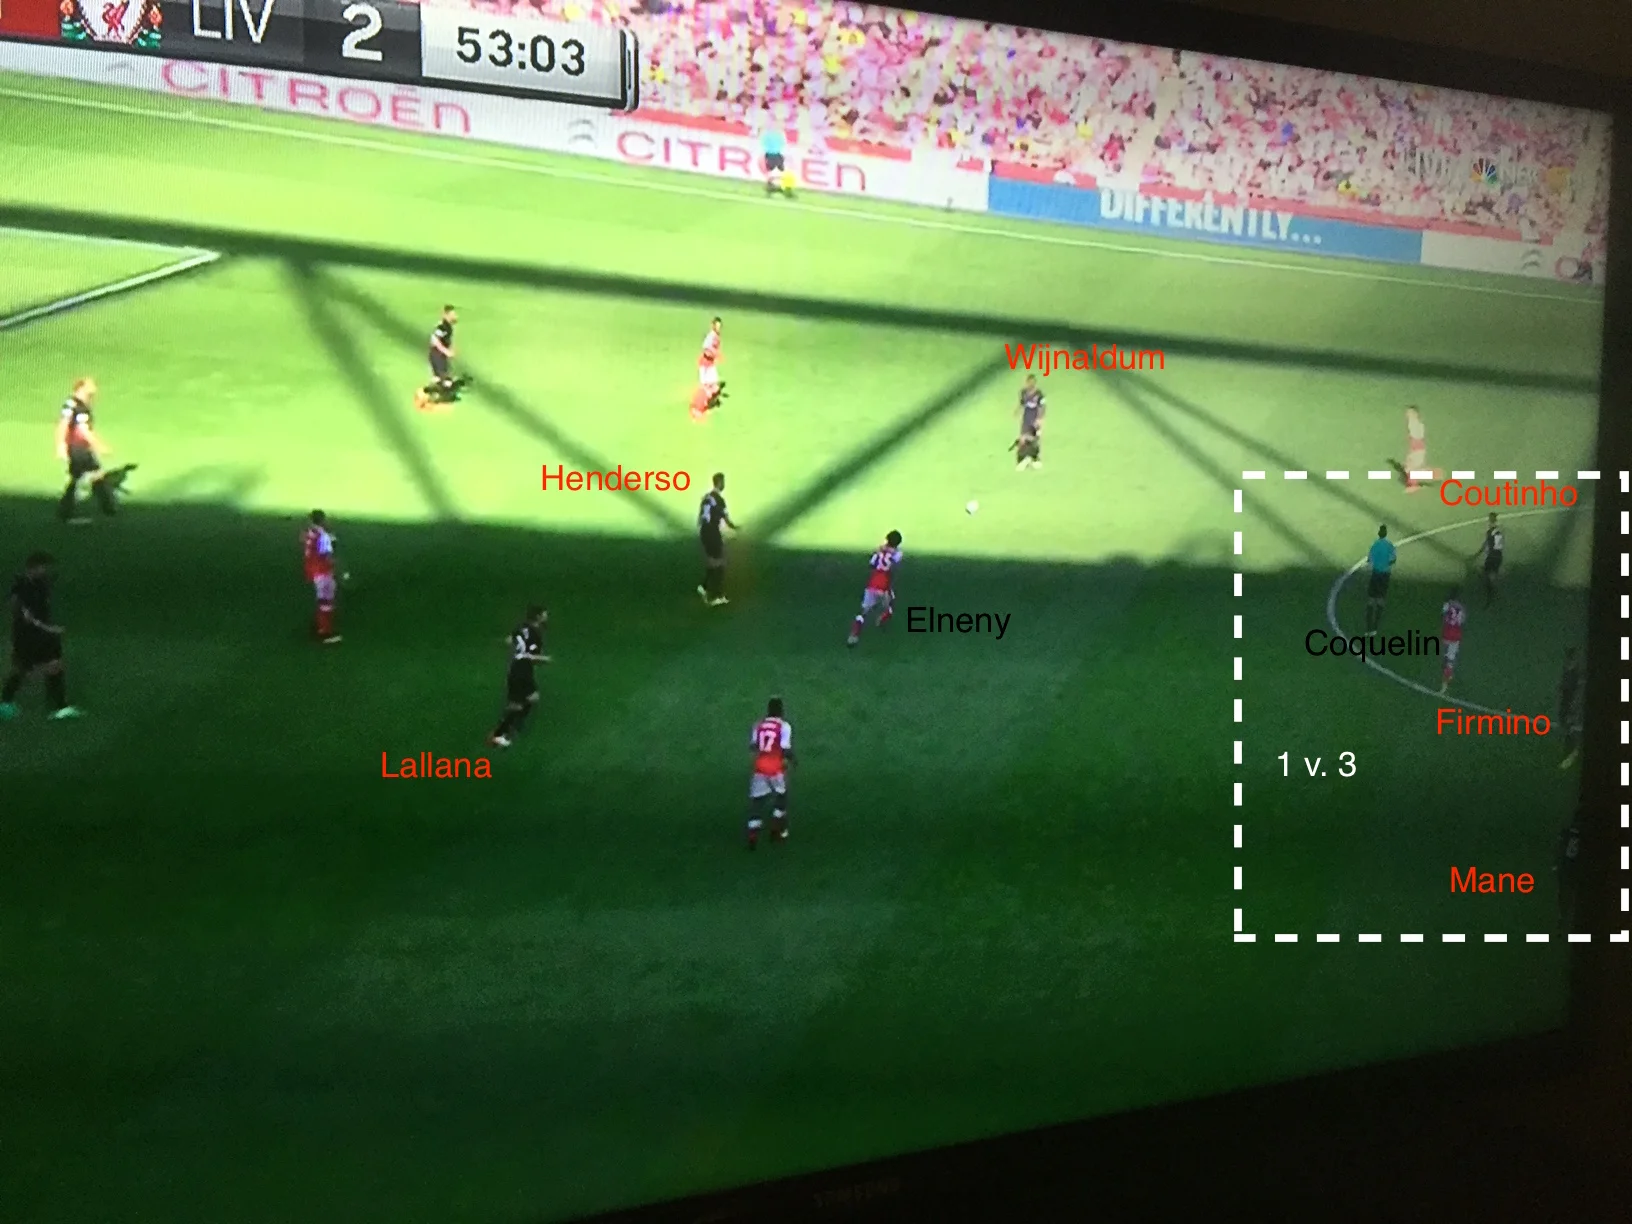
Below is another example just a couple minutes later. Here Elneny is doing the pressing with Coquelin sitting deep. One simple square pass from Lallana to Wijnaldum means Liverpool have passing lanes forward and Coquelin outnumbered 3 v. 1 near the halfway line.

We were also confused by the excellent movement of Firmino. The Brazilian dropped into deep positions from his starting position at striker and floated into the channels to create overloads all over the pitch. Liverpool found an excellent balance with Firmino in this sort of false 9 role with Mane and Coutinho playing the wide forward positions. Coutinho would tuck into the gaps between our midfield and defense to link play forward like a #10 and Mane would tuck inside and play high up the pitch near our center backs, his pace posing a serious threat in behind our defense.

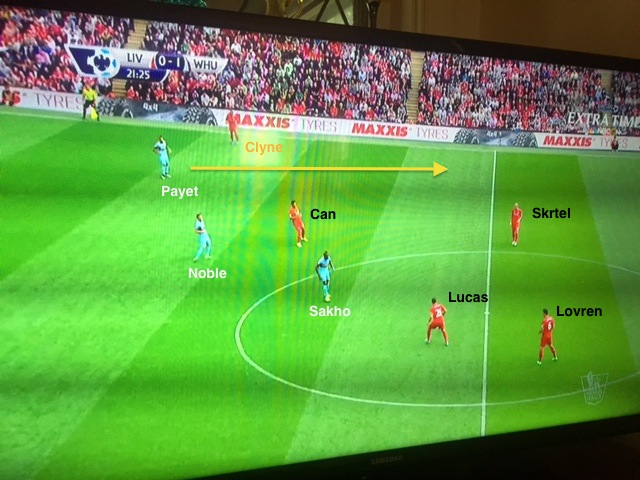
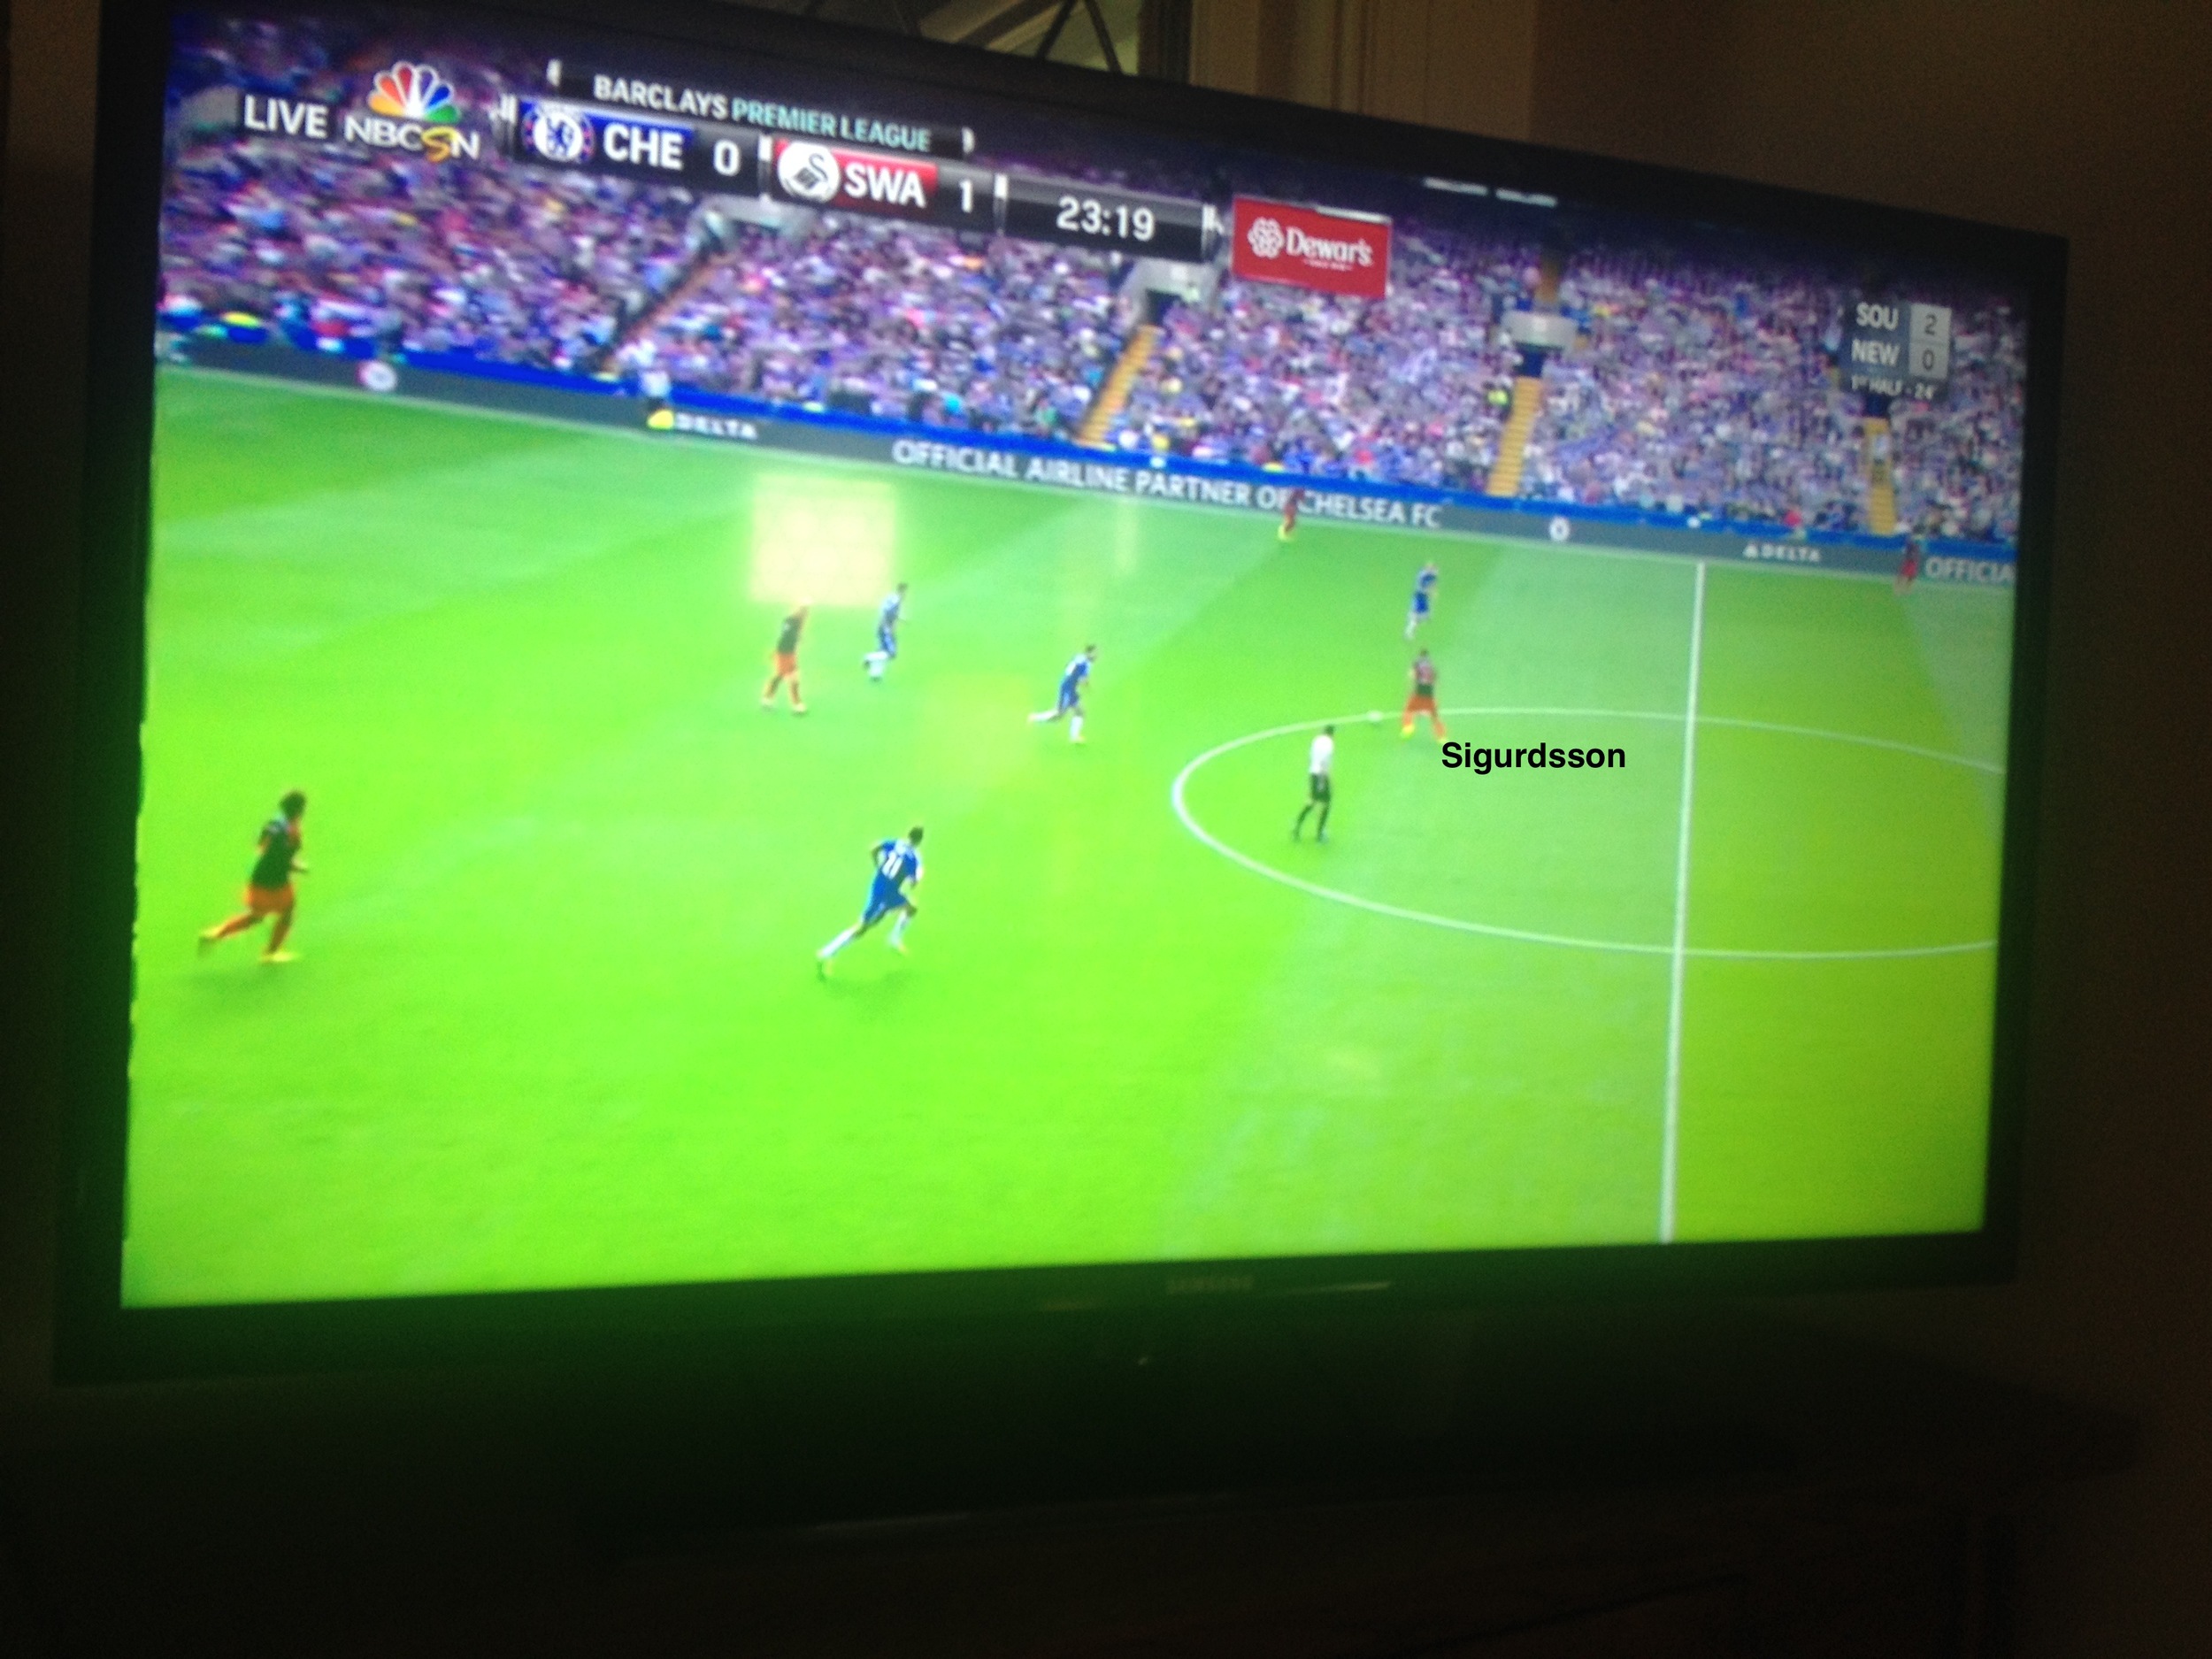
Below is an example of this clever movement from Liverpool. Here, Firmino drops very deep into midfield to collect a pass from Clyne. Coutinho has come all the way across the pitch from the left and offers Firmino a short square pass. The two then combine for a quick 1-2 before playing into Mane between the lines.

This particular move fizzled out for Liverpool but Firmino’s and Coutinho’s movement was critical for Liverpool’s second. Firmino pulled wide to the right channel to get on the ball and Coutinho moved into space between the lines. Firmino plays a penetrating pass to Coutinho who flicks on for Wijnaldum. Lallana makes a driving run into the box and takes down Winjaldum’s cross with a deft touch before finishing coolly.

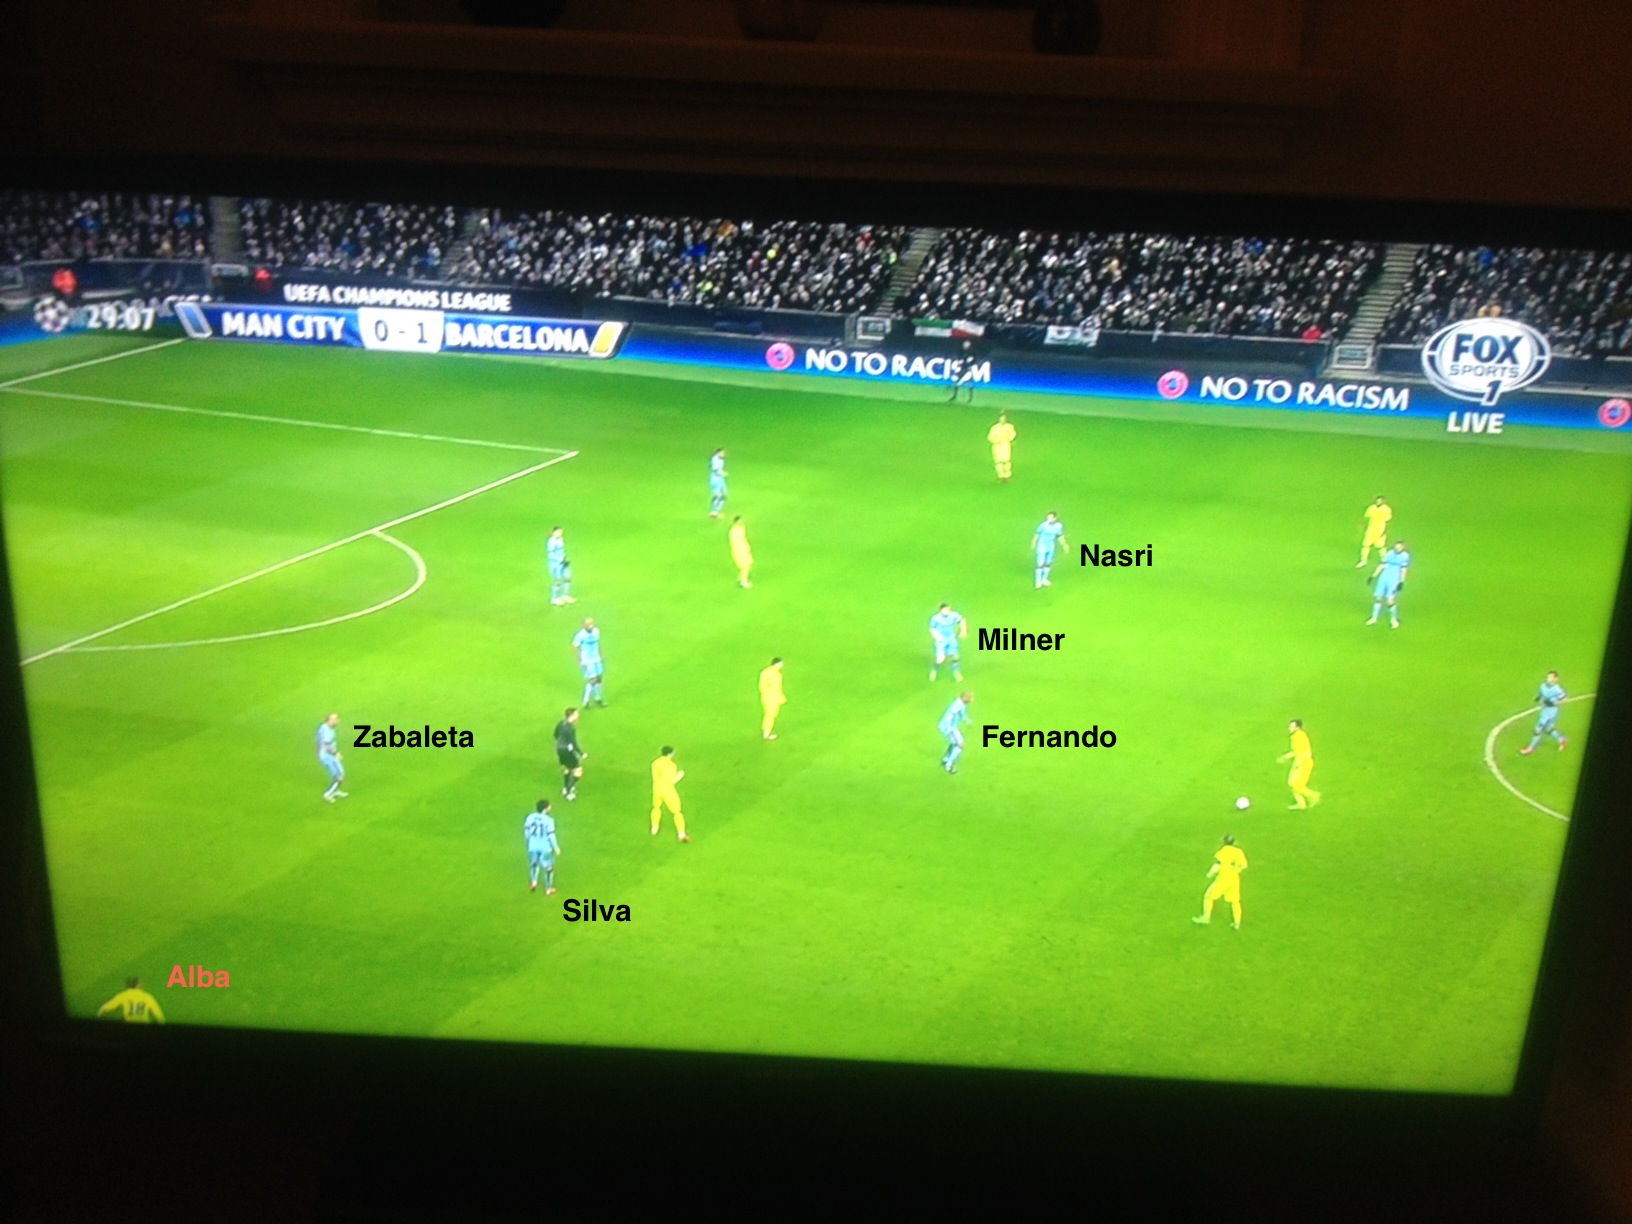
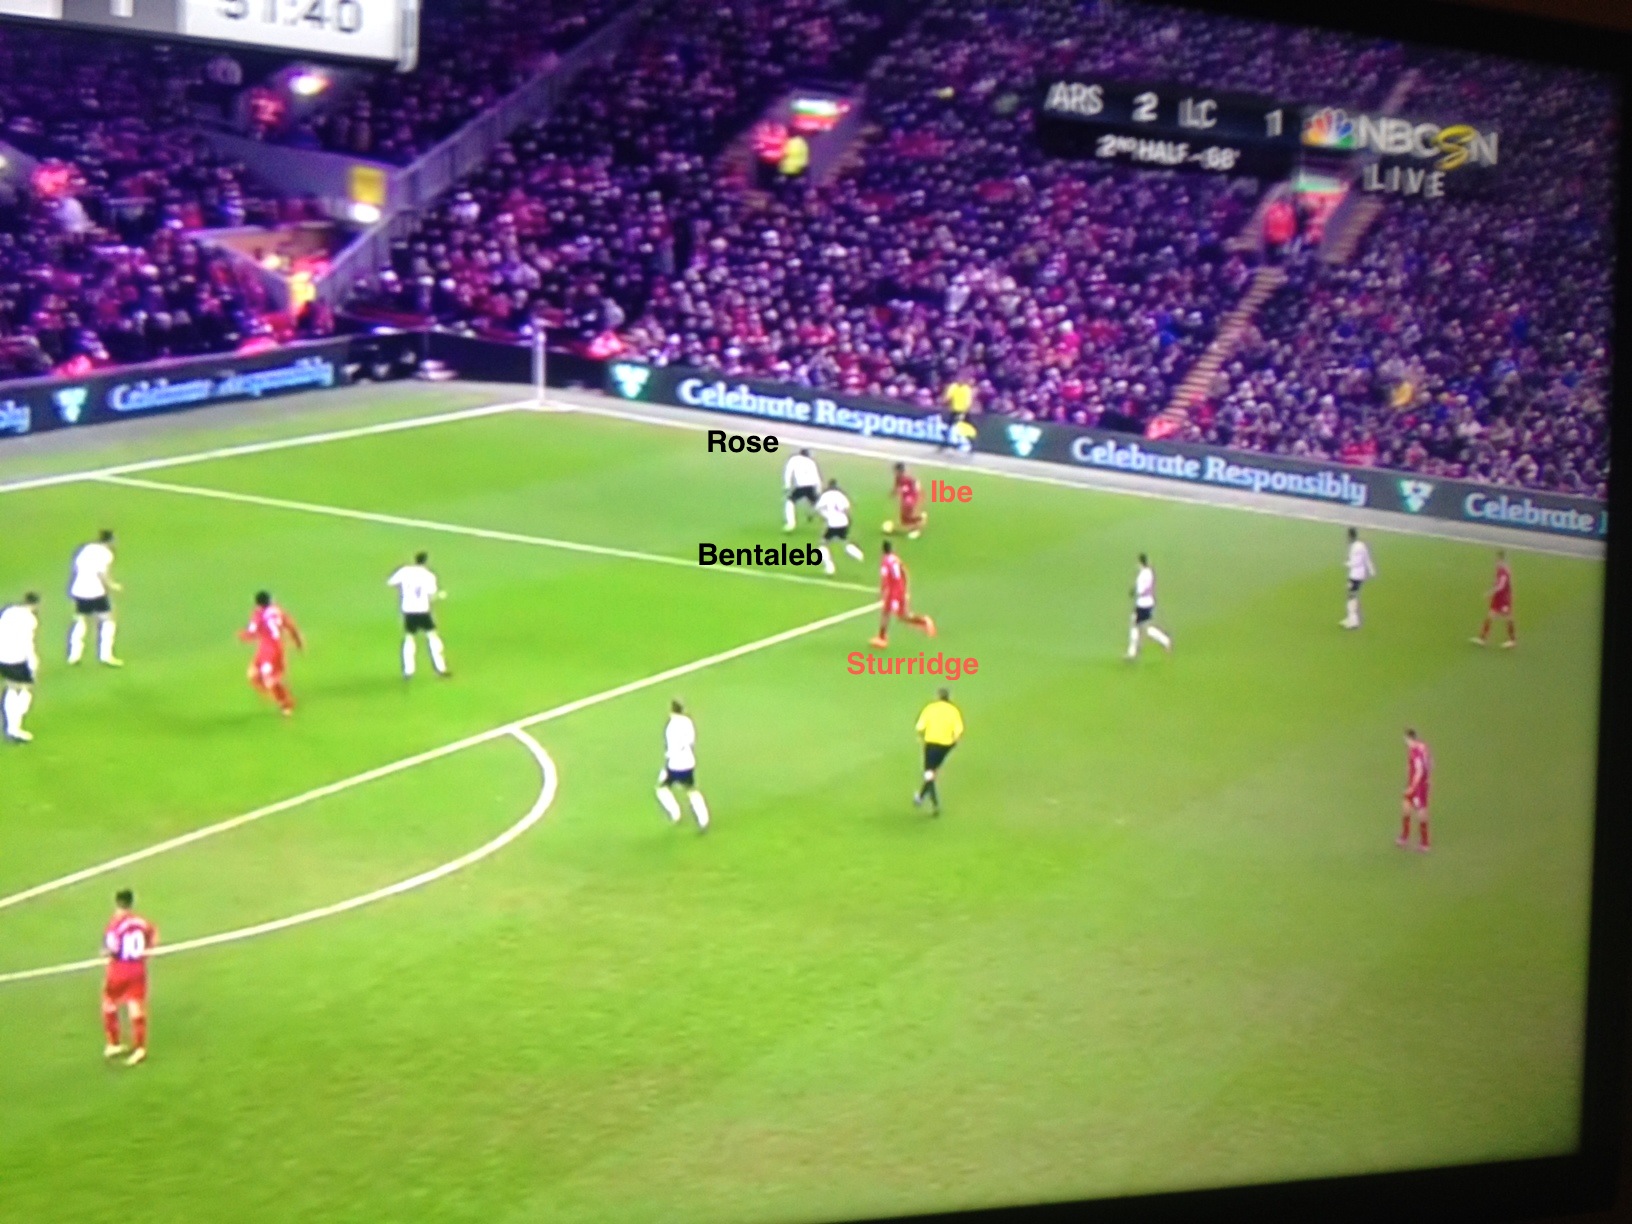
Even Coutinho’s stunning free kick opener came about as the result of clever movement from the Liverpool front three. Firmino dropped to within 10 yards of the halfway line to collect a short pass from Henderson. Again, Elneny stepped forward to press him, leaving Coquelin behind him and acres of space in the middle of the pitch (see screen grab below). Firmino plays a pass to Mane who is then able to pick out Coutinho tucking inside. Holding steps out and commits the foul. The issue here isn’t just that Elneny is pressing. Pressing when done as a unit is great but the movement has to be coordinated throughout the squad. The issue here is what’s going on behind Elneny. Our defense is way too deep when Firmino gets the ball, leaving a massive gap for Liverpool players to move into and offer him easy passing lanes. The second the defense sees Elneny stepping forward to press they all need to push up to close that gap between defense and midfield. We were never compact enough. On one hand we were trying to press high up the pitch but on the other hand we were playing with a deep defensive line. That’ll never work out well. I’m sure Holding and Chambers wanted to stay deep because they were concerned about the pace of Mane and Coutinho getting in behind them. But if that was the case we needed to have the midfield play deeper to screen the center backs. Our shape was too loose in defense throughout the 90 minutes.

Arsenal don’t exploit Moreno in second half

In the match preview I discussed what a defensive liability Moreno is and that we should be looking to force him into 1 v. 1 situations as much as possible down our right side. In the 14th minute he attempted to head a clearance that fell straight to Ramsey in the penalty area. On that occasion he made a decent recovery tackle but his shakiness was evident. Then in the 28th he took a wild lunge at Walcott in the box leading to an Arsenal penalty. For Arsenal’s opener he was high up the pitch when Lallana lost possession in midfield, leaving him out of position and allowing space down the right for Walcott to drive forward and score.

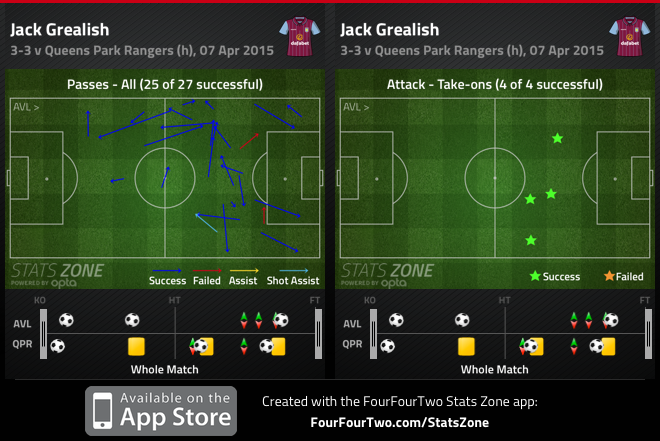
However in the second half we got away from attacking down the right and made Moreno’s job too easy. Walcott only attempted two take ons in the entire 90 minutes, both of which were in the first half. He completed just 13 passes, 8 of those came in the opening half.

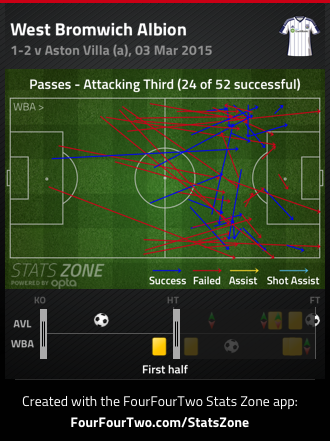
The most maddeningly frustrating stat of the weekend is that according to whoscored.com 48% of Arsenal’s attacks were down the left side and only 27% were down the right side. I’m sure some of this has to do with the fact Iwobi plays more of a possession style and likes to join in the buildup more while Theo is a much more direct player. But when an opposition has such a glaringly obvious weakness in their defensive ranks you have to alter your game to exploit it. Liverpool have a very solid right back and an England international in Nathanial Clyne yet we chose to attack him time and again over Moreno. 

Conclusion

I think the obvious takeaway from this match is how abundantly clear it was that we were unprepared for every facet of a football match. Physically we looked off the pace, evidenced by the fact Liverpool covered 5 kilometers more than us over the 90 minutes. Tactically we were all over the place, conceding way too much space defensively and failing to exploit the biggest weaknesses in Liverpool’s not-all-that-good back four. Mentally we responded to Coutinho’s late first half equalizer by capitulating and conceding three in 15 minutes. Yes we made it close in the end but a hardened, mentally strong team would have never gotten themselves into a position where they were 3 goals down at home on the opening day of the season. That the squad needed reinforcements should have been abundantly clear before the match but now Wenger can’t even try to claim otherwise. All is certainly not lost. The returns of Koscielny, Ozil and Giroud will have a big impact but still the result is troubling. We were played off the park by a team that will be one of our competitors for a top 4 spot. Manchester City, Manchester United and Chelsea all won. Tottenham have a talented squad and could easily be right up there again this season. Competition for a top four spot is as tight as it has ever been and if we don’t improve quickly our run of Champions League participation will be under serious threat.

Arsenal's matchweek 1 scouting report: Liverpool

For the 2016-2017 season Soccermetrica will focus solely on Arsenal. I plan on doing a weekly scouting report of the Gunners’ upcoming opponent that I’ll put out at least a day before each match day. I’ll also write a detailed tactical analysis of each fixture that I will try to put out the Sunday or Monday after a amatch.

Here is the first installment of the weekly scouting report for Arsenal’s week one opponent Liverpool. These should become more detailed with more graphics and game-specific analysis in subsequent weeks as our opponents begin playing competitive fixtures that offer more insight into how they’ll lineup and approach matches tactically.

Liverpool

Jurgen Klopp is enjoying his first preseason at Liverpool having replaced Brendan Rodgers last October. It’s remarkably difficult for a manager to arrive midseason and thoroughly instill a nuanced playing philosophy while also trying to prepare for matches every few days. So while their 8th place finish last season wasn’t hugely impressive (they were 10th when Klopp took over), they did appear to be developing a distinct identity and better positional organization under Klopp as the season progressed, something they were desperately lacking towards the end of the Brendan Rodgers era and will look to build on this time around.

That disappointing 8th place finish may largely be attributable to a congested fixture list brought about by impressive finals runs in both the League Cup and the Europa League. Although they lost both those matches, the fact they got there was cause for optimism in Klopp’s first partial season and offered proof that he was having an effect.

This summer’s preseason will provide invaluable time on the training pitch. Preseason will also provide Klopp’s staff the chance to control the fitness regime of the squad. Liverpool hired on Bayern Munich’s fitness and conditioning coach Andreas Kornmayer and nutritionist Mona Nemmer in May and Klopp has promised the most difficult preseason of his players’ careers.

One thing you know to expect from a Jurgen Klopp side is a tireless work rate and relentless pressing in midfield. They finished tied with Leicester in successful tackles per game last season and if the new training regiment has the desired impact we can expect an even more tenacious side off the ball.

New signings

Klopp has made six new signings this closed season. Loris Karius was brought in from Mainz to provide competition for Simon Mignolet but broke his hand in a friendly against Chelsea at the end of July. Sadio Mane will provide attacking pace in wide areas following an impressive last season at Southampton where he scored 11 league goals and provided 7 assists. Joel Matip and Ragnar Klavan will provide competition for Dejan Lovren and Mamadou Sakho at center back. Georginio Wijnaldum is a tremendously athletic midfielder capable of providing goals from midfield. He led Newcastle in goals last season and was second in assists and should compete for a spot in the first 11. Veteran goalkeeper Alex Manninger was brought in to provide additional cover for Mignolet and Karius. Additionally, the promising 20 year old midfielder Marko Grujic signed from Red Star Belgrade in January but was immediately sent back to them on loan for the remainder of the season. He’ll provide additional depth in midfield after Joe Allen’s departure for Stoke City.

How they’ll line up

At the Emirates against a midfield as technically gifted as ours I expect Klopp to opt for more of a 4-3-3 than a 4-2-3-1 so as not to get overrun in the middle of the pitch. That midfield three will likely be Emre Can flanked by two of Jordan Henderson, Georginio Wijnaldum or Adam Lallana.

If Klopp does go with the 4-3-3 we could see Mane on the right of a front three, with Coutinho on the left and either Roberto Firmino or Divock Origi at the #9 with Daniel Sturridge likely to miss out as he recovers from a hip injury. This is Anfield’s Henry Jackson predicts Firmino will get the nod after an impressive preseason and with Origi’s late arrival following his participation in the Euros with Belgium.

Like Arsenal, Liverpool are struggling with injuries in defense. They will be without Mamadou Sakho for the opening weeks of the season while it looks like Dejan Lovren will recover from a knock in time for Sunday’s kickoff. Matip is just returning from an injury of his own and apparently looked off the pace in their 4-0 defeat Sunday to Mainz. We’ll therefore likely see Lovren partner with new signing Klavan- who has impressed in preseason- in the center of defense. Nathaniel Clyne will start at right back. The Reds are rumored to be interested in Köln left back Jonas Hector but to start the season the at times erratic Alberto Moreno will retain his spot at left back.

Klopp will hope preparations this summer will result in more assuredness at the back. Despite possessing the 8th best goals against record last season, Liverpool made more defensive errors than any other side with 32 according to data from Squawka (Watford had the next most errors with 28, Arsenal had the fourth most with 25).

How Arsenal will line up

Arsenal have of course been hit with an all too predictable injury crisis that sees us without center backs Gabriel and Mertesacker for an extended period. Koscielny is likely to miss out having just arrived early this week to training after France’s run to the finals of the European Championship. These absences coupled with our baffling inability (or unwillingness) to sign an obviously needed top class center back to partner Koscielny means the situation in the center of defense looks dire for the opener. Ahead of our friendly with the MLS All Stars at the end of July, Coquelin revealed via the Arsenal snapchat that, with Koscielny on holiday and Gabriel out at the time with tonsillitis, he had been training at center back. Krystian Bielik and Rob Holding ended up partnering in the center of defense for that game but both are yet to make their Premier League debut and it’s difficult to imagine Wenger starting an 18 and 20 year old in an important league fixture. Might we then see Coquelin partnering Calum Chambers? Chambers seems the one obvious pick to start but he hasn’t exactly overwhelmed in his appearances at center back thus far at Arsenal. Wenger may opt to rush Koscielny back but has been reluctant to hurry players back at the beginning past seasons even when it has meant using a significantly weakened side. Monreal and Debuchy are also capable of deputizing in the center of defense. If Monreal were to slot inside, we wouldn’t lose much on the left with the able Kieran Gibbs slotting in at left back. Hector Bellerin at right back is the only obvious feature of the back four. What Wenger opts to do with the center backs will be partly fascinating but mostly terrifying.

At the base of midfield we should see Granit Xhaka make his Premier League debut, particularly if Coquelin does indeed start at center back. Mohamed Elneny has been fantastic in pre season showing the impressive energy levels we saw last season but combining that work rate with a range of passing and assuredness on the ball he was at times lacking following his January move from Basel. It’s difficult to see how Wenger could leave him out.

With Ozil being rested following his summer with Germany at the Euros I expect to see Ramsey in the more advanced central role. He’ll play that role differently than Ozil, collecting the ball in slightly deeper areas and looking to dribble past the midfield whereas Ozil tends to collect the ball in pockets of space between the lines. Ramsey was hugely impressive this summer with Wales and a return to his 2013-2014 form would be a massive boost, although he’ll likely operate in either a deeper midfield role or on the right when Ozil returns.

Wenger has a difficult to decision to make about who starts at striker. Alexis Sanchez played there in the friendly win over Manchester City on Sunday. He looked a bit rusty but has operated centrally with great success at times with Chile, although usually as part of a front two.

Alternatively Wenger could go with Theo Walcott. The manager views Walcott as more of a striker than a wide attacker though the 27 year old expressed a desire to return to the wing. Wenger feels his defense isn’t strong enough to consistently operate on the right but he performed excellently there in the Man City friendly, providing a first half assist for Alex Iwobi before combining well with Alexis for a one-two before deftly chipping over Joe Hart.

Wenger said in a 2012 interview with FIFA “the 4-4-2 formation is the formation best suited to the dimension of the football pitch.” In recent seasons he has ditched the 4-4-2 for either 4-2-3-1 or 4-3-3 because it allows for more control in midfield and the presence of Ozil more or less requires you to play 4-2-3-1 with him in the #10 role.  But with Ozil out this weekend I’d be half tempted to use a 4-4-2 with Xhaka and Elneny in the middle of midfield, Ramsey tucking inside from the right and Alex Iwobi on the left. Wenger would likely never spring for it but I do think it suits the players we have available well.

Ramsey is comfortable playing on the right and tucking inside to offer additional link up play forward. You can still defend in two banks of four out of possession- Ramsey is a tireless runner and will track the opposition fullback. In possession he tucks inside and operates more like a #10. Perhaps most importantly, I think Walcott and Alexis are better as part of a strike partnership than as lone #9’s. Their combination that resulted in the goal against City offers some proof they can combine well together. Up against a new and not particularly quick defensive partnership for Liverpool in Lovren and Klavan, I think the two could cause real problems. It’s probably a futile thought- Wenger will almost certainly operate with three in the middle of midfield- but is interesting to consider at least theoretically.

My best guess is we see Chamberlain on the right, Ramsey in the #10 role, Iwobi on the left and Alexis at striker.

Liverpool advantages

The obvious advantage for Liverpool will be their three attacking players against what will be a makeshift Arsenal center back pairing following injuries to Mertesacker and Gabriel.  I imagine we’ll look to maintain possession as much as possible to keep our inexperienced backline from being put under pressure. That means when Liverpool do win the ball back, which under Klopp they’ll do quite well, the midfield need to recover quickly. Any quick transitions forward from Liverpool that leave our center backs exposed could cause some serious troubles. In Mane, Coutinho and Firmino Liverpool have pace and trickery in abundance.

Liverpool could also cause us problems pressing high up the pitch. Chambers has a tendency to give the ball way cheaply when put under pressure and Cech isn’t always convincing when the ball is dropped back to him. If Liverpool can press high and force our center backs to play backwards to Cech, it’ll force him into hitting long hopeful clearances forward. Not only will that prevent us from developing a passing rhythm from back to front, without Giroud we don’t have anyone likely to win any of those long balls.

Arsenal advantages

Whether Wenger starts Oxlade-Chamberlain, Walcott or Joel Campbell on the right side of midfield, Arsenal should have an advantage down that channel where Alberto Moreno will be at left back for Liverpool. Moreno can certainly be a threat going forward but is a truly awful defender, poor both positionally and in terms of his decision-making and 1 v. 1 defending. He’ll almost certainly look to provide attacking width deep in the Arsenal half when Liverpool are in possession which should open up space down the right to counter into when we win the ball back. Whoever plays at right midfield will have to be diligent tracking Moreno’s bursts forward but should get plenty of joy in transitions. Ramsey should look to float right from his #10 role and Bellerin will get forward from right back, forcing Moreno into tricky overloads where his decision-making tends to be poor.

Elsewhere, Arsenal could cause problems to what will be a new center back partnership for Liverpool in Lovren and Klavan. Whoscored.com lists Klavan’s weaknesses as aerial duels and tackling, two seemingly important skill sets for a Premier League center back, and Lovren can at times look clumsy and unathletic though he enjoyed a marked improvement under Klopp after a disastrous 2014-2015 season. If the Arsenal front four can get behind the Liverpool midfield and force the two center backs into defending 1 v. 1 we’ll be favored to win those battles.  

Liverpool 0-3 West Ham: West Ham defend deep, counter into channels, take advantage of Liverpool errors

West Ham put in an organized counterattacking performance and took advantage of Liverpool defensive errors en route to a 3-0 away win, the East London club's first league win at Anfield since 1963. Forced to play on the front foot, Liverpool looked a shell of the side that put in an excellent performance in a 0-0 draw at Arsenal Monday.

In his first season at Liverpool in 2012-2013 Brendan Rodgers stated his preferred formation was a 4-3-3 with one holding midfielder in front of the back four flanked on either side by two box-to-box running midfielders. He said he preferred this to 4-2-3-1, with two holding midfielders, because it offered more vertical passing options higher up the pitch whereas in a 4-2-3-1 the holding midfielders often play a lot of square passes either into each other or wide to the fullbacks. You can hear him explain his reasoning in the video below.

But right away Liverpool had problems with defensive balance in that 4-3-3 formation. The fullbacks would bomb forward to provide width high up the pitch. This left just the one holding midfielder and the two center backs in deep positions when Liverpool conceded possession. The opposition therefore had acres of space to quickly counterattack into, particularly behind the advanced fullbacks.

Lucas Podolski's first goal in a 2-0 Arsenal win at Anfield in early September 2012 exemplified that lack of balance. Steven Gerrard gave the ball away cheaply in Liverpool's attacking third. Right back Glen Johnson had pushed forward down the channel to provide width. Joe Allen, playing as the lone holding midfielder, was the only Liverpool player in a defensive position in midfield to try to stop the counter. Santi Cazorla easily drifted into a space between Allen and the Liverpool center backs and collected a pass from Podolski. Podolski continued his run and sprinted in behind the advanced Johnson, received a well timed ball from Cazorla and slotted it in.

Liverpool has used a 4-3-3 in their last two Premier League games, the 0-0 draw at Arsenal Monday evening and today. Those were two very different games for Liverpool and the formation worked to different effect in each. Against Arsenal, Rodgers was content allowing the home side to control possession. Liverpool defended deep in a 4-1-4-1 shape, invited Arsenal forward, then looked to play on the break. It was an excellent away performance- they frustrated Arsenal with compact defending and forced the home side to come up with the creativity to break them down.

Today, Liverpool's role was reversed. They were the favored side playing at home and therefore the onus was on them to break down a visiting side that was always likely to defend deep and play on the break. Rodgers' side had some of the same problems in the 4-3-3 that his 2012-2013 side had in that 0-2 loss to Arsenal.

Lucas Leiva played at the base of midfield, with Emre Can and James Milner either side of him in the shuttling roles. Both Milner and Can moved into advanced positions in the attacking third when Liverpool were on the ball. Coutinho and Firmino tucked inside from their starting positions, leaving Joe Gomez and Nathaniel Clyne to provide the width from fullback. As a result, Liverpool often only had Lucas and center backs Dejan Lovren and Martin Skrtel behind the ball. Liverpool therefore struggled to defend the width of the pitch against counters. Dimitri Payet and Manuel Lanzini would break forward into the channels in the space left vacated by Gomez and Clyne to join striker Diafra Sakho. This forced Skrtel and Lovren to move into the channels to defend Payet and Lanzini on the counter, a position that neither center back is particularly comfortable in given the lack of pace they share.

The screen shot below is a good example of Liverpool's first half shape. Lucas is on the ball with Lovren and Skrtel just behind him. Can is in a slightly more advanced position to his right. Out of the shot Firmino has taken up a central position from the right and Clyne has gotten forward to provide width down the right channel. If Liverpool concede possession from this position they are in a difficult shape to defend against the counter. Payet can run past Clyne and force Skrtel to defend him 1 v. 1- a position that's always going to favor Payet. On the oppositie channel, Lanzini can sprint behind Gomez and force Lovren to defend in the channel. Again, it's a battle you'd expect the West Ham wide man to win.

West Ham's second goal, through Lovren's ridiculous error, came as a result of the Croation defender being forced to defend in West Ham's right attacking channel. West Ham right back James Tomkins knocked a ball over the top behind Gomez into the right channel. Lovren slid over and collected the ball near the touchline but was put under immediate pressure by Lanzini. The defender looked to have escaped the pressure but was woefully ponderous in possession and gave Lanzini another bite of the cherry. The Argentinian nipped in, won the ball and slid it across the face of goal. It was ultimately deflected to Mark Noble who slotted home coolly.

In the draw with Arsenal early this week, Liverpool were always in a tight, compact defensive four with Gomez just to the left of Lovren in a position to defend the channels. Lovren could therefore stay central, check the runs of any Arsenal players moving into the box and clear away anything that came to him. His lack of mobility wasn't much of an issue because Liverpool's deep compact shape allowed him to do all his defending inside the penalty area.

Today, with Liverpool dictating possession, Gomez was higher up the pitch meaning Lovren didn't always have that cover to his left. He was pulled wide into the channels and forced to defend quicker players 1 v. 1. The graphic below shows the passes West Ham completed in the final third. They completed just 50% of their passes into the final third but nearly all of those occurred in the channels where Liverpool were most vulnerable, particularly down the left side of Liverpool's defense.

Rodgers change in formation at halftime to 3-4-2-1 with a back three and wing backs was an acknowledgement of just how vulnerable his side had been defending the channels in the first half. Alberto Moreno came on for Emre Can and played left wing back. Gomez moved to right center back with Clyne operating as right wing back.

The shape allowed Coutinho and Firmino to take up the narrow positions they had been in the first half just behind Benteke. It also enabled Liverpool to get width from their wide defenders, Clyne and Moreno. But whereas Liverpool had just two center backs to defend the width of the pitch when the fullbacks bombed forward in the first half, they now had three center backs and could therefore more effectively cover the channels. Gomez and Lovren would split into wider areas when Liverpool had the ball. When they lost possession West Ham could no longer knock it into the channels to spring counters because Lovren and Gomez were already positioned there.

With Liverpool's change in shape West Ham didn't offer as much on the break in the second half. We didn't have time to get much of an idea how it would've worked for Liverpool in attack as Coutinho was foolishly sent off for a second yellow in the 52nd minute.

This game follows a fascinating trend so far in the Premier League of favored home sides struggling to break down deep, compact opposition looking to play on the counter. Notable examples have been West Ham's 2-0 defeat of Arsenal at the Emirates, Newcastle's 0-0 draw at Old Trafford, Everton's 3-0 win at Southampton and Liverpool's 0-0 draw at Arsenal. I didn't watch Chelsea's 2-1 home loss to Crystal Palace today but I presume it followed a similar pattern. Remarkably, as I type this, the home side has won just 7 of the 37 Premier League matches played thus far.

I'm not sure what explains the trend. I imagine the tradition of English football being played at a frenetic pace means teams are less comfortable when the game slows down and they have to patiently pick apart the opposition. I think the main reason we're seeing home teams lose is that they become too proactive. When home teams are up against opposition that is defending deep and inviting them to push numbers forward, they always take that invitation and leave themselves too vulnerable at the back to quick counters. In Italy you'll often see a side bating the opposition to bring numbers forward so they can hit them on the break but the opposition often won't take the bate. They'll attack more conservatively, always conscious of what type of defensive shape they'll be in if they concede possession. While that conservative attacking may make for some slower, less entertaining spectacles for viewers, it mitigates the risk of being caught out on the break.

It's something you'll rarely see in England but something home teams probably should do more of. English teams are generally filled with pacey, direct players most comfortable when they have the space to run with the ball. By allowing an away side to play on the break, home teams are are giving the opposition the chance to play a style that most suits their personnel.

Tackling efficiency among Premier League deep-lying midfielders

Deep lying midfielders are a vitally important part of Premier League sides. In attack they're expected to constantly offer a passing option, either by checking back to receive passes from the back four or offering a drop for more attacking players, then circulate possession around with accurate passes. As a rule of thumb good deep lying midfielders should have a pass success rate in the high 80's.

Defensively, deep lying midfielders are tasked with offering protection for the back four, winning tackles in midfield and slowing opposition counter attacks. In this post I'll focus specifically on the defensive aspect of the deep lying midfielder's job.

The relentless pace and openness that defines the Premier League means rapid counter attacks are a major feature of fixtures. In the modern game fullbacks push high up the pitch to offer width in the attacking third, leaving space in behind them down the channels for the opposition to counter into when they regain possession. It is largely the responsibility of holding midfielders to either stop or slow down these counters. They're expected to be able to move laterally across the width of the pitch to win challenges before the opposition can break at the center backs with a numerical advantage.

Another feature of the modern game is that wide attacking players often tuck inside into central positions. As a result, the center of the pitch is often crowded meaning central midfielders are in the thick of the action competing to win the ball. Therefore deep lying midfielders frequently find themselves in positions where they need to commit to challenges. Committing fouls is an inevitable byproduct of challenging for a tackle. It should be little surprise then that deep lying midfielders made up 7 of the top 10 spots in successful tackles per game last season (Lucas Leiva, Morgan Schneiderlin, Nemanja Matic, Claudio Yacob, Mile Jedinak, Alex Song and Francis Coquelin) as well as 7 of the top 10 spots in fouls committed per game (Victor Wanyama, Jedinak, Lee Cattermole, Song, Fernandinho, Gareth Barry and Schneiderlin).

Premier League tackles per game: deep lying midfielders make up 7 of top 10

Premier League tackles per game: deep lying midfielders make up 7 of top 10

Fouls per game: deep lying midfielders also make up 7 of top 10 in this stat

Fouls per game: deep lying midfielders also make up 7 of top 10 in this stat

Committing fouls isn't always a bad thing for a deep lying midfielder to do and in fact it's often the right decision to make- how often in a match do we see a player take a yellow card for the team by hacking down the opposition in order to prevent a dangerous counter attacking opportunity? This gives the side time to organize itself and prepare for a more manageable defensive set piece. Given their position in front of the center backs it's often the deep lying midfielder getting booked for those challenges. However, on the other hand we also often see holding midfielders committing needless fouls that give the opposition dangerous set piece opportunities that didn't need to be conceded.

So although there are occasions when committing a foul is the only option, it's preferable for a holding midfielder to win a tackle versus committing a foul. Using this bit of logic, I've calculated a very basic metric of defensive efficiency among deep lying midfielders. By dividing a players tackles per game by their fouls per game, we get a ratio of number of successful tackles per foul committed. If a player averages 3 tackles per game and commits 1.5 fouls they have a ratio of 2 tackles per 1 foul committed. The higher the ratio the more efficient the holding midfielder is from a defensive perspective.

I've calculated this ratio for the 11 holding midfielders that featured on the top 10 tackles per game and top 10 fouls per game lists from last season (Jedinak, Schneiderlin and Song feature on both).

Liverpool's Lucas was the most efficient tackler with 2.79 tackles per foul, closely followed by Chelsea's Matic with 2.77 tackles per foul. West Brom's Yacob (2.43), Arsenal's Coquelin (2.29), and Southampton's Schneiderlin (2.06) were the only other two players with a ratio in the twos. At the bottom of the table is Southampton's Wanyama (1.38), Everton's Barry (1.39) and Sunderland's Cattermole (1.42). Unsurprisingly, Wanyama, Barry and Cattermole also have three of the worst disciplinary records on the list. Wanyama accumulated 10 yellow cards, Barry 10 yellows and a red and Cattermole 14 yellows (Matic also had 10 yellows and a red, no other player had more than 7 yellows).

I think the inclusion of Lucas on the list highlights what on effective midfielder he can be when healthy and perhaps suggests Brendan Rodgers has been a bit hasty in not including the 28 year old Brazilian in the match day squad in either of Liverpool's first two games. Lucas played an important role at the beginning of Liverpool's 13 match unbeaten run between December and March last season before suffering a groin injury. The deep midfield pairing of Jordan Henderson and Joe Allen in Liverpool's 3-4-2-1 left too many gaps in the middle of midfield, highlighted especially in the first half of their 2-1 defeat to Manchester United towards the end of March.

James Milner has come in and the extremely promising Emre Can has been used off the bench deep in midfield in both Liverpool games thus far but there could still be room for Lucas. Milner and Jordan Henderson are both more all-action box to box runners than controlled deep lying midfielders so when they play together the side have struggled to really get control of games. Can's introduction has brought more of that control and defensive cover but he's still a young player with a mistake or two in him. Lucas could provide important experience and be a steadying force Liverpool don't really have in the squad at the moment.

Excellent Everton counterattacking display in 3-0 thrashing of Southampton

Everton cruised to a 3-0 win over Southampton at St. Mary's as a first half brace from Romelu Lukaku gave the Toffees a dream start before Ross Barkley put the game beyond doubt with a beautiful curling effort in the 84th minute. After a poor performance in their opening day draw with Watford, Everton looked a different side and produced a display of excellent defensive organization and counter attacking football. Lukaku and Barkley both endured difficult seasons in 2014-2015 but put in the type of performance that suggests the two could kick on and fill their tremendous potential this season. Their energy and direct running proved lethal on the counter and both took their chances with aplomb.

It was a frustrating afternoon for Ronald Koeman and Southampton. They enjoyed plenty of the ball but were short on creativity in the final third.

Here are a couple of key points from this one.

Excellent tactical performance from Everton

Everton gave up 19 points from winning positions last season, more than any Premier League side. That tendency to squander leads largely came down to needless mental errors and perhaps some tactical shortcomings- they often left themselves far too open defensively in chasing a goal that would kill the game off.

Their performance today however showed tremendous maturity and professionalism in playing with a lead. They were willing to cede possession to Southampton, drop off into a solid defensive shape inside their own half, then use the pace and power of Barkley, Lukaku and Arouna Kone on the break when they won the ball back.

Southampton set out in a 4-2-3-1 with Steven Davis and Victor Wanyama at the base of midfield and Saido Mane in a more advanced role off of striker Graziano Pelle. Everton stifled Southampton's ability to quickly advance the ball into the attacking third by man marking the three Saints central midfielders. Rather than defend in a zonal midfield bank of four, Gareth Barry sat just in front of the back four and tracked Mane. Higher up the pitch Barkley and James McCarthy man marked Davis and Wanyama. Barkley and McCarthy would sit off the two Southampton deep lying midfielders, allowing them to collect the ball from the center backs, but then would quickly close them down once they received possession.

This tactic successfully cut off the supply of penetrating balls into the attacking third for the home side. With Mane man marked by Barry and Wanyama and Davis not being given enough time on the ball to pick their heads up and spot a forward pass, Southampton were left hitting hopeful longer balls into Pelle. The screen shot below shows a good example of Everton's defensive shape. (To start the second half Southampton replaced Dusan Tadic with Oriol Romeu. Romeu slid in alongside Wanyama, Davis moved forward into the #10 role and Mane moved to the left channel where Tadic had played but the shape remained 4-2-3-1). Below Barry is tight to Davis (1), the attacking central midfielder, Barkley is stepping out to Wanyama (2) on the ball and McCarthy is playing off Romeu (3), ready to step out when Wanyama plays the square ball. As the screen grab shows, Everton were content to allow Wanyama and Romeu to play square passes among themselves- their focus was on denying the supply line into the attacking third. In the image the only ball on for Southampton is the square pass to Romeu.

When Everton won the ball back, Barkley constantly broke forward behind the Southampton holding midfielders to provide an outlet for the counter. His energy was used expertly by Martinez. He was the one player on the pitch that had the legs and pace to both contribute defensively in the middle of the park then sprint forward to spring attacks.

Southampton lacked creativity

Southampton didn't have the creativity to unlock Everton's man marking. With the center attacking midfielder being man marked by Barry, they needed the wide players to be more clever with their movement and tuck inside to the space either side of Barry. Instead Tadic tended to stay wide while Long tucked inside but took up positions close to Pelle to get on the end of knockdowns rather than coming short to provide a forward pass for Davis and Wanyama. That's not terribly surprising. Long is more of a striker being played out of position on the wing. His strengths are his pace, energy and physicality rather than clever tactical movement and defense-splitting passes.

Southampton's difficulties penetrating Everton through the middle of the pitch show up in the stats. Their only approach to channeling possession into the attacking third was either through the flanks or by knocking it long towards Pelle. As a result they attempted a startling 39 crosses. Southampton scored just 4 goals from headers all of last season. Although they did manage 2 headed goals on the opening day, sending loads and loads of crosses into the middle isn't the most effective approach for a side that doesn't tend to score a lot of headed goals. The graphic below showing the passes received by Pelle highlights Southampton's dependency on longer floated balls into the tall striker. For a side that played a swift attacking style last season, there were a surprising number of long passes knocked in towards Pelle. Again, Everton's excellent defensive shape was largely responsible for the home side's approach.

Conclusions

Martinez got his tactics spot on. Southampton are an attractive attacking side but are at their most effective when they have space to break into behind the opposition midfield and get at the back four. They simply didn't have that space today. Martinez forced them to build patiently and challenged them to come up with the creativity to unlock a deep, compact defense. Koeman's side didn't have an answer. Other sides will certainly take note of Everton's approach. Southampton won't be able to surprise teams in the manner they did last season. They will have to improve their approach against opposition that cedes possession and forces them to break down a crowded defense or a repeat of last season's 7th place finish seems unlikely.

Ability to consistently win ugly serves Chelsea well

Despite a marked change in approach from a free-flowing attacking side at the start of the season to a functional and rigid one in the latter months, Chelsea continued to consistently get results throughout and steadily separated themselves from the rest of the Premier League pack. That ability to alter their approach allowed them to gain points when they weren't at their best. Here, Kyle discusses Mourinho's pragmatism and how Chelsea pulled away from their rivals at a time they were playing their worst football of the season.

Jose Mourinho has long since cemented his reputation as one of football's ultimate pragmatists. Although his level of pragmatism is at times exaggerated, it's difficult to deny that he's built one of the game's most successful managerial careers primarily by setting his sides out for big matches in a way that stifles the opposition's creativity then looks to take advantage of their mistakes (on the counter or on set pieces) rather than proactively setting his side out to play on the front foot. In their 10 games last season against opponents that would go on to finish in the top 6 (Manchester City, Arsenal, Manchester United, Tottenham, Liverpool), Chelsea were outpossessed in 9 of them. It's noteworthy that the shock 3-5 New Year's Day defeat to Tottenham was the one exception.

While it's become trite to discuss Mourinho's pragmatism, there are some fascinating stats from last season that highlight just how effective Chelsea were when they weren't playing particularly attractive football.

Chelsea's season can be divided into two parts. The first part lasted through the Blues 5-0 away win at Swansea on Jan 17. and appeared to usher in a new, more proactive Mourinho. Chelsea played a free flowing attacking style and looked to use their wealth of attacking talent to outscore opponents rather than dropping into deep blocks of four and looking to nick goals on the counter. They netted 15 goals from their first four league fixtures and continued to produce solid attacking displays as the season progressed into the winter months. In the first 22 league fixtures they failed to score more than one goal on just five occasions.

However, as the season progressed the players appeared to begin to feel the effects of Mourinho's limited squad rotation. Chelsea used fewer players than any other first division side. As fatigue set in, they struggled to maintain their attacking prowess and Mourinho reverted to the pragmatism he's most comfortable with. Following the decisive win over Swansea, second place Manchester City visited Stamford Bridge five points behind Mourinho's side in the title race. Chelsea were without both Diego Costa, who had been banned for a stamp on Emre Can, and Cesc Fabregas, out through a hamstring injury. With his most creative midfielder and first choice striker absent, Mourinho opted to play Ramires in Fabregas's position alongside Nemanja Matic at the base of midfield. Ramires, whose strengths are his tireless work rate and pace, is quite a different type player than the ultra technical and creative Fabregas and his inclusion meant Chelsea were more suited to attacking with quick vertical passes after winning back possession. With the score level at 1-1 heading towards injury time Mourinho was pleased enough retaining a 5 point gap at the top and introduced Gary Cahill for Loic Remy and Ruben Loftus-Cheek for Oscar, meaning Chelsea finished the game with five defenders on the pitch and three holding midfielders.

This contest marked a turning point in the season for Chelsea. Concerned that continuing with the attacking style he'd started the season with would leave his tiring side too open at the defensive end, Mourinho opted for a far more functional approach that revolved around defensive solidity and relied heavily on the individual talent of Eden Hazard to create and score goals.

The run in to Chelsea clinching the title highlights Mourinho's ruthless effectiveness. Starting with the Manchester City match, Chelsea remained unbeaten in their next 14 matches despite undergoing an obvious dip in form that saw them score more than one goal on just four occasions. They clinched Mourinho's third Premier League title with a home win over Crystal Palace in the thirteenth match of that run. In their opening 22 league fixtures they averaged 2.32 goals per game. That number fell by nearly a goal to 1.36 per game in the next 14. Fabregas, who had been the catalyst for Chelsea's enterprising early season style, providing 15 assists in 21 appearances to start the season, had just 3 assists in his last 12 matches.

In order to win a title a squad has to learn to win matches when it's not at its best and Mourinho has proved that there are few managers better at forcing results out of his side when they're not playing well. Chelsea matched their longest unbeaten run (Chelsea started the season unbeaten in their first 14 before losing at Newcastle) while playing their least convincing football- it may not be the easiest on the eye but when you do that you give yourself a decent chance.

One of Mourinho's biggest attributes as a manager is his ability avoid the temptation of taking risks in the heat of the moment that may not ultimately be the best thing for his side's title challenge. While at the time Chelsea's supporters surely would have preferred chasing a winner in the home 1-1 draw with City rather than introducing an extra center back and holding midfielder, Mourinho was able to view that result as part of a bigger picture and accept that maintaining a 5 point lead at the top was an adequate result. When his side was being questioned by some sections of the media for their uninspiring approach in the second half of the season, he continued to stick to his guns and set his team out in a way that gave Chelsea's rivals little chance of closing the sizeable gap at the top of the table. He recognizes Chelsea's supporters care little about having to sit through some unentertaining performances if they can celebrate a title at the end of the season. He may not be one for those among us inspired by the likes of Rinus Michels, Cruyff and Guardiola but it's hard to argue against his effectiveness. With him at the helm Chelsea must be considered favorites again this season.

Tactical Analysis: Aston Villa 3-3 QPR

Aston Villa and QPR gained a point a piece in a wild 3-3 draw. This was a spectacularly entertaining contest between two sides that showed the commitment and fight needed to stay in the Premier League but whose inability to establish some control when in a winning position showed why they're in a relegation battle in the first place. In many ways it was the stereotypical Premier League match- fast-paced, open, passionate, chaotic and at times comically sloppy.

Lineups

Tim Sherwood went with a diamond 4-4-2. Jack Grealish was given his first Premier League start at the top of the diamond just behind the front pairing of Gabriel Agbonlahor and Christian Benteke. Carlos Sanchez played at the bottom of the diamond in front of the back four, Fabian Delph and Tom Cleverley played the shuttling roles.

Chris Ramsey opted for a flat 4-4-2 but was forced to make two changes from the side that beat West Brom 4-1 at the weekend. Yun Suk-Young was out with a concussion and was replaced at left back by Clint Hill. Eduardo Vargas picked up a knee injury and was replaced at left midfield by Niko Kranjcar.

First half: Villa midfield diamond dominant

Tactically this was similar to Villa's 2-1 win over West Brom in the league in early March. Just as QPR started today, West Brom used a flat 4-4-2 and Villa were able to take advantage of the narrow positioning of all four of their midfielders to overload the two opposition center midfielders. It was a similar story in the first half today. Joey Barton and Sandro were outnumbered 2 v. 4 in the central midfield zone and as a result Villa were able to stretch them and create gaps to play quick passing combinations. In the 6th minute Delph, Cleverley and Grealish combined excellently in a move that nearly put Benteke through on goal but the Belgian was narrowly offside.

The positioning of Grealish caused QPR real problems. Sandro and Barton picked up Delph and Cleverley, leaving Sanchez without a direct marker deeper in midfield. Because Villa were playing with two up front, both QPR center backs were responsible for a Villa forward. Therefore neither center back could step forward from the back line to get tight to Grealish. With Barton and Sandro with direct opponents in midfield and Onuoha and Caulker marking forwards, Grealish was free to find space between the center midfielders and center backs. The 19 year-old youth product was bright in his first league start. He showed impressive feet in tight areas to maintain possession, was both tidy and expansive with his passing and moved intelligently into dangerous pockets of space to link play forward. By the time he was substituted on 70 minutes he had completed 25 of 27 passes, 10 12 attacking third passes and 4 of 4 successful take ons.

Another important impact of Villa's dominance in the middle of the pitch is that it sucked QPR's wide men into central areas to help defend, opening up space in the channels for their fullbacks, particularly Leandro Bacuna down the right. With QPR being overwhelmed in the middle, Kranjcar continued to tuck inside from his left midfield position to offer support on Cleverley. Bacuna took advantage of the space, rampaging down that channel to receive crossfield passes and providing some good crosses into the box for Benteke and Agbonlahor. Agbonlahor put one of these crosses inches wide of Rob Green's far post.

Perhaps the most striking feature of Villa's first half performance was the partnership of Agbonlahor and Benteke up front. As formations that use three central midfielders have become the norm we see fewer two-man striker partnerships in the Premier League than the days when everyone utilized a 4-4-2. It's therefore something of a rare treat to see a front two connecting as well as Agbonlahor and Benteke did in the first half. At times, Agbonlahor dropped off into deeper positions to get on the ball and found Benteke running in behind the back four. He provided the assist on the counter to Benteke for Villa's second. Prior to that he had played Benteke in behind Isla on the left channel, resulting in a Benteke ball across the face of goal that forced Green into a last ditch save from Grealish.

The combination also gave Villa the option to skip the midfield entirely and play longer balls in to Benteke. Villa attempted a fairly staggering 71 long balls. Benteke was able to use his strength to bring these balls down and lay off for Agbonlahor or provide flicks in behind for Agbonlahor to use his pace to run onto. The strike partnership also meant that Villa always had two bodies in the box when the ball went wide to aim crosses into. One issue that can arise with one striker systems is that a side will get into good positions in wide areas but won't have anyone to aim at in the box.

Second Half: QPR switch to 3-5-2

Five minutes into the second half Chris Ramsey switched to a 3-5-2, a change that enabled his side to tighten the gaps Villa were finding it so easy to get into in the opening half. Karl Henry replaced Kranjcar and moved into center midfield alongside Sandro and Barton. Armand Traore was introduced for Isla and played left wing back, allowing Hill to tuck inside as part of a back three with Onuoha and Caulker. Phillips made the subtle change from right midfielder to right wing back. The change paid dividends almost immediately. Because Villa were playing a narrow diamond in midfield, it meant their fullbacks had little cover in front of them in wide areas. Throughout the second half left back Kieran Richardson found himself isolated against Phillips down QPR's right and twice that match up result in QPR goals. For their equalizer Phillips was able to get into the channel and earn a corner that Hill headed home. For QPR's go-ahead goal he outmuscled Richardson off the ball and got to the end line before cutting back for Austin to score.

It was remarkable how dependent QPR were on crosses and long balls into Zamora and Austin in getting the ball into the attacking third. Phillips summed up this approach. He played a role in all three of QPR's goals but his stats suggest a shockingly poor performance. He attempted as many crosses (10) as he completed passes. He had a pass success rate of just 42%. As a team Villa completed just 37 out of 83 passes into the attacking third and just 64% of their passes overall.

Defensively, the change in shape meant QPR had an extra man in midfield to track the runs of Grealish in the hole. One of the midfielders could sit in front of the back four and deny those spaces the Villa #10 had taken up in the first half. However, Grealish and later his replacement Joe Cole continued to cause problems when they drifted into wide areas to create overloads on the QPR wing backs.

Conclusion

Wild contest. Villa had the better of play but QPR took advantage of set plays and the lack of cover Richardson had at left back. In the end Sherwood was rescued by a brilliant Benteke free kick to cap a fantastic performance from the Belgian. Sherwood showed during his time at Spurs he's not afraid to take risks, fielding quite attacking lineups. He's not rested on his laurels now that he's in a relegation scrap with Villa. The side have played some much more free flowing attacking football than under Paul Lambert- not an especially difficult feat of course given Villa's abysmal record 12 goals from 25 games under Lambert, the second lowest after 25 games in top flight history. Still, Villa's 10 goals from 7 games under Sherwood shows startling improvement on in that aspect of the game and has given supporters some joy in watching their side. But you do still wonder at times if perhaps he throws caution to the wind a bit too much. His sides are very open defensively and there are times when he's in a winning position you wonder if maybe he shouldn't become a bit more pragmatic, especially given the precarious position Villa are in the league. At 2-1 ahead at halftime he could have pushed Grealish and Agbonlahor out to the wings in a 4-3-3 which would have offered more protection for the Villa fullbacks. Instead he continued with the open, swashbuckling approach and it nearly resulted in his side coming away with nothing.

Should Brendan Rodgers switch Liverpool's midfield box to a diamond after being overrun in midfield by United

Following Liverpool's 3-0 defeat away to Manchester United in mid December, Brendan Rodgers decided he'd seen enough positives from the 3-4-2-1 formation he used for the first time that afternoon to give the formation another go. It was a brave decision to stick with the experimental shape after a heavy defeat to bitter rivals but Rodgers' side had played much better than the scoreline suggested- David De Gea was excellent in the Manchester United goal coming up with 9 saves. Rodgers' decision paid off- Liverpool went on a 13 game unbeaten run in the league with the 3-4-2-1 formation and put themselves in a position to contest for the final Champions League spot.

However, over the course of their last two fixtures, an unconvincing 1-0 win over Swansea and yesterday's defeat to Manchester United, Liverpool have begun to look more stretched defensively and less threatening going forward. Swansea were dominant in the opening half, controlling possession with 57.8% and getting into dangerous scoring positions. Their wastefulness in the final third let them down but Swansea were the better side in the opening 45 minutes. It was a similar story yesterday. Liverpool were entirely overrun in the first half. Manchester United bossed possession with 60.4% but more importantly controlled the tempo and didn't let Liverpool get anywhere near them.

The source of Liverpool's recent difficulties seem to largely be coming from the central midfield zone. The 3-4-2-1 shape uses two holding midfielders- Jordan Henderson and Joe Allen- and two attacking midfielders- generally two of Adam Lallana, Coutinho or Raheem Sterling- in what in effect is a midfield box. At its best the shape allows the two attacking midfielders to float into dangerous pockets of space between the opposition defensive lines, creating plenty of forward passing options and resulting in a brand of football that is fluid and confusing for opposition defenses. Over the last two games however it has caused Liverpool to be overrun in midfield. In the system, the two attacking midfielders stay high up the pitch when the opposition is in possession. Liverpool defend with a defensive bank of three- the three center backs- and a midfield bank of four- the two holding midfielders and the two wing backs. The shape forces Henderson and Allen to do a tremendous amount of defensive work in the middle of midfield. Against a side that plays with three central midfielders like Manchester United yesterday, Allen and Henderson are outnumbered 2 v. 3 in the central midfield zone. As a result, Liverpool have had difficulties getting the ball off the opposition which is why we saw Swansea and Manchester United with such high first half possession totals.

We also see big gaps form in the center of the pitch between Henderson and Allen. The opposition can split these gaps with vertical passes, easily bisecting Liverpool's midfield. This happened time and again against United. United were in a 4-3-3 with Herrera and Marouane Fellaini to the left and right respectively of Michael Carrick at the base of midfield. Both Herrera and Fellaini would take up positions closer to the channels than the center of the pitch. In order to deny passes into them in these areas, Henderson and Allen would have to get tight to them in the wider positions they were taking up. This left what at times was a 15 to 20 yard gap between the two Liverpool holding midfielders. United were able to play passes between that gap, effectively taking the entire Liverpool midfield out of the game with one simple vertical pass.  The screen shot below shows one of many examples of the vast gap between Henderson and Allen in the first half. With Carrick enjoying plenty of time on the ball he has plenty of options for playing forward passes against a stretched Liverpool midfield line.

Rodgers recognized this issue in both the Swansea and Manchester United games. In the second half of those contests he replaced one of the two attacking midfielders with Steven Gerrard who operated just in front of the back four, altering the shape from a midfield box to a midfield diamond. Against Swansea Gerrard replaced Alberto Moreno with Lallana dropping in to fill Moreno's left wing back spot. Against Manchester United Gerrard replaced Lallana. The midfield was therefore Gerrard at the base, flanked on either side by Henderson and Allan in shutting roles with Coutinho at the top of the diamond. The subtle change in shape gave Liverpool more control in the Swansea contest. Defensively, Allen and Henderson would drop in alongside Gerrard to form a midfield bank of five rather than the four they had when they were operating with two attacking midfielders. They were better able to compete in midfield and prevent Swansea from circulating possession as they had in the opening half. We were unable to see whether the change would have a similar impact yesterday after Gerrard's immediate dismissal following his introduction at halftime.

I think the midfield diamond as opposed to the box is something Rodgers may need to opt for more often in the final fixtures to give Liverpool a stronger presence in midfield. With the two deeper lying midfielders used in the box they're asking Henderson and Allen to do too much ball winning in the central midfield zone. By switching to a diamond and defending with a midfield bank of five rather than four they'll be better able to disrupt the attacking rhythm of the opposition and allow fewer gaps in midfield for the opposition to play passes into. Figure 1 shows their current defensive set up with the midfield box, Figure 2 shows the defensive shape with a midfield diamond. (I'm using the traditional numbering system here so these numbers don't correspond to actual Liverpool players, it would have made way too much sense to show the names of actual Liverpool players in their normal positions.) In the box system there is at times too big a gap between Henderson and Allen that the opposition can easily get in between. With the introduction of a holding midfielder those gaps are tightened.

Figure 1: In their current midfield box with two holding midfielders and two attacking midfielders, the holding midfielders are asked to cover a tremendous amount of ground defensively and gaps form between them.

Figure 1: In their current midfield box with two holding midfielders and two attacking midfielders, the holding midfielders are asked to cover a tremendous amount of ground defensively and gaps form between them.

Figure 3: By introducing a holding midfielder just in front of the back four and defending with a midfield bank of five there are fewer gaps for the opposition to play through in the middle of midfield and Liverpool can compete better defensively in…

Figure 3: By introducing a holding midfielder just in front of the back four and defending with a midfield bank of five there are fewer gaps for the opposition to play through in the middle of midfield and Liverpool can compete better defensively in that zone.

They'll still have four central midfielders and will therefore continue to be able to overload the opposition midfield when in possession but it will be more structured, less of the swashbuckling style we've seen with the current box midfield. Gerrard's dismissal of course means he'll be unavailable for the next three games but they still have the personnel to play the diamond. Lucas Leiva is a fine candidate to play at the base of the diamond. He lacks Gerrard's range of passing but is competent in possession and provides needed bite on the defensive end.

The one obvious downfall of switching from the box to the diamond is that Rodgers would likely have to remove one creative midfielder to make way for Lucas. However, Coutinho has already shown he can be effective in a slightly deeper, shuttling role. He's played on the left of a central midfield triangle in a 4-3-3 and on the left of a center midfield diamond in a 4-4-2. One option would therefore be to go with Lucas at the base of the diamond with Henderson to his right and Coutinho to his left in the shuttling roles and either Lallana or Sterling at the tip of the diamond as shown in Figure 3 below. Allen would be the odd man out. It's a set up that provides quite a nice balance of defensive steel, energetic running and technical ability.

Figure 3: Hypothetical Liverpool lineup with three at the back, wing backs and midfield diamond.

Figure 3: Hypothetical Liverpool lineup with three at the back, wing backs and midfield diamond.

Throughout his time at Liverpool Rodgers has shown a great deal of tactical flexibility. If he feels a system isn't working he's more than willing to experiment with another one. Given yesterday's loss was only Liverpool's second since introducing the 3-4-2-1 it's hardly time to scrap the system. However, the Swansea and Manchester United fixtures may hint the midfield box leaves Liverpool too thin in midfield.

Tactical Analysis: Aston Villa 0-1 Swansea

After a difficult afternoon, Bafetimbi Gomis turned hero as he turned in a brilliant Jefferson Montero low ball across the face of goal in the 87th minute to give the visiting Swansea a 1-0 win over Aston Villa in an entertaining game.

Gary Monk went with the same diamond 4-4-2 formation he's used in recent weeks and that was so impressive in the first half of their slightly unfortunate 1-0 defeat to Liverpool on Monday. The only change he made to that side was bringing in Frederico Fernandez, who returned to the club after flying back to Argentina for personal reasons, for Jordi Amat in the center of defense.

Tim Sherwood opted for a flat 4-4-2 with Gabriel Agbonlahor partnering Christian Benteke up front and Tom Cleverley playing alongside Fabian Delph in midfield. Cleverley went off with an injury and was replaced with Carlos Sanchez in the 25th minute and Villa kept the same shape.

With the diamond 4-4-2 versus flat 4-4-2 the teams had clear numerical advantages in different areas of the pitch. Swansea enjoyed a 4 versus 2 advantage in the middle of midfield, giving them the impetus to control possession and overload Aston Villa through the center of the pitch. Aston Villa enjoyed a 2 v. 1 advantage in the channels, meaning they had opportunities to overload the Swansea fullbacks with overlapping runs and get balls into the box from wide areas. This game had three distinct tactical phases: in the first phase Swansea's advantage in midfield won out and they overran Villa in that zone, creating several good chances that they failed to conver; in the second phase Villa disrupted Swansea's rhythm and looked the more dangerous side attacking through the channels where they had the numerical advantage; in the third phase Monk switched to a 4-2-3-1, nullifying Villa's dangerous overlapping fullback runs and creating a threat through Jefferson Montero down the left.

Phase 1: Swansea use 4 v. 2 advantage in midfield to control possession

Just as they did in their defeat to Liverpool, Swansea controlled possession and had the better of play in the first half. Villa looked to press the two deepest lying Swansea center midfielders, Jack Cork and either Ki or Jonjo Shelvey and played a high line to to mitigate the space between the midfield and back four where Gylfi Siggurdsson was playing. However, with the 4 v. 2 advantage in the middle, Swansea were able to comfortably play through the press, get players on the ball in behind Delph and Cleverley then look for passes in behind Villa's extremely high defensive line. Within the opening 10 minutes Swansea were fractionally offside twice but it looked like only a matter of time before they'd exploit Villa's loose midfield and risky high line.

With Delph and Cleverley overloaded in midfield, Charlez N'Zogbia and Scott Sinclair were forced to tuck inside from their wide midfield positions to offer defensive help in central zones. This created loads of space down the channels for Swansea's overlapping fullbacks Neil Taylor and Kyle naughton to get forward. In the sixth minute Shelvey and Taylor played an excellent 1-2 down the left channel that resulted in Taylor getting to the byline and cutting back for Gomis 8 yards from goal. Gomis put his shot straight at Brad Guzan but the buildup from Swansea was excellent. Unfortunately for Monk, good build first half build up play but wasteful finishing has become a theme the last two games. Gomis looked to be struggling for confidence. While he uses his strength well in the build up and works hard, the fluid 4-4-2 system has created a number of chances for him that he hasn't taken well enough. It's difficult not to speculate whether the Liverpool result may have been different if Wilfried Bony were still at the club. Hopefully Gomis' winner will provide him with a boost of confidence. He's shown in France he has the ability to be a prolific striker. Under this diamond 4-4-2 he'll likely continue to get plenty of chances.

Phase 2: Villa dangerous down the flanks

As good as Swansea have been in the first halves of their last two fixtures, there's been a worrying trend both that they haven't converted that dominance into goals and that they haven't maintained the dominance into the second half. Out of the gates from the second half Villa looked the more energetic side. They disrupted the rhythm Swansea had in the first half, breaking up play in midfield better and limiting Swansea's space. Monk's side defended with a narrow midfield three of Cork, Shelvey and Ki. Sigurdsson dropped in just in front of them to pick up Villa's deepest center midfielder or an advancing center back while Routledge and Gomis stayed higher up the pitch. This meant Swansea were defending quite narrow in midfield and that there was no one to track the Villa fullbacks when they advanced forward. The Swansea fullbacks were therefore overloaded 2 v. 1 in the channels- they were occupied by both the Villa wingers and fullbacks. Villa began to take advantage of these 2 v. 1's in the channels by getting the fullbacks forward and having them overlap the wingers. They were able to get towards the byline and hit dangerous balls in from wide areas. This was a real threat given they had a dominate physical presence in Benteke to aim at in the box.

In the 57th left back Alan Hutton overlapped Sinclair down the left and played a driven cross into Benteke. He was able to use his strength to hold off a defender and knock the ball down for Agbonlahor. His effort was blocked well by Taylor but the move illustrated where Villa were their most dangerous.

Swansea go 4-2-3-1

After about a 20 minute spell of Villa creating good chances down the channels, Monk made a substitution in the 64th minute introducing Montero for Sigurdsson. Montero played wide on the left, Routledge moved to a right attacking midfield position, Shelvey moved forward into a #10 role and Swansea played a 4-2-3-1. They defended in banks, Montero and Routledge tracked the runs of the Villa fullbacks and mitigated the danger Sherwood's side had posed in the channels. The game became tighter, neither side really created any great chances. Montero posed the biggest threat for Swansea, his quickness on the ball caused problems for Leandro Bacuna, a center back playing out of position at right back.

Monk made a substitution that proved the deciding factor in the 85th minute, bringing on Nathan Dyer for Shelvey. Dyer played wide right and Routledge moved back inside to the #10 role. Two minutes after the change Routledge collected the ball in the middle of midfield and played a clever outside of the right foot pass to Montero in space down the left in behind Bacuna. Montero played an incredible first time pass with the outside of his right foot across the face of goal for Gomis to slide home after using great strength to hold off Ciaran Clark. Monk's personnel and tactical changes had paid off. The change in shape to 4-2-3-1 had stifled Villa as they were on the ascendency and the introduction of Montero on the left proved a game changer.

Conclusion

Tim Sherwood was accused at times of being tactically naive last season at Spurs. Those accusations were often leveled when Sherwood played an open 4-4-2 that left his side too open and outnumbered in midfield. His decision to play a flat 4-4-2 against a side he knew would likely play a midfield diamond seemed a strange one given how Sherwood chose to have the team defend. Rather than operating in deeper banks of four, they pressed with Cleverley and Delph in midfield and played a high line. This left gaps of space for Swansea to to easily move into and collect possession, where they could play dangerous passes in behind the Villa high line. That the score remained level at halftime was a product of Swansea's inability to finish- Villa were fortunate not be trailing.

They improved in the second half and were more compact defensively. However, Sherwood maintained the same shape and tactics throughout, whether his side were being outplayed or on the ascendency.

Monk on the other hand reacted to changes in how the contest was taking shape. When his side lost their first half dominance and were being dominated in the channels, he changed to a shape with wide midfielders to give his fullbacks defensive cover in the channels.

This was a fluid and enjoyable contest between two sides playing decent football. Monk will be slightly concerned his side's dominance of late hasn't been translated into enough goals, Sherwood will feel Villa missed a chance to get vital home points in their battle for safety but both managers can take positives from today's match.

Tactical Analysis: Aston Villa 2-1 West Brom

Christian Benteke's 94th minute penalty gave Aston Villa their first win in eight Premier League matches and lifted Tim Sherwood's side out of the bottom three. Villa played a diamond 4-4-2 and took advantage of a 4 v. 2 advantage in the middle of midfield in the first half when they controlled the game and were the better side. West Brom did a better job of taking advantage of space in behind the Villa fullbacks in the second half and were marginally the better side after the break. Perhaps a draw would have been the more appropriate result but Villa were excellent in the first half and were rewarded for an adventurous attacking display.

Lineups

Sherwood opted for an attacking diamond 4-4-2 shape with Charles N'Zogbia playing in the hole behind the front pairing of Christian Benteke and Gabriel Agbonlahor. Tom Cleverley and Fabian Delph played the shuttling roles either side of Kieran Westwood at the base of midfield.

Tony Pulis used the same 11 he has in West Brom's last two league fixtures in his normal 4-4-2/4-4-1-1 set up. Saido Berahinho partnered Brown Ideye up front. Craig Gardner, typically a center midfielder, was again used wide on the left in midfield.

Villa exploit 4 v. 2 advantage in middle of midfield

The diamond 4-4-2 versus flat 4-4-2 formation meant Aston Villa had a 4 v. 2 advantage in the middle of midfield. West Brom defended in two compact banks of four. Positionally, Claudio Yacob was matched up against Cleverley, Darren Fletcher was matched up against Fabian Delph. However, Yacob and Fletcher defended zones on the pitch in front of their two center backs and rarely stepped out to get tight to Cleverley and Delph.

With that 4 v. 2 advantage in central areas, Villa always had an open spare man to pass to and were therefore easily able to circulate the ball and maintain possession. N'Zogbia posed a concern for the West Brom defense playing in the #10 role. Because Villa were playing with two strikers in Agbonlahor and Benteke, both West Brom center backs had a direct opponent and therefore neither could step forward to help the holding midfielders track N'Zogbia. He was free to move about in the pockets of space between the center backs and central midfielders. He got into one of these areas behind Fletcher and combined with Delph at the tail end of the first half, leading to Delph striking the woodwork.

But the main advantage Villa gained from their numerical superiority in midfield was that it kept the ball in their own attacking half, allowing them to build in confidence and get the fans behind them while keeping West Brom pinned in their own half. A nervous start could have been trouble for a team that had lost its last seven- by controlling the game it allowed a team with shattered confidence to gather a bit of belief.

Villa press well in first half

Sherwood's side pressed high up the pitch when they lost possession in the first half. Cleverley and Delph would immediately get tight to Fletcher and Yacob while the front three pressed West Brom's back four. Villa's fullbacks Alan Hutton and Matthew Lowton remained high up the pitch on West Brom's wide midfielders. As a result, West Brom struggled to find an out ball that would allow them to transition into attack. With Villa's fullbacks high up the pitch, there was space behind them in the channels for West Brom to exploit but they simply couldn't create enough time on the ball to play those passes into the channels (they improved here in the second half, more on that later). As a result their only route forward was to knock long, hopeful passes into Ideye and Berahino who didn't have enough support to do anything with those passes. West Brom completed just 24 of 52 passes into the attacking third in the first half.

Combination of big striker, quick striker troubles West Brom center backs

For all of Villa's tidy passing and build up play in the opening half, their goal came from the most simple, direct football you could imagine. Okore played a pass back to Brad Guzan at the Villa eighteen, prompting the West Brom defense to step forward. Guzan thumped it long to Benteke who used his superior strength to comfortably hold off Chris Brunt and flick a header on behind West Brom's defensive line. The pacey Agbonlahor read the situation, ran onto the flick and comfortably ran past Lescott and McAuley before slotting home. Five minutes later a West Brom goal kick was headed around a couple times before falling for Westwood. West Brom's center backs were high up the pitch because the goal kick had just been taken. Westwood played a simply pass up over the top and Agbonlahor was clean through on goal once again having beaten Lescott for pace. Lescott was able to save off the line but two extremely simple moves from Villa and the pace of Agbonlahor had nearly resulted in a 2-0 Villa lead.

West Brom start to exploit space in channels

With Villa playing a diamond 4-4-2 they weren't getting any natural width from the midfield. It was therefore up to the fullbacks to bomb forward to provide that width in the attacking third. Hutton in particular was playing more like a wing back than a fullback. As I mentioned earlier, this advanced positioning meant there was space for West Brom to exploit in the channels if they could quickly transition from defense to attack. Villa's decent pressing in the first half prevented West Brom from finding an out ball to allow them to transition. It's difficult to keep up a high pressing game for 90 minutes however and in the second half Villa began to tire. As they did West Brom found more time to transition from defense to attack and exploit that space behind the Villa fullbacks. 

The screen shot below shows the one example where West Brom were really able to take advantage of the Villa fullbacks' advanced positioning on the counter. Hutton is on the ball and Lowton, who for the most part kept a deeper position than Hutton, is at the edge of the 18 yard box. Hutton plays a diagonal ball into the box that West Brom end up with. In the next sequence Morrison runs into the right channel behind Lowton in acres of space. He's through on goal but his lack of pace allows Lowton and Clark to recover. Morrison played a ball to the back post that Okore does well to cut out but Villa left themselves exposed down the wings when they lost possession.

Because Villa were defending with just a midfield bank of three, West Brom's fullbacks didn't have a direct opponent when they were in possession and the Baggies therefore had a 2 v. 1 advantage in the channels. In the build up to West Brom's equalizer Dawson collected the ball in space on the right channel and played an overlapping Morrison. Morrison whipped in a dangerous low cross across the six yard box that Ciaran Clark did well to snuff out for a corner. West Brom would score from the subsequent corner. Their strategy was clear-funnel the ball wide into the channels and get crosses into the box.

Conclusion

Tony Pulis doesn't offer tactical surprises and today was no different. He makes the individual tasks for his players remarkably simple- they defend in banks of four, attack through the channels and look to exploit set piece opportunities. While he is often derided for it, it is that simplicity that allows his sides to be so well organized and difficult to break down. While it's not often easy on the eye, it's the reason he's never been relegated. Although they were awful in the first half and only marginally improved in the second, they showed that characteristically Pulis ability to get an ugly result. In the end they were let down by a poor decision by Foster to dive in on Lowton after mishandling a cross but I expect Pulis to continue to collect enough points to have West Brom comfortably enough outside the relegation zone by the final week of the season.

Aston Villa put in a much improved showing, particularly in the first half when I thought they were excellent, but for all their tidy play they still don't create enough genuine scoring opportunities. The result shouldn't mask the fact they scored from a route one move in which Benteke looked to be offside and from a penalty that resulted from a mistake by the opposition keeper. They won't get those breaks every week and need to improve their play in the final third. However, they should gain confidence from a good showing and a badly needed three points.

Tactical Analysis: Roma 1-1 Juventus

Juventus went one step closer to claiming a fourth consecutive Scudetto with a 1-1 draw at second place Roma. The result keeps the gap between the two sides at 9 points. Juventus will perhaps feel they missed an opportunity to extend their lead after Vasilis Torosidis was given a second yellow for a foul on Arturo Vidal and Carlos Tevez scored from the resulting kick. However, Seydou Keita earned his side a point after heading home an Alessandro Florenzi free kick.

This was a slow-moving contest- with Juventus comfortably in control of top spot in the league a draw was an acceptable result and they were content to defend deep with eleven men behind the ball and look to break on the counter. Roma lacked the creativity and tempo to break down a compact Juventus defense- they were too slow and methodical to cause the visitors problems. Tevez's goal was Juve's only shot on target but they were the more dangerous side throughout playing on the counter. Second half substitution Juan Iturbe injected some pace and direct running for Roma in the second half- he won the free kick that led to Keita's equalizer- but Roma were extremely poor in attack.

Rudi Garcia opted for the same starting eleven that beat Feyenoord in the Europa League Thursday in Rotterdam. Daniele De Rossi, Miralem Pjanic and Keita made up the midfield triangle in Garcia's 4-3-3 with Radja Naingollan left out.

Massimo Allegri returned to 3-5-2, Juve's default Serie A formation, after playing a diamond 4-4-2 in the bianconeri's 2-1 Champions League win over Dortmund last Tuesday. Andrea Pirlo was out with a calf injury sustained in that match and was replaced at the base of midfield by Claudio Marchisio. Paul Pogba also just missed out with Roberto Pereyra filling in alongside Vidal in the shuttling midfield role.

Juve defend deep

The most obvious tactical feature of this contest was Juventus's deep defending. Evra and Lichsteiner dropped back towards the center backs to form a back five. Tevez and Morada dropped 10 yards within their own half to pick up Roma's deepest lying midfielder, usually De Rossi. This meant Juventus's three center midfielders had a 3 v. 2 advantage against Pjanic and Keita in deeper positions. Pjanic, Roma's most creative midfielder, couldn't find pockets of space to influence the game in a crowded center of the pitch. He played 15 passes in the attacking third but they were mostly short and into wide areas and not the type of defense-splitting through balls likely to cause the Juventus center backs problems.

For Roma, both Gervinho and Adem Ljajic like to tuck inside from their wide starting positions. However, with Juventus playing three center backs their movement into central areas wasn't causing the type of overloads it would against the center backs in a back four. Instead they were moving infield to an area of the pitch that was extremely crowded. There weren't the gaps in those interior zones to find any space. With Lichtensteiner and Evra dropping deep, the only space in midfield for Roma was in deep positions in the channels. Juventus were happy to concede this space- the only real threat from those deep wide areas was big diagonal crosses into the box but with a front three of Totti, Ljajic and Gervinho Roma didn't pose any type of aerial threat from crosses.

Juventus's deep positioning always kept Totti from picking up possession in dangerous areas between the lines. Totti dropping into deeper positions to get on the ball is an element of Roma's play- he's a gifted creative player and it allows space for Gervinho and Ljajic to run in behind him- but it was incredible just how deep Juventus's defensive positioning was forcing him to come. The graphic below shows where the Roma captain received passes. The vast majority of those were beyond 30 yards from goal and he received just one pass in the box.

Juventus counter behind fullbacks

With Ljajic and Gervinho tucking inside for Roma, their fullbacks Torosidis and Holebas were tasked with providing attacking width. This left space down the channels for Juventus to counter into when they won possession back. Morata broke into this space quickly behind the Roma fullbacks then Pereyra and Vidal would use their pace and power to join in with runs from deep as Roma struggled to get back into defensive position. In the build up to Juve's opener Pereyra won possession in midfield, sprinted forward with the ball and provided a pass for Vidal in a position inside of the left channel. Torosidis had been high up the pitch providing width and was left struggling to recover as Vidal had gotten in behind him. He clipped the Chilean's heels as he was breaking into the box, picking up his second yellow and giving Juve the free kick Tevez would go on to score from.

Roma substitutions impactful

Reduced to ten men, Garcia was forced into making substitutions that turned out to be hugely influential. Florenzi replaced Ljajic to restore Roma's back four and five minutes later Iturbe replaced Totti. Roma moved to a 4-3-2 with Iturbe taking up a right forward position. The two substitutes gave Juventus more trouble than they'd felt all game combining down the right. Florenzi brought more pace and guile in possession than Torosidis and Itrube offered more direct running on the ball Roma had lacked and that finally forced the Juventus defense to do some 1 v. 1 defending. Iturbe won a free kick with a burst of pace down the right channel that Florenzi clipped into the back post well for Keita to equalize.

Perhaps Juventus were guilty of allowing themselves to become too stretched after going a man and a goal ahead and looking for the second to kill it off. Roma certainly enjoyed more space once they were reduced to ten than they had at any point beforehand and you feel that maybe had Juventus continued to defend cautiously as though it was still 11 v. 11 they may have held on.

Conclusion

Roma may take some pride in fighting back to snatch a point from a difficult situation but this was a poor result both in terms of the performance and the impact a draw has on their chances at getting back into the title race. The tempo was too slow and they couldn't get their creative players into positions where they could impact the game.

Juventus will be somewhat disappointed they didn't hang on for the three points they probably deserved but they too didn't really create enough. The draw suits them fine however- they will in all likelihood cruise to another title.

Tactical Analysis: Manchester City 1-2 Barcelona

Barcelona were rewarded for a dominant first half display with a Luis Suarez double that gave the Catalan side a commanding position in the tie before Sergio Aguero pegged one back for Manchester City in the 69th. City then went down to 10 men after two yellow cards in 15 minutes saw Gael Clichy sent off. Barcelona had an opportunity to kill off the tie after Pablo Zabaleta brought down Lionel Messi in the box but the Barca #10 had his effort saved by Joe Hart then headed the rebound wide.

Manuel Pellegrini and his side may take some joy from an improved second half and the knowledge that it could have ended far worse following the sending off but the truth is that this is a disastrous result- beating Barca by two goals at the Nou Camp would rank among the Champions League's biggest shocks.

Pellegrini should shoulder a large part of the blame. He opted for a 4-4-2 against Barcelona's 4-3-3 which meant the visiting side had a 3 v. 2 advantage in the middle of midfield. Barcelona were able to use that extra midfielder to dominate possession. Losing the possession battle and having that numerical disadvantage in itself isn't necessarily a problem. Atletico Madrid play 4-4-2 and have enjoyed a great deal of success the last two seasons against Barcelona and Real Madrid, sides that nearly always play with three central midfielders. They do this by dropping off into two incredibly compact banks of four and pressing the opposition relentlessly when they cross midfield (as opposed to pressing high up the pitch). When they win possession back they break forward immediately at pace.

Unlike Atletico Madrid, Manchester City are not a side whose 4-4-2 system is based around compact pressing and countering. City play a much more open style and prefer to boss possession. They lead the Premier League in average possession with 60% per game. However, it's one thing to dominate possession using a 4-4-2 against opposition in England, where City generally enjoy a talent gap over their opposition and the game's rapid speed means less emphasis is placed on controlled buildup, but another thing to do so against Barcelona, a club whose footballing identity is built around keeping the ball.

Pellegrini stated before the game his side would be more attacking than they'd been in the knockout stages against Barca last season and sticking with his favored 4-4-2 suggested he meant it. But with Rakitic, Busquets and Iniesta up against Milner and Fernando in the midfield zone City simply couldn't get a foothold on the game as Barca's spare man meant they nearly always had a passing option that allowed them to keep the ball. Whether it was because Barcelona were enjoying possession or by Pellegrini's design, City's midfield bank of four dropped well into their own half. That's a strategy that's worked well against Barca in the past- allowing them to play the ball in midfield and get their attack minded fullbacks into advanced positions opens space behind those same fullbacks to quickly counter into when possession is won back. However, to employ that system you need midfielders that work incredibly hard defensively and are capable of winning tackles and that also have the pace and athleticism to quickly transition in behind the opposition fullbacks. . For Atletico those players are Arda Turan and Koke, players that average 2.0 and 2.6 tackles per game respectively but just 41.9 and 51.6 passes per game. City's wide players this evening were Samir Nasri and David Silva, players that average just 1.1 and 1.2 tackles respectively but 59.5 and 65.4 passes. In other words, Silva and Nasri are much more suited to games where City control the possession and spend less time defending.

The rather long-winded point is that it's difficult to understand exactly what Pellegrini was trying to do. If his plan was to defend slightly deeper and play on the break, surely Nasri should have been replaced by Jesus Navas or James Milner (with Fernandinho coming into midfield alongside Fernando), players more suited to playing on the break. If instead it was to try to have plenty of possession it's strange to think he'd be optimistic enough to believe he could do that playing with one less midfielder than a side that averages 70% possession in their domestic league. Dropping Dzeko and bringing Nasri inside to a #10 role would have made more sense.

Another key element of the fact City were outnumbered in midfield is that it allowed space down the channels for the Barcelona fullbacks to push into. Milner and Fernando were 2 v. 3 against the Barcelons midfield and with Messi freqeuntly tucking into very narrow positions from the left this often became 2 v. 4. As a result, Nasri and Silva tucked in to very narrow defensive positions to even the numbers in that zone. The screen shot below was taken in the 30th minute and shows just how narrow City's defensive shape was. Conceding the channels is a strategy sides often have to take against Barcelona to not get overrun in the middle but Luis Enrique's side exploited the space well. Forty or so seconds after this photo Jordi Alba got around the outside of Silva and Zabaleta and cut back for Suarez to score what was ultimately the game winner.

After a disappointing La Liga defeat at the weekend and growing suggestions of discord between Messi and Luis Enrique, this was a big win for Barcelona. As a closer follower of English football than La Liga I tend to write these posts from the prospective of what the English team did right or wrong but it was a treat to watch Barca tonight. I thought Rakitic and Pique were were particularly excellent. If anything the result doesn't reflect just how dominant the Catalan side were and they'll be disappointed they don't have a bigger cushion heading into the second leg.

Ibe's positioning at wing back opens space between Rose and Vertonghen that Liverpool exploit

Mario Balotelli's first Premier League goal since 2012 gave Liverpool a 3-2 win over Tottenham in a game that twice saw Spurs come from a goal behind to draw level. The win crucially puts Brendan Rodgers' side just 3 points behind 4th place Arsenal and just a point behind Spurs in the race for Champions League places. A win would have seen Spurs go third at least briefly with Southampton and Manchester United still to play tomorrow.

This was an immensely entertaining contest for the first hour with with two quite different formations that created some really intriguing tactical battles. With both sides having played important derby matches just two days ago, fatigue seemed to set in on the hour mark and the energy fell until Balotelli's 83rd minute winner. Rodgers' second half substitutions made the difference- Balotelli replaced the excellent Daniel Sturridge, still regaining fitness from the thigh injury that has seen him miss most of the season, in the 74th minute and was set up with an assist from Adam Lallana who came on for Lazar Markovic in the in the 79th.

What proved to be the key tactical feature on the day occurred down Liverpool's right attacking side. Rodgers opted for the same 3-4-2-1 formation he's used in recent matches with Jordan Ibe given a second successive league start at right wing back after his excellent performance at Everton Saturday. Ibe was instrumental in setting up both Liverpool second half goals and proved a tactical nightmare defensively for Spurs left back Danny Rose and left midfielder Christian Eriksen.

Markovic and later Lallana operated in a narrow right-sided attacking midfield position. The left side of Spurs defense was confused throughout about who was responsible for picking up this inside right attacking midfielder and who was responsible for tracking Ibe. Ryan Mason played as the left-sided holding midfielder in a double pivot with Nabil Bentaleb (in the 69th Paulinho replaced Mason and Bentaleb moved into Mason's left-sided position). He pressed Henderson, Liverpool's right sided holding midfielder, when Liverpool were in possession. This left Liverpool's inside right attacking midfielder with space behind Mason and in front of Rose and left-sided center back Jan Vertonghen (Figure 1).

Figure 1: Markovic occupies space behind Mason and in front of Rose and Vertonghen.

Figure 1: Markovic occupies space behind Mason and in front of Rose and Vertonghen.

Rose and Vertonghen therefore had a difficult decision to make about their positioning. Vertonghen could step out from the back line to get tight to Markovic/Lallana but it would have opened up space in behind for the pacey Daniel Sturridge to make a diagonal run in behind (Figure 2).

Figure 2: If Vertonghen steps to Liverpool's inside right attacking midfielder it opens space in behind for Sturridge to run into

Figure 2: If Vertonghen steps to Liverpool's inside right attacking midfielder it opens space in behind for Sturridge to run into

Alternatively, Rose could have tucked inside towards Markovic/Lallana, leaving space down the channel for Ibe to run into behind Eriksen (Figure 3).

Figure 3: Space opens up for Ibe down the touchline if Rose tucks inside towards Liverpool's inside right attacking midfielder.

Figure 3: Space opens up for Ibe down the touchline if Rose tucks inside towards Liverpool's inside right attacking midfielder.

Spurs opted more for the option in Figure 3 with Rose tucking inside. The problem that arose for Pochettino's side was therefore that Ibe was happy to take that space near the touchline behind Eriksen. To effectively deal with that threat, Eriksen would have had to been asked to track Ibe's runs all the way into the Liverpool attacking third. Such a strategy would have had its own drawbacks- Spurs wouldn't have wanted their most creative attacking player pinned 80 yards from the opposition goal.

When Ibe got the ball in advanced wide positions his direct and incisive decision-making were extremely effective. By receiving possession near the touch line he forced Rose to sprint wide to close him down. Spurs left-sided holding midfielder (Mason and then Betaleb when Mason was subbed) would drift to that channel to offer defensive support for Rose, vacating space in the middle of the pitch that Markovic and then Lallana could exploit.

The screen shot below shows the buildup to the penalty won by Sturridge that resulted in Liverpool's second goal. Ibe gets the ball wide, forcing Rose to the touchline. Bentaleb offers defensive cover leaving space at the right edge of the box Sturridge to move into on this occasion. Ibe finds Sturridge with the next pass who dribbles past Mason and is taken down by Rose in his effort to make a recovery tackle.

The buildup to Balotelli's winner was remarkably similar. Here, Ibe receives a pass from Lallana on the touchline. Once again Rose is forced wide to close him down with Bentaleb providing cover. Lallana drifts into the space left vacated by Bentaleb and provides a well-weighted ball across the face of goal for Balotelli to tuck in.

Markovic's opener was slightly different- Simon Mignolet's long punt toward Sturridge ultimately fell for the Serbian in space to dribble forward, but like the other two it resulted from a Liverpool player finding space just inside the right channel.

Pochettino's side created their share of difficult tactical issues for Liverpool. With Markovic, Coutinho and Sturridge all staying high up the pitch Liverpool were outmanned in the middle of midfield where Gerrard and Henderson often found themselves trying to defend Bentaleb, Mason and Dembele as well as Eriksen and Lamela tucking inside. Spurs' fantastic opener came when Lamela and Eriksen tucked insideto overload that zone and played a tidy 1-2 before Lamela laid off an inch-perfect reverse pass for Harry Kane.

One final interesting feature of this contest was Liverpool's first half pressing of Bentaleb and Mason, an approach that differed from that taken by Arsene Wenger in the North London Derby Saturday. Arsenal sat deep and allowed Bentaleb and Mason plenty of time on the ball. The two midfielders looked excellent, Bentaleb providing the cross for Kane's winner, and Spurs controlled the game. Today the two looked extremely uncomfortable with the pressure they were being put under and struggled to move the ball forward to the front four. Both Mason and Bentaleb played poor back passes that nearly led to one v. one opportunities at the Spurs goal for Ibe and Sturridge. The difference in strategy between Arsenal and Liverpool could be attributable to the fact Arsenal were the away side Saturday and therefore more cautious, but it's difficult not to wonder if Arsenal couldn't have come away from that contest with something had they put the two rather green Spurs midfielders under more pressure.

Tottenham 2-1 Arsenal: Spurs press pins deep defending Arsenal

A second half brace from Harry Kane gave an outstanding Tottenham a 2-1 come-from-behind win over Arsenal in the North London Derby. Despite going behind from an 11th minute Mesut Ozil tap in, Spurs dominated throughout and were deserving winners. The win sent Spurs a point ahead of Arsenal and into 5th after Southampton's dramatic late win over QPR.

Arsenal adopted a similar defensively organized, counter-attacking approach to their 2-0 away win over Manchester City at the Emirates three weeks ago, an excellent performance that earned the Gunners their first away win over City, Manchester United or Chelsea since 2011. In the past Arsene Wenger has been rightly criticized for his unwillingness to adopt a more pragmatic approach to big away fixtures. The City performance seemed to suggest an evolution of Wenger's tactics and a maturation of his players. They showed tremendous professionalism and concentration, comfortably nullifying the attacking threat from City and carving out good chances of their own that they finished efficiently.

Given the effectiveness of that performance it maybe wasn't a surprise that Wenger would adopt the same approach in another big away fixture against talented opposition. Santi Cazorla and Aaron Ramsey both dropped deep in the middle of midfield with Francis Coquelin just behind them in the hole giving Arsenal a 4-1-4-1 shape with 9 players behind the ball. It was a strategy aimed at preventing Coquelin becoming overrun in central areas in front of the back four. Both Tottenham wide players Erik Lamela and Christian Eriksen enjoy tucking inside from the channels to find space between the lines. With Ramsey and Cazorla dropping deep it prevented Eriksen and Lamela from creating 2 v. 1 or 3 v. 1 overloads against Coquelin, who had a direct opponent in Spur's central attacking midfielder Mousa Dembele.

Both sides attack the same channel

With the center of the pitch crowded, the space to exploit for both sides was in wide areas. Both sides were particularly vulnerable down the same side of the pitch, Arsenal's right and Spurs left. Spurs were remarkably dangerous when they were able to quickly switch the point of attack from their right side to the left channel. Eriksen was Arsenal right back Hector Bellerin's direct opponent. With Eriksen tucking inside to central areas from the left channel, it forced Bellerin to follow him into very narrow positions, leaving space down the channel for Spurs left back Danny Rose to sprint into. Rose was able to sprint past Arsenal right midfielder Danny Welbeck, in the side ahead of Theo Walcott for his defensive work rate, and get the ball in space in the attacking third.

With Eriksen's narrow positioning, Bellerin was forced inside, leaving space on the right side of Arsenal's defense. Tottenham were able to switch the point of attack quickly in the opening half and find Danny Rose in space down that channel.

With Eriksen's narrow positioning, Bellerin was forced inside, leaving space on the right side of Arsenal's defense. Tottenham were able to switch the point of attack quickly in the opening half and find Danny Rose in space down that channel.

Rose got the ball in dangerous positions at the edge of the 18 yard box four times in the opening half hour. He delivered a poor ball in early after getting to the end line, produced a smart save from Ospina in the 14th, shot just wide of Opsina's back post in the 22nd and delivered another disappointing ball after again getting behind the defense in the 24th. Despite Arsenal being set up to defend and prevent good scoring chances for Spurs, the tactic wasn't working particularly well. Spurs inability to find the net in the first half was more a product of their lack of ruthlessness in the final third and strong goalkeeping from Opsina than Arsenal keeping them contained.

Rose's forays forward did create space for Arsenal to break into down their right and they looked dangerous in the opening half hour countering into that channel. Arsenal got their 11th minute opener when Giroud won the ball in back in midfield and it ended up at Welbeck's feet around the right channel. Welbeck took one touch behind Rose, who was high up the pitch with Spurs having just been in possession, and had room to carry the ball towards the endline. He cut it back for Giroud whose scuffed shot fell kindly to Ozil to tuck home at the back post.

Spurs press, Arsenal pinned deep

Spurs continued to dominate possession and control proceedings in the second half. The key tactical feature of the final 45 minutes was Arsenal's deep defending and Spurs pressing. With Arsenal continuing to drop deep near their own box with a defensive midfield bank of 5, Olivier Giroud became isolated up front. Spurs quickly closed down Arsenal high up the pitch when they lost the ball and the Gunners simply didn't have an outlet ball to spring counters. Their only release valve was hopeful balls towards Giroud, who was being outmanned by Spurs' center backs Jan Vertonghen and Eric Dier. The graphic below shows that the bulk of passes to Giroud in the second half were either in deep positions near midfield or hopeful long ball. Spurs won possession back quickly and created wave after wave of attacking pressure. They finally broke Arsenal's resistance in the 56th through Kane after a sustained spell of pressure.

The graphic below of where each team won tackles highlights the two sides' strategies. Spurs pressed quickly when they lost possession and won the ball higher up the pitch while Arsenal defended in deep lines around their own 18 yard box.

Tottenham got fantastic performances throughout the lineup. Ryan Mason and Nabil Bentaleb comfortably controlled the middle of the park with Bentaleb providing the assist for Kane's winner. Eriksen put in a typical tidy performance tucking inside and linking play from midfield to attack, Lamela took a while to get going but grew into it and offered plenty of creativity in the second half. The majority of the plaudits however will rightly go to Kane. His coolness in front of goal is hardly believable given his age and lack of Premier League experience but he's also more than just a ruthless finisher. His work rate off the ball is phenomenal- he'll run in behind the defense, work the channels to get on the ball and hold up play with his back to goal.

Conclusion

It would be unfair to criticize Wenger for Arsenal's approach given the success a similar one brought at City but it's difficult not to wonder how this contest would have panned out had his side looked to establish a bit more authority. Spurs had Bentaleb, Mason and Dier in their defensive spine and although all three are fine players, they are 20, 23 and 21 years of age respectively and don't have a ton of big game experience. Could Arsenal have rattled their nerve with more attacking pressure?

For Pochettino and Spurs this performance should provide a platform for what they're capable of. This was an even more complete and dominant performance than their 5-3 win over Chelsea. They simply didn't allow Arsenal to get into any decent scoring positions for the bulk of the 90 minutes. The question now is can they consistently replicate this type of performance. Two seasons ago Spurs beat Arsenal by the same 2-1 scoreline at White Hart Lane in early March. The lead left them 7 points clear of Arsenal and third in the league but Wenger's side ultimately secured the final Champions League spot at their expense by a point on the final day of the season. Arsenal are the more talented side and will still be considered favorites for the Champions League but Pochettino is a very good manager and Liverpool proved last season what momentum in the second half of the season can do for a squad. With 13 points from their last 6 fixtures, including wins over Chelsea and Arsenal, they're in a great run of form at just the right time.

Arsenal vs. Tottenahm; North London Derby Preview

Arsenal travel to White Hart Lane Saturday to play Spurs in a NLD that could have significant implications in the race for Champions League places. Arsenal sit fifth in the league and trail Southampton for the final Champions League position on goal difference; Spurs are just two points adrift in sixth. The reverse fixture at the Emirates in September ended in a 1-1 draw with goals from Nacer Chadli and Alex Oxlade-Chamberlain in a game largely controlled by the home side.

Here are some potential tactical features to look for and some interesting stats.

  • Arsenal have taken 15 out of 18 possible points from their last six matches; Spurs have taken 13 out of 18. Only Liverpool have recorded more points in their last 6 (16).
  • Mauricio Pochettino has used Moussa Dembele in a central attacking midfield role behind Harry Kane in Tottenham's last two fixtures with Erik Lamela and Christian Eriksen on the right and left flanks respectively. Both Lamela and Eriksen like to tuck inside to central areas. For Arsenal, this could cause Francis Coquelin, whose main matchup will be with Dembele, to become overloaded in central areas at the base of Arsenal's midfield. It'll be important for Aaron Ramsey to get close to Coquelin when Spurs are in possession so that Lamela and Eriksen can't find pockets of space either side of Coquelin.
  • With Alexis Sanchez set to miss out with a hamstring injury, Theo Walcott will likely get his second successive start. Sanchez is obviously a big miss- he's arguably been the Premier League's best player in his opening season- but Walcott is a strong replacement and provides Arsenal's attack with solid balance. His pace poses a threat in behind the opposition defense that you don't get from striker Olivier Giroud and he's usually a proficient finisher when through on goal. He also gives the Gunners a threat in wide areas where he can beat the opposition fullback with his pace, get to the endline and cut the ball back into the box.
  • The positioning of Tottenham left back Danny Rose when Spurs are in possession will be interesting. With Eriksen likely to be tucking inside ahead of him, he could be responsible for providing Spurs with width in the attacking third. However, by getting into advanced positions he'll allow Walcott space in behind down the channels to counter into, an area where Walcott's pace can be deadly.
  • Spurs are 11th in home goals conceded while Arsenal are third in away goals scored. I'd be shocked if Arsenal didn't score at some point during the 90 minutes. In order to secure three points Spurs will need multiple goals but they proved in their 5-3 home win over Chelsea they're capable.
  • Spurs have just the 9th best home record in the league; Arsenal have the 5th best away record.
  • All eyes will be on Harry Kane. The 21 year old has been a revelation this season. His 20 goals in all competitions lead the Premier League and he combines that proficiency in front of goal with a tremendous work rate off the ball. The battle between him and veteran Arsenal center backs Laurent Koscienly and Per Mertesacker should be fascinating.

Chelsea pressing improves after disjointed start

Chelsea maintained their perfect start the Premier League season with a 4-2 home win over Swansea. Jose Mourinho's side were too disjointed in their pressing early on, allowing too much space between the midfield and back four, but improved in that area just before the half hour mark and took firm control of the game from there.

Lineups

Mourinho opted for the same starting 11 and 4-2-3-1 formation he used in Chelsea's first two games against Burnley and Leicester with Cesc Fabregas playing a deeper role in midfield just in front of Nemanja Matic and Oscar as the most advanced midfielder. The Matic-Fabregas holding midfield partnership appears as though it'll be one Mourinho uses at home or against weaker opposition. It allows Chelsea to have an additional creative player on the pitch but comes at the expense of playing two defensive holders to protect the back four and as a result Chelsea can become a bit more stretched. The presence of an additional creator against weaker opposition is an important one- too often last season Chelsea were unable to break down deep defenses. On the road at Everton Mourinho played Fabregas as the #10 with Ramires partnering Matic in the holding roles in a move that in theory was meant to make the side more compact at the back. They went on to concede three that day in a 6-3 win but the personnel decision reflects Mourinho's focus on not losing and allowing the opposition to make mistakes against top sides on the road rather than proactively setting up to take the game to the opposition. We'll likely see Fabregas as the #10 next week away to Manchester City with two defensive holders behind.

Gary Monk's only change to the side that won its first three league games was the inclusion of Bafetimbi Gomis for Wilfried Bony who had just met up with the team from international duty yesterday.

Chelsea press disjointed

Early on Chelsea appeared to be caught between two minds whether they wanted to press high up the pitch or drop off and defend in banks of four. At times Fabregas and Matic would step forward to join the front four and press but the Chelsea back four didn't step forward in tandem to play a higher line. As a result, there was a big gap between the pressing midfielders and the back four. Sigurdsson and Gomis got on the ball in these positions before moving it wide where Dyer and Routledge could use their pace to run at Azpilicueta and Ivanovic.

The two images below give an of Chelsea's failure to press as a unit. Diego Costa closes Amat down, Hazard is tight to Rangel, Matic has moved forward tight to Ki, Fabregas (just at the edge of the shot) is moving towards Shelvey, Oscar is in a position to deny a pass into Shelvey or close down Ashley Williams if Amat plays a square pass to his left. Here, the front six are in good pressing positions.

However, the back four are far too deep. Amat picks out Sigurdsson positioning himself between the lines (below). He receives the pass with loads of space to turn- you don't even see Chelsea's defenders in the screen shot below. With Swansea playing a lone striker, the Chelsea center backs have a 2 v. 1 advantage. Therefore, when the midfielders press, one should be able to step out from the defensive line and get tight to the back of Sigurdsson, not allowing him to turn.

It isn't hugely surprising that Terry and Cahill were reluctant to move up the pitch and play a higher line. While both are positionally solid, neither have a tremendous amount of pace and would be worried about opposition attackers running in behind them. Both are more comfortable playing a deeper line and dealing with high crosses into the box.

Chelsea's pressing midfielders were also at fault for the early struggles. They were hesitant and uncertain when closing down the ball and as a result Swansea had that extra second to pick their heads up and find a pass.

Chelsea press improves

Right around the half hour mark Chelsea began to press with more conviction. There was a 20 second or so spell where Fabregas and Oscar closed Shelvey 30 yards from goal and committed a foul. Amat played the resulting free kick square to Williams rather sending it forward and Diego Costa and Oscar immediately pressed the two Swansea center backs. Amat received a pass back from Williams and played the ball forward into Shelvey who was put under pressure straight away by Fabregas. He was forced to play back into Fabianski's feet and the goalkeeper simply had to hoof it forward to escape the pressure. From that point on Swansea couldn't find a way out of their own half and Chelsea took control of the game. In the opening 29 minutes Swansea completed 11 passes into the attacking third. For the remainder of the half they completed just 1.

Mourinho moves to 4-3-3

At the start of the second half Mourinho introduced Ramires for Schurrle and moved to a 4-3-3 shape. Matic anchored the midfield with Ramires to his right and Fabregas to his left, Oscar moved to an attacking right position. Chelsea continued to press relentlessly and man marked in midfield with Ramires and Fabregas versus Ki and Shelvey and Matic versus Sigurdsson in front of the Chelsea back four.

The major impact the change had for Chelsea was that it allowed Fabregas to get into more advanced areas to dictate tempo in the attacking third, knowing that he had two midfield partners in Ramires and Matic that were going to do the defensive leg work. With his position on the left of the Chelsea midfield trio he was able to create overloads and combine for 1-2's with Hazard in his position down the left channel. The two combined brilliantly for Chelsea and Diego Costa's second. Fabregas played 12 attacking third passes in the first half in his slightly deeper role, 17 in the second half before being subbed off in the 82nd including the assist to Costa.

Diego Costa

Costa has been on fire, his hat trick today taking his tally on the season to 7 in 4 league matches. Mourinho lamented his lack of an in form striker last season. Costa's goals today were of the poaching sort Chelsea desperately lacked last season. Last season Torres constantly dropped between the lines to try to link play forward and at times was effective in doing so. However, he never seemed to pop up in key areas in the box to finish moves off. Costa doesn't drop off the opposition back four to get on the ball and link play forward- with the attacking midfielders Chelsea have he shouldn't need to. He'll drift into the to get on the ball and run at defenders but always gets himself into the right areas in the box when Chelsea get into dangerous positions. He's also an imposing physical presence. His headed opener showed his power and strength, his second and third showed his positional instincts.

Some thoughts on Everton 2-2 Arsenal tactics

Everton looked to be coasting to a 2-0 win at Goodison Park before Aaron Ramsey and Olivier Giroud struck in the 83rd and 90th minutes to give Arsenal the away point. Roberto Martinez's side dominated the first half and defended fairly comfortably for 35 minutes of the second but Everton simply ran out of energy in the final 10 as Santi Cazorla, who provided the assist for Ramsey's goal, and Giroud proved inspired second half substitutions.

Just as he had in Everton's 3-0 defeat of Arsenal in April, Martinez played Naismith as the striker and put Romelu Lukaku in the right channel. It proved to be an astute tactical move on that afternoon- Lukaku terrorized Nacho Monreal and Thomas Vermaelen on the left side of Arsenal's defense, forcing a save from Wojciech Szczesny that fell for Naismith to finish off for Everton's opener before scoring one of his own after a powerful run into the box from the right.

The strategy was similarly impressive in the first half today. Naismith would drop off the Arsenal center backs to collect the ball between their defensive and midfield lines. This would force one of the Arsenal center backs to step out of their line to get close down Naismith. This would leave space between the stepping center back and the fullback on the same side of the pitch for Lukaku and Mirallas to make diagonal runs from outside in in behind the Arsenal defense. The graphic below shows Mertesacker stepping out to close down Naismith, opening space between himself and Monreal for Lukaku to run into.

Everton were also dangerous countering in the space behind Arsenal's advanced fullbacks through Mirallas and Lukaku when they won the ball in midfield. The center midfield trio of James McCarthy, Gareth Barry and Leon Osman showed tremendous energy closing down the ball in midfield and winning back possession. When they won it back, Lukaku and Mirallas would spring in behind Arsenal's fullbacks to receive the ball in space in the channels. Seamus Coleman's opener stemmed from poor marking by Ozil after an Everton set piece but the second was through a blistering counter down the right. After an Everton interception Lukaku received the ball in space behind Monreal and broke forward before slipping Naismith through to tuck between the legs of Szczesny. Replays showed Naismith was clearly offside but Everton had consistently looked a threat on the break leading up to the goal.

In the second half it was always a question of how long Everton could keep up the tremendous work rate they showed closing down Arsenal in midfield. For 35 minutes of the second period they looked fairly comfortable but in the final 10 they became exhausted. In the move that resulted in the throw in that Arsenal ultimately scored from, Coleman and McCarthy gave Mesut Ozil 5 yards of space on the left edge of the penalty box. His delivery into the box was poor and cleared out of play by Jagielka. From the resulting throw Arsenal overloaded their left channel with Monreal, Cazorla and Ozil. The ball ultimately came to Cazorla. McCarthy and Coleman continued to drop off rather than closing him down. The Spanish midfielder was allowed to dribble the ball into the penalty area with no pressure, pick his head up and find Ramsey making a run in front of goal. Osman was guilty of allowing Ramsey to get a step behind him but even if he'd have done a better job tracking the run, Cazorla's ball was driven hard enough across the face of goal that it may have resulted in an Osman own goal. The fault clearly fell on the shoulders of Coleman and McCarthy who failed to close down the fresh legged substitute Cazorla but it looked like they simply didn't have the gas to do so. Coleman had ran up and down the sideline from his left back position, offering Everton width in the attacking half. McCarthy had worked tirelessly to not allow Arsenal's midfield to get into the passing rhythm that makes them such a dangerous side going forward. After 80's minute left they ran out of legs as Martinez referenced in his post game interview saying, "The first-half performance is what we want to be doing. But we ran out of legs a little bit and Arsenal, as you would expect, threw everything forward and you get into a position where the third goal is going to be vital."

While Arsenal looked disjointed in attack for most of the match, they deserve credit for the manner in which they fought back and were unfortunate to be in a two goal hole in the first place. Often last season in order to conserve energy Arsenal would drop off defensively in the first half, get in a compact 4-1-4-1 shape with Flamini just between the midfield and defensive banks of four and allow the opposition to have most of the ball (the 1-0 win at the Emirates over Spurs is an example) then look to attack directly on the break. In the second half as the opposition tired they'd take the game to them. We saw some of this today. Although Arsenal had their share of possession in the first half, when Everton got on the ball they'd drop off and allow the home side to pass in their own half. It was Everton doing the intense pressing in midfield. While this resulted in the home side being the more dangerous one in the first half, it wasn't something they could sustain in the second. Arsenal had more energy after the break. Everton began to defend deeper, allow Arsenal more time on the ball in midfield and got stretched across the width of the pitch.

It obviously wasn't in Wenger's plans to allow the home side to go in at halftime two goals ahead but the Gunner's more subdued start was probably no accident. Against a strong opponent and in front of a difficult away crowd, it made sense to keep a tight defensive shape, weather the storm, then go for it in the second half.

Tactical Analysis: Manchester United 1-2 Swansea

Louis Van Gaal's reign in charge at Old Trafford got off to a poor start as Manchester United were beaten 2-1 by an organized Swansea side.

Van Gaal was without Michael Carrick, Luke Shaw, Johnny Evans, Antonio Valencia and Danny Welbeck through injury while Robin Van Persie was not yet fit. Van Gaal was therefore forced to field a bit of a makeshift side in the 3-4-1-2 formation he favored with Holland at the World Cup and with United in preseason. Tyler Blackett and Jesse Lingard were given their United debuts at left center back and right wing back respectively. Lingard however was forced off early with an injury and replaced by Adnan Januzaj. Javier Hernandez started alongside Wayne Rooney at forward with Juan Mata just behind in the #10 role. Ander Herrera and Darren Fletcher played deeper in midfield.

Gary Monk opted for a 4-2-3-1. Wilfried Bony was given the nod up front ahead of new signing Bafetimbi Gomis after his excellent second half of last season. Jonjo Shelvey and Ki Sung-Yueng anchored the midfield. Wayne Routledge, Gylfi Sigurdsson and Nathan Dyer took up the attacking midfield positions. Angel Rangel, Jordi Amat, Ashley Williams and Niel Taylor made up the back four.

United attack down right

Swansea defended with Shelvey and Ki sitting deep in front of the back four. When United's back three had the ball, Swansea's ball side wide midfielder would step forward to apply pressure along with Sigurdsson and Bony while the opposite side wide midfielder tucked back into a narrow position alongside Ki and Shelvey to form a narrow bank of three. Swansea's fullbacks moved into very wide positions to pick up United's wing backs. This tactical feature should have provided a bigger advantage for United than it did. With Taylor moving all the way towards the touch line to pick up Januzaj, a large gap was left between Taylor and Williams in Swansea's defense. With United playing two center forwards, Williams and Amat both had direct opponents to mark and therefore Swansea didn't have a spare center back to pick up midfield runners. Any runs United midfielders made into that gap of space would have forced Williams to leave Rooney in order to pick up the runner (Figures 1 and 2). However, Herrera and Fletcher kept deeper positions and Mata didn't make those penetrating runs into the corner of the penalty area. United attacked continuously down the right, and Januzaj looked a genuine threat running past Taylor, but LVG's side couldn't take advantage of the space between Taylor and Williams that was there to be exploited.

Figure 1: Januzaj receives ball on wing, Taylor moves wide to close him down. Both Swansea center backs have a marker, neither spare to track midfield runners. Mata and Herrera have space in gap between Williams and Taylor to make dangerous penetrat…

Figure 1: Januzaj receives ball on wing, Taylor moves wide to close him down. Both Swansea center backs have a marker, neither spare to track midfield runners. Mata and Herrera have space in gap between Williams and Taylor to make dangerous penetrating runs. Too often they fail to make those runs.

Figure 3: If Herrera makes the run into the gap it forces Williams to slide over to close him down and leaves Rooney free in the box.

Figure 3: If Herrera makes the run into the gap it forces Williams to slide over to close him down and leaves Rooney free in the box.

Swansea opener

Manchester United man marked in the middle of midfield. Mata picked up one of the Swansea holding midfielders, Herrera stepped out to get tight to the other and Fletcher sat in the hole on Sigurdsson. United are without wide midfielders in their 3-5-2 shape and therefore Swansea's fullbacks didn't have a direct opponent in possession. For Swansea's opener Fletcher was pushed into a position wide on the left of United's defense to pressure Rangel on the ball. Rangel looped a ball in behind left wing back Ashley Young into Dyer. This forced Blackett to shift wide to the right channel to close down Dyer. With Fletcher high up the pitch after picking up Rangel, Sigurdsson was unmarked in the middle of the pitch. He was spotted by Dyer. Herrera and Mata did a poor job tracking the Swansea midfield runners- they were up near midfield when Ki burst forward, collected a pass from Sigurdsson and slotted home to give Swansea the lead.

United lack ball playing center back

One of the keys to playing three at the back is having one of those central defenders possess the vision to step out of the back and play forward passes into midfield. Smalling, Jones and Blackett did not show that vision. They were unable to channel passes into Fletcher and Herrera in midfield and simply passed sideways to one another at the back. United's top three passing combinations in the first half involved the three center backs. Their top seven pass combinations involved either passes between the three center backs, a center back and a wing back or de Gea and a center back. United need to sign a center back with more vision if they wish to continue playing three at the back. Ideally that player would be Mats Hummels who offers excellent composure on the ball and good passing vision.

United switch to 4-2-3-1

Van Gaal switched formations at halftime bringing on Nani to replace the woefully ineffective Hernandez. Nani played wide on the left, Young slipped back to left back, Jones slid over to a traditional right back role and Januzaj played a more advanced right midfield position. The change in shape prompted United's most dangerous attacking spell of the contest and resulted in more attacks through the middle of the pitch, as opposed to attacking mostly wide on the right in the first half. Although it seems counterintuitive, the main reason for the increased pressure through the middle was the change to playing with two wide players on each side of the pitch- a wide midfielder and fullback- rather than just one as they had with the 3-4-1-2 shape- the wing back. The reason being that with Jones and Young providing width from the full back position, Nani and Januzaj were able to tuck inside giving United more passing options in central areas. Now, rather than having only Juan Mata working the space between Swansea's defensive and midfield lines, they had Nani and Januzaj who could also move into those dangerous areas. With Nani and Januzaj tucking in at times, Swansea's fullbacks had to take up narrower positions closer to their center backs. This meant that when United did get the ball into wide areas there was more space. Januzaj continued to cause trouble when he tucked out into the channels and won the corner that ultimately resulted in Rooney's equalizer. The graphic below shows United's more varied and central attacking in the second half compared to their reliance on attacking the right channel in the first half.

Swansea go ahead

Bony was isolated up front for Swansea for much of the game but did well to hold the ball up and earn the foul that led to his side's winner. United were guilty of switching off immediately after the whistle was blown and Bony was alert enough to release Sigurdsson towards the left. He played the ball down the left channel for freshly introduced Jefferson Montero. Montero's lofted pass to the back post was mishit by Routledge but fell kindly for Sigurdsson to smash home.

Conclusion

The bulk of this post has focused on Manchester United's performance however Gary Monk and Swansea deserve plenty of credit for their excellent organization. United never really threatened from open play and the Swans' organization was particularly admirable after retaking the lead. It's a dream start for Monk after some questioned whether he was too inexperienced to be up for the task of managing in the Premier League. This was certainly a performance Swansea can build on.

Van Gaal will need to strengthen his squad. Injuries didn't help today but at present this isn't a side with enough depth or quality to contest for the title or even a top four position.

Herrera too reactive after Mexico take lead

Late goals from Wesley Sneijder and Klaas Jan Huntelaar broke Mexican hearts as Netherlands battled back from a 48th minute Gio dos Santos opener to win 2-1. This is the sixth consecutive World Cup Mexico have been eliminated in the round of 16.

Last week Dan analyzed how Mexico continued to offer an attacking threat after taking the lead in their final group game against Croatia. As is often the case when a side takes a lead, Mexico conceded some possession to Croatia after the goal and defended slightly deeper but pushed numbers forward on the counter and were a real threat. They were rewarded with two insurance goals and comfortably saw out a 3-1 win.

Their approach today after dos Santos's opener was different. Javier Aquino replaced dos Santos in the 61st minute and slid into the right side of midfield, changing Mexico's shape from 3-5-2 to more of a 5-4-1. The change left Oribe Peralta (and then Javier Hernandez when he replaced Peralta) isolated up front when Mexico won back possession. They had no outlet pass to allow them to counter and quickly gave possession back to the Netherlands, inviting wave after wave of second half pressure. The graphics below illustrate Mexico's inability to offer an attacking threat after taking the lead. Up until dos Santos's goal Mexico produced 7 shots to just 1 for the Netherlands. After the goal Mexico produced just 3 shots to 12 for Netherlands.

Mexico with 7 shots in the opening 48 minutes to Netherlands 1.

Mexico with 7 shots in the opening 48 minutes to Netherlands 1.

Netherlands with 12 shots after dos Santos's goal to 3 for Mexico

Netherlands with 12 shots after dos Santos's goal to 3 for Mexico

Mexico's attacking third passing statistics were similar to the Netherlands before the goal. They completed 38 attacking third passes in the first 48 minutes, Netherlands completed 41. Following the goal Mexico completed only 24 attacking third passes while Netherlands completed 43.

Attacking third passes up to dos Santos's opener.

Attacking third passes up to dos Santos's opener.

Attacking third passes after dos Santos's opener

Attacking third passes after dos Santos's opener

It was a shame Miguel Herrera was so reactive when his side went ahead. They had been the better side throughout the first half, looking comfortable defensively and producing some decent scoring opportunities of their own on the break. They allowed a Dutch side that had been ponderous to attack for long periods of time without having to worry much about being picked off on the break. Louis Van Gaal made an intelligent change in shape from 3-5-2 to more of a 4-2-3-1 in the second half, knowing a third center back was unnecessary while Mexico were playing so deep. Had Herrera stuck with his approach against Croatia and not given the Netherlands so much respect in the second half, Mexico may well have broken their round of 16 losing streak.

Chile and Brazil both press early, Brazil tire after half

Brazil are through on penalties. It's disappointing to see the tournament's most tactically exciting team in Chile eliminated in this fashion.

The first half was exceptional and was defined by both teams pressing high up the pitch. Brazil had the better opening half, winning back possession in Chile's half and attacking quickly and directly. It appeared that Scolari was looking to kill the game off early then sit deeper in the second half and protect the lead, knowing his side wouldn't have the legs to maintain their relentless pressing for 90 minutes. The strategy probably should have worked. Brazil got their early lead and had chances to add to it. Had they bagged a second it would have been a long way back for Chile.

Hulk's mistake that led to Alexis Sanchez's equalizer made life difficult for Brazil in the second half. Having used so much energy to press in the first half, they looked tired after the break and couldn't move the ball with enough pace to trouble Chile in the attacking third. They defended deeper, didn't put the Chile midfielders under pressure and it was all fairly comfortable for the visitors. The graphic below shows Brazil's tackles in the first half compared to the second half. In the first half they were winning the ball back higher up the pitch, leaving Chile's defense out of position. In the second half they were winning the ball back in deeper areas but failed to create much on the counter. Chile play with three center backs so are a different team to exploit on the break.

Chile, a side used to pressing for the full 90 minutes, looked the much better side. A fine save from Julio Cesar to deny Charles Aranguiz and Mauricio Pinilla's late effort off the crossbar nearly put the host nation out of the tournament.

The pressing made for a somewhat sloppy encounter. Neither side had time on the ball so we didn't see many long spells of possession or patient passing moves up the pitch. Brazil completed just 69% of their second half passes, a remarkably low number for such a talented side.