After a difficult afternoon, Bafetimbi Gomis turned hero as he turned in a brilliant Jefferson Montero low ball across the face of goal in the 87th minute to give the visiting Swansea a 1-0 win over Aston Villa in an entertaining game.
Gary Monk went with the same diamond 4-4-2 formation he's used in recent weeks and that was so impressive in the first half of their slightly unfortunate 1-0 defeat to Liverpool on Monday. The only change he made to that side was bringing in Frederico Fernandez, who returned to the club after flying back to Argentina for personal reasons, for Jordi Amat in the center of defense.
Tim Sherwood opted for a flat 4-4-2 with Gabriel Agbonlahor partnering Christian Benteke up front and Tom Cleverley playing alongside Fabian Delph in midfield. Cleverley went off with an injury and was replaced with Carlos Sanchez in the 25th minute and Villa kept the same shape.
With the diamond 4-4-2 versus flat 4-4-2 the teams had clear numerical advantages in different areas of the pitch. Swansea enjoyed a 4 versus 2 advantage in the middle of midfield, giving them the impetus to control possession and overload Aston Villa through the center of the pitch. Aston Villa enjoyed a 2 v. 1 advantage in the channels, meaning they had opportunities to overload the Swansea fullbacks with overlapping runs and get balls into the box from wide areas. This game had three distinct tactical phases: in the first phase Swansea's advantage in midfield won out and they overran Villa in that zone, creating several good chances that they failed to conver; in the second phase Villa disrupted Swansea's rhythm and looked the more dangerous side attacking through the channels where they had the numerical advantage; in the third phase Monk switched to a 4-2-3-1, nullifying Villa's dangerous overlapping fullback runs and creating a threat through Jefferson Montero down the left.
Phase 1: Swansea use 4 v. 2 advantage in midfield to control possession
Just as they did in their defeat to Liverpool, Swansea controlled possession and had the better of play in the first half. Villa looked to press the two deepest lying Swansea center midfielders, Jack Cork and either Ki or Jonjo Shelvey and played a high line to to mitigate the space between the midfield and back four where Gylfi Siggurdsson was playing. However, with the 4 v. 2 advantage in the middle, Swansea were able to comfortably play through the press, get players on the ball in behind Delph and Cleverley then look for passes in behind Villa's extremely high defensive line. Within the opening 10 minutes Swansea were fractionally offside twice but it looked like only a matter of time before they'd exploit Villa's loose midfield and risky high line.
With Delph and Cleverley overloaded in midfield, Charlez N'Zogbia and Scott Sinclair were forced to tuck inside from their wide midfield positions to offer defensive help in central zones. This created loads of space down the channels for Swansea's overlapping fullbacks Neil Taylor and Kyle naughton to get forward. In the sixth minute Shelvey and Taylor played an excellent 1-2 down the left channel that resulted in Taylor getting to the byline and cutting back for Gomis 8 yards from goal. Gomis put his shot straight at Brad Guzan but the buildup from Swansea was excellent. Unfortunately for Monk, good build first half build up play but wasteful finishing has become a theme the last two games. Gomis looked to be struggling for confidence. While he uses his strength well in the build up and works hard, the fluid 4-4-2 system has created a number of chances for him that he hasn't taken well enough. It's difficult not to speculate whether the Liverpool result may have been different if Wilfried Bony were still at the club. Hopefully Gomis' winner will provide him with a boost of confidence. He's shown in France he has the ability to be a prolific striker. Under this diamond 4-4-2 he'll likely continue to get plenty of chances.
Phase 2: Villa dangerous down the flanks
As good as Swansea have been in the first halves of their last two fixtures, there's been a worrying trend both that they haven't converted that dominance into goals and that they haven't maintained the dominance into the second half. Out of the gates from the second half Villa looked the more energetic side. They disrupted the rhythm Swansea had in the first half, breaking up play in midfield better and limiting Swansea's space. Monk's side defended with a narrow midfield three of Cork, Shelvey and Ki. Sigurdsson dropped in just in front of them to pick up Villa's deepest center midfielder or an advancing center back while Routledge and Gomis stayed higher up the pitch. This meant Swansea were defending quite narrow in midfield and that there was no one to track the Villa fullbacks when they advanced forward. The Swansea fullbacks were therefore overloaded 2 v. 1 in the channels- they were occupied by both the Villa wingers and fullbacks. Villa began to take advantage of these 2 v. 1's in the channels by getting the fullbacks forward and having them overlap the wingers. They were able to get towards the byline and hit dangerous balls in from wide areas. This was a real threat given they had a dominate physical presence in Benteke to aim at in the box.
In the 57th left back Alan Hutton overlapped Sinclair down the left and played a driven cross into Benteke. He was able to use his strength to hold off a defender and knock the ball down for Agbonlahor. His effort was blocked well by Taylor but the move illustrated where Villa were their most dangerous.
Swansea go 4-2-3-1
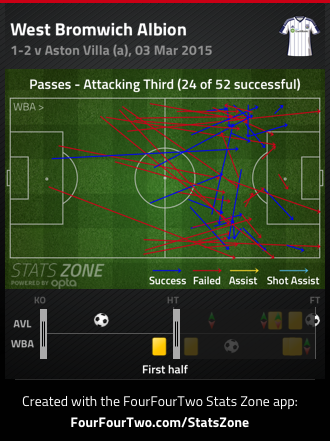
After about a 20 minute spell of Villa creating good chances down the channels, Monk made a substitution in the 64th minute introducing Montero for Sigurdsson. Montero played wide on the left, Routledge moved to a right attacking midfield position, Shelvey moved forward into a #10 role and Swansea played a 4-2-3-1. They defended in banks, Montero and Routledge tracked the runs of the Villa fullbacks and mitigated the danger Sherwood's side had posed in the channels. The game became tighter, neither side really created any great chances. Montero posed the biggest threat for Swansea, his quickness on the ball caused problems for Leandro Bacuna, a center back playing out of position at right back.
Monk made a substitution that proved the deciding factor in the 85th minute, bringing on Nathan Dyer for Shelvey. Dyer played wide right and Routledge moved back inside to the #10 role. Two minutes after the change Routledge collected the ball in the middle of midfield and played a clever outside of the right foot pass to Montero in space down the left in behind Bacuna. Montero played an incredible first time pass with the outside of his right foot across the face of goal for Gomis to slide home after using great strength to hold off Ciaran Clark. Monk's personnel and tactical changes had paid off. The change in shape to 4-2-3-1 had stifled Villa as they were on the ascendency and the introduction of Montero on the left proved a game changer.
Conclusion
Tim Sherwood was accused at times of being tactically naive last season at Spurs. Those accusations were often leveled when Sherwood played an open 4-4-2 that left his side too open and outnumbered in midfield. His decision to play a flat 4-4-2 against a side he knew would likely play a midfield diamond seemed a strange one given how Sherwood chose to have the team defend. Rather than operating in deeper banks of four, they pressed with Cleverley and Delph in midfield and played a high line. This left gaps of space for Swansea to to easily move into and collect possession, where they could play dangerous passes in behind the Villa high line. That the score remained level at halftime was a product of Swansea's inability to finish- Villa were fortunate not be trailing.
They improved in the second half and were more compact defensively. However, Sherwood maintained the same shape and tactics throughout, whether his side were being outplayed or on the ascendency.
Monk on the other hand reacted to changes in how the contest was taking shape. When his side lost their first half dominance and were being dominated in the channels, he changed to a shape with wide midfielders to give his fullbacks defensive cover in the channels.
This was a fluid and enjoyable contest between two sides playing decent football. Monk will be slightly concerned his side's dominance of late hasn't been translated into enough goals, Sherwood will feel Villa missed a chance to get vital home points in their battle for safety but both managers can take positives from today's match.