Positives from defeat: Villa's compact defense and high line frustrated Chelsea

Despite losing 2-1 to Chelsea, Paul Lambert will take pride in another excellent Aston Villa performance this evening in a contest his side deserved a point from. Three crucial decisions from referee Kevin Friend went against Villa. With the score at 1-1, Branislav Ivanovic could have been sent off for an arm into the head of Christian Benteke. Moments later a powerful Ivanovic header from a Lampard free kick stood despite replays showing the Serbian defender was a fraction offside. In stoppage time a Villa header struck John Terry's hand which was in an unnatural position above his head.

Still, as gutted as Lambert will be about the unlucky defeat, he'll be able to draw on another overwhelmingly positive performance away to a top four side. He should be particularly pleased with his team's performance on the defensive side of the ball. Last season Villa finished with the third worst defensive record behind relegated clubs Wigan and Reading. They were famously beaten 8-0 in this fixture last season during a week that also saw them lose 4-0 to Spurs and 3-0 to Wigan. Although they've conceded in both of their first two games this campaign, the defense looks far less porous and allows them a platform on which to spring their explosive counterattacks.

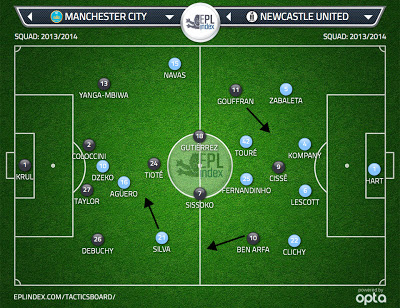
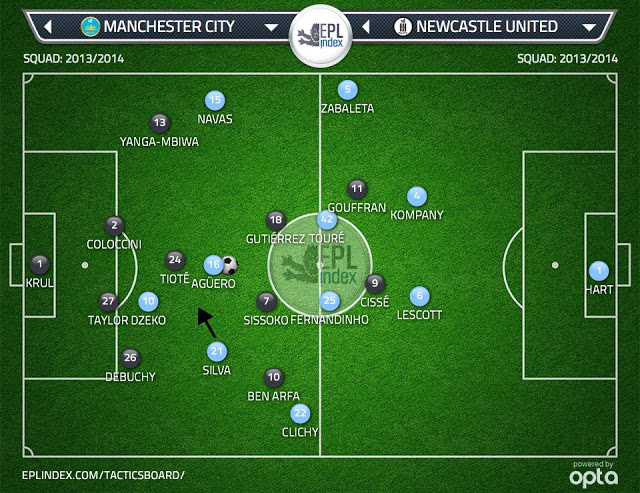
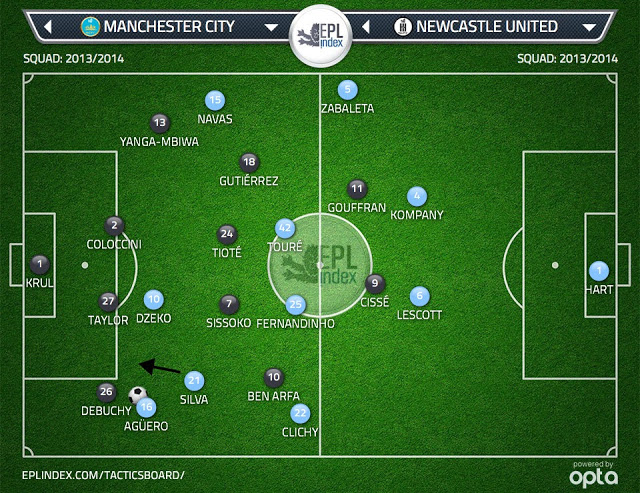
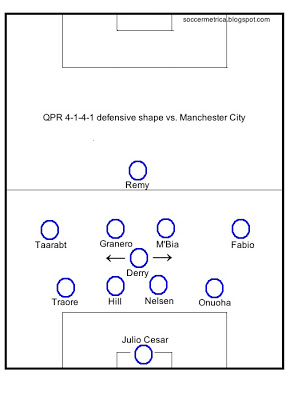
Villa's solid defensive performance owed to their excellent team shape. They lined up in the same 4-3-3 formation used in the win over Arsenal. Defensively, it turned into a 4-1-4-1. Gabriel Agbonlahor, Fabian Delph, Karim El Ahmady and Andy Weimann formed a midfield bank of four with Ashley Westwood sitting in the middle of the park just in behind Delph and El Ahmady to form a central midfield triangle. That triangle moved as a unit and stayed very compact, taking away forward passing lanes for Chelsea. When the ball was played to Ramires on the right side of Chelsea's center midfield, Delph would apply token pressure and El Ahmady would drop in closer to Westwood on the weak side. When it was reversed to Lampard on the left, El Ahmady would step to ball and Delph would drop in on the weak side. This defensive movement did two very positive things for Villa. First, the token ball pressure meant Lampard and Ramires could freely play the ball horizontally to one another but didn't have the option to pick out a forward pass with a defender stepping directly to them. Secondly, Westwood, Delph and El Ahmady staying so compact ensured Villa had enough bodies in the middle of the park to block off passing lanes to Oscar sitting in the middle behind the striker and Mata and Hazard cutting inside. Chelsea play with three extremely fluid attacking midfielders that all like to drift inside and overload the middle of the park so the presence of three compact center midfielders made space difficult for the likes of Hazard, Mata and Oscar to find.

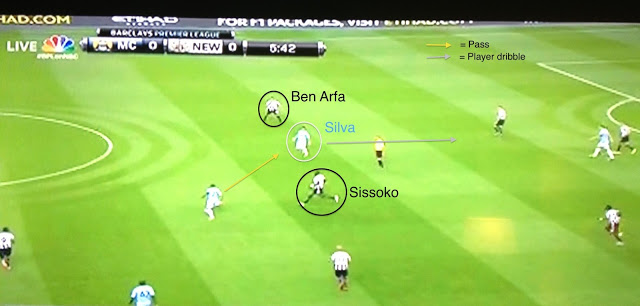
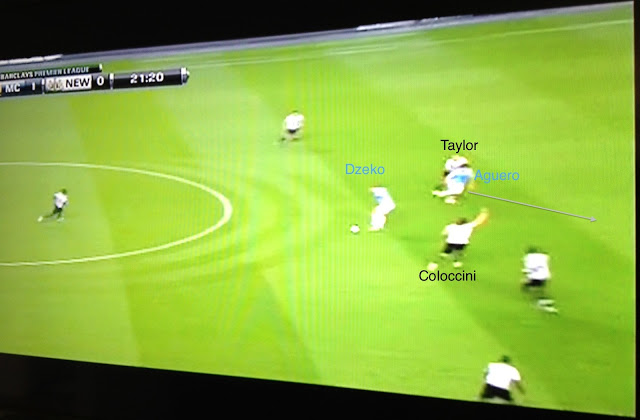
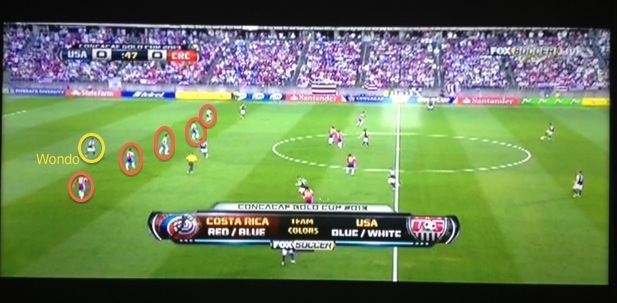
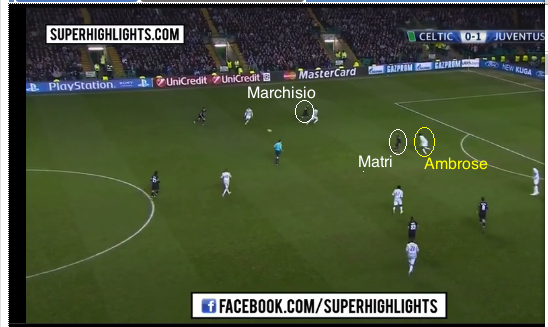
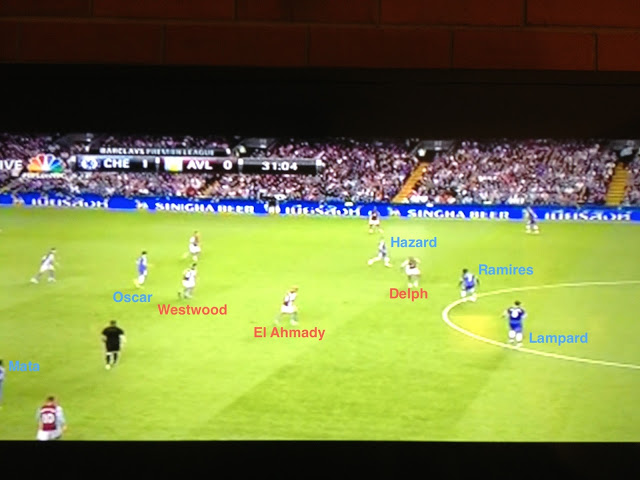
The screenshot below shows a good example of Villa's movement. Ramires is in possession for Chelsea. Delph applies token pressure to Ramires, simultaneously taking away the passing lane to Hazard. El Ahmady is in position to cut out any pass aimed at Mata cutting in from the left. Westwood is denying any pass forward into Oscar. Ramires ends up on the ball for a full 6 seconds looking for a forward passing option. One never opens up and he's forced to play a square pass to Lampard.


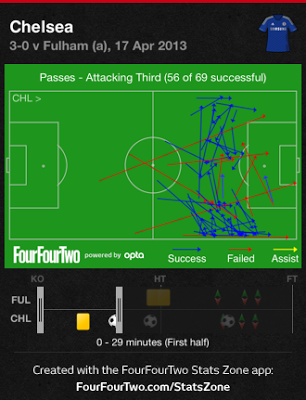
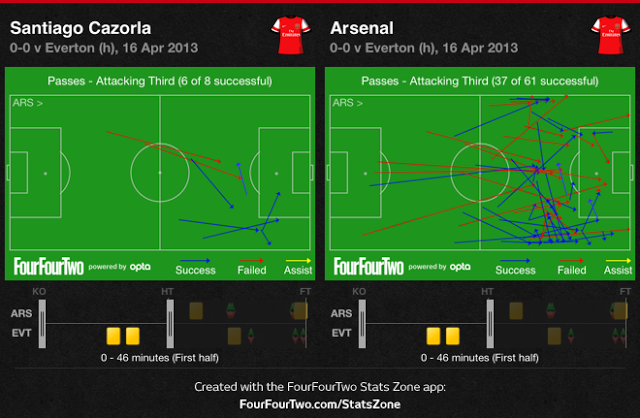
Hull City also played a 4-3-3 in their 2-0 defeat to Chelsea Saturday but it took a very different shape defensively and led to Steve Bruce's side being completely overrun. Unlike Lambert, Bruce had his two box-to-box midfielders Robbie Brady and Robert Koren both press Ramires and Lampard high up the field, leaving much more space between those two and the holding midfielder David Meyler. With Hazard tucking in from the left, Kevin de Bruyne tucking inside from the right and Oscar all occupying central areas high up the pitch, Meyler was overwhelmed and Chelsea controlled possession high up the pitch in dangerous areas. In the first half against Hull, Chelsea completed 81 passes in the attacking third. In the first half tonight against Villa they manged just 46.

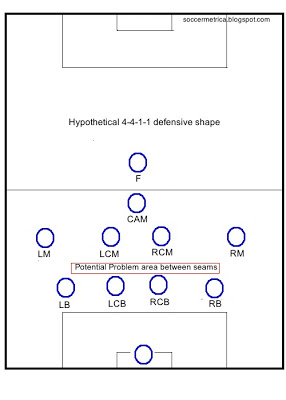
Along with sharp defensive movement from the midfield, Villa also kept space very compact by holding a high defensive line and pressing relentlessly when Chelsea advanced the ball past the midfield line. As a result, Mourinho's side had very little space between the seams to operate and were therefore left to try to hit long balls over the top to Demba Ba. This evening Chelsea played 64 long balls and were caught offside 5 times compared to just 46 long balls against Hull and one offsides.

In Weimann, Agbonlahor and Benteke Villa have three explosive attackers capable of getting at opposition defenders on the break. Agbonlahor and Benteke combined for the first goal. Benteke and Weimann would have combined for two others were it not for some brilliant goalkeeping from Petr Cech. If Lambert's side can continue to keep things tight defensively, Villa will be a very difficult team to beat.

Tactical Analysis: Manchester City 4-0 Newcastle

Manchester City scored twice in each half to run out comfortable 4-0 winners over Newcastle in an impressive performance at the Etihad. David Silva and Sergio Aguero each found the net before Newcastle’s Steven Taylor was sent off just before halftime for a forearm swing into the back of Aguero. Yaya Toure added a sublime freekick early in the second half and substitute Samir Nasri closed out the scoring in the 75th.

There were three major tactical features of the game: David Silva’s ability to create overloads and find gaps coming inside from the left, the refreshing width provided by Jesus Navas on the right flank, and the partnership and clever movement of Aguero and Edin Dzeko.

Lineups:
Manuel Pelligrini set his side out in a similar 4-2-2-2 formation to the one typically used by Roberto Mancini, the man he replaced. Clichy, Lescott, Kompany and Zabaleta made up the back four. Toure and new signing Fernandinho made up the center midfield, occupying the space in front of the back four. David Silva frequently tucked inside from a starting position on the left, as he did under Mancini, while Jesus Navas stayed wide on the right to provide width. Aguero and Dzeko were given starts up top over newcomers Stevan Jovetic and Alvaro Negredo.

Newcastle did not include French midfielder Johan Cabaye in the squad after Arsenal had a £10 million bid rejected for him earlier in the day. They lined up in something of a hybrid 4-3-3/4-4-2. The midfield three was made up of Jonas Gutierrez, Cheick Tiote and Moussa Sissoko. Hatem Ben Arfa started on the right of a front three. Yoan Gouffran was on the left with Papiss Cisse as the main striker. In possession Ben Arfa would frequently drop deep on the right flank while Gutierrez would drift wider to the left. Gouffran would tuck inside close to Cisse making the shape more of a 4-4-2. Defensively they formed two banks of four with Ben Arfa dropping in alongside the midfield three and Cisse and Gouffran staying higher up the pitch. 

Click for larger image

David Silva’s Movement:
David Silva’s movement is always a handful for opposing defenses. He’s tremendous at reading the runs of his fellow attackers, finding space between the seams and creating overloads for opposition defenders. For instance, when Aguero drops into midfield and is picked up by the opposition holding midfielder, Silva will drift infield alongside Aguero to create a 1 v. 2 situation for the holding midfielder to defend (Figure 1). When Aguero drifts wide and is picked up by the opposing left back, Silva will tuck just inside and create 1 v. 2 situations for the left back (figure 2). 

Figure 1

Figure 2
He’ll also drift into the space between the opposition right-sided center midfielder and right midfielder/forward, where he can collect passes from the two deeper lying midfielders and have the space to run at the defense. He was incredibly dangerous in this space last night, collecting possession from Fernandinho in the gap between Sissoko and Ben Arfa. City’s opener came from this type of movement. The image below shows Silva tucking inside of Ben Arfa where he’s able to receive a pass from Fernandinho and has the space to turn and dribble at the defense. He releases a pass to Dzeko on the left side of the box whose deflected pass across the face of goal falls for Silva to head home.  Identical movement from Silva in the 29th allowed him to release Dzeko through on goal again but the Bosnian striker was unable to finish. 


Navas provides width:
For much of last season Maninci employed Samir Nasri on the right. Like Silva, Nasri enjoys tucking infield from wide areas. When the two played together City could often therefore become a bit narrow. In Jesus Navas, Pelligrini has a true right-sided winger capable of providing width and stretching the defense laterally. This gives City a bit more balance going forward- they can through the middle with Silva tucking inside or down the wing with Navas hugging the touchline. The graphics below compare where Silva and Navas received passes yesterday. Nearly every pass Navas received was down the right channel whereas Silva moved freely around the pitch to create overloads. Navas had a shaky start but was excellent in the second half, combining well with Zabaleta and whipping in some dangerous crosses.

Click for larger image

Movement of Aguero and Dzeko:
The final major defining feature of this game was the partnership between Aguero and Dzeko. When playing with two forwards it is obviously important both understand the off-ball movement of one another. One of the major strengths of a two forward system is that against a team playing four at the back, both opposition center backs have to pick up a forward so neither is left free to provide cover.

One way teams using two forwards like to take advantage of the lack of a spare center back for the opposition is to put both forwards on the shoulder of each of the center backs. One forward then checks into midfield, drawing one of the center backs with him. The other forward will then make a diagonal run into the space that becomes available. The figure below shows an example. Here, Dzeko checks into midfield for the ball, forcing Coloccini to step out of line with the rest of the back four to close him down. This opens up space in behind for Aguero to make a diagonal run into. 


In fact, the example illustrates the forward movement City used to score their second goal. Dzeko checked into midfield for a pass from Kompany, forcing Coloccini to follow him. Rather than step forward to force Aguero into an offside position, Taylor follows his diagonal run in behind but doesn’t have the pace to keep. Dzeko provides a clever flick and Aguero is one on one with Krul to tuck it home. Below you can see a screenshot of the buildup. Coloccini steps out to Dzeko just as Aguero begins his diagonal run in behind.


Although Dzeko was guilty several times of wasting his own goal scoring chances, his movement with Aguero was clever and he deserves credit for setting up the first two goals and generally stretching Taylor and Coloccini around the field in the first half. 

Conclusion:
Pellegrini will be pleased with what was a dominant performance in all facets. I didn't discuss it in any detail above but Fernandinho and Toure formed a powerful and formidable midfield pairing capable of both breaking up attacks from the opposition and springing into the attacking third to offer extra options. Fernandinho completed the second most passes in the attacking third of any player behind Silva. 

Tacticially it wasn't an especially different look from Pellegrini although the inclusion of Navas added width City frequently lacked last season. 

It's difficult to judge Alan Pardew's side after such a difficult opening fixture in which they played half of it with ten men. They have plenty of power in midfield but were desperately missing the technical ability of Cabaye and could struggle to break teams down if he ends up departing for Arsenal. Ben Arfa looked to be the only player capable of providing any creativity in a lineup full of strength and power. 

USA 1-0 Costa Rica: CR 5 man defense frustrates US but provides little going forward


A well-executed counter-attacking goal from a Costa Rica corner allowed the USA to run out group C winners in the Gold Cup in what was a cautiously played and uneventful game. 

Tactically, the game was defined by the Central American side’s rather unusual use of a flat back 5 playing an aggressively high line and thereby making the middle of the field very compact for the US. From a defensive standpoint the strategy worked well but fielding a five man defense was a strange decision from Costa Rica manager Jorge Luis Pinto. His team had already clinched a top two berth in the group no matter how severe a loss they may have suffered and only a win would have won them the group. I expected his strategy to therefore be a bit more adventurous. His side may have frustrated the US defensively but they created only one meaningful chance of their own.

Costa Rica defends 5-4-1
Costa Rica played a flat five man defense behind a midfield bank of four with Jairo Arrieta as the lone striker up top. When the US had possession in their own defensive third, the Costa Rica midfield four would drop off towards the halfway line and the back five would step forward towards the bottom of the center circle. As a result their defense was quite compact and the US had very little space between the lines to collect the ball and run at the defense. As the US advanced the ball towards the center circle, Costa Rica put high pressure on the ball- particularly on holding midfielders Stu Holden and Mix Diskerud and fullbacks Michael Parkhurst and DeMarcus Beasley- making it difficult for them to find the time to pick out forward passes.  The image below shows just how compact the Costa Rican defense was and how little space the US had in the middle of the park. 


Playing a high line worked particularly well for Costa Rica given Jurgen Klinsmann’s decision to start Chris Wondolowski at center forward. Wondolowski’s strengths are as a poacher inside the penalty area. He’s not a gifted passer capable of dropping off the defense and providing neat link up play in tight spaces with midfielders nor does he have the pace to be dangerous on balls played over the top in behind a high back line.  By playing such a high line, Costa Rica was taking him 30 yards away from the penalty area where he is most dangerous.  In the image above you can see him 40-45 yards from goal surrounded by two defenders. In the image below, taken in the first minute, he’s in an offside position taken completely out of play by the high, flat line. He was ultimately subbed off in the 77th minute, goalless for the first time in three games and looking a visibly frustrated figure.


With Costa Rica’s back line positioning itself 40 yards from goal, the space for the US was in behind the back line rather than in midfield. Klinsmann could possibly have used a pacier striker to stay on the shoulder of the center backs but to do so requires a deeper lying player that can accurately hit those balls over the top of the defense (see Andrea Pirlo and Mario Balotelli operate for Italy against an opponent with a high line). For all of their strengths circulating possession, I’m not sure Diskerud and Holden have the ability to consistently hit those diagonal long balls accurately.

Costa Rica Attack
With their emphasis on a high defensive line and midfield pressing, Costa’s Rica’s attacking strategy was to win the ball in midfield and break forward quickly before the US had time to recover defensively. At times in the first half the strategy looked dangerous. The clip below shows what Los Ticos were looking to do- they press well to win the ball at the halfway line then play two quick vertical passes looking to get behind the US defense. However, the move lacked a quality final ball and highlights Costa Rica’s struggles in the final third all game. US center backs Clarence Goodson and Michael Orozco deserve credit as well as I thought their positioning was decent throughout. 


In the second half Costa Rica tired and their pressing grew less intense. They dropped deeper defensively, won fewer balls in midfield and allowed the US to control possession. As a result, Arrieta was left isolated up top. Costa Rica created little and the US defense looked comfortable. Los Ticos’ only real chance on goal in the second half was a header off of a corner kick that rattled the crossbar (initially it looked like Sean Johnson had made a wonderful save but after watching the replay I think it went straight off the bar). From that corner the US was able to find the space to counter and get the winner (a game of inches). Second half substitute Joe Corona played an excellent outlet pass down the right flank to Donovan who played an even better one-touch crossfield through ball for Brek Shea (also a second half sub) to tuck home.

Conclusion
In the end it was a professional, if not overwhelmingly impressive performance from the US. Costa Rica’s five man high back line frustrated Klinsmann’s side in midfield but also left Arrieta isolated up front as the game wore on and didn’t provide them with the necessary firepower going forward to get the win they needed to clinch first place in the group.

Brazil's press prevents Japan from countering

Brazil cruised to a 3-0 win over Japan in the opening game of the Confederations Cup in Brasilia. Neymar opened the scoring just 3 minutes in with a sensational volley from a Fred knockdown. Paulinho secured the 3 points early on the second half with Brazil's second and Oscar teed up Jo for a third with the last kick of the game.

Unsurprisingly, Japan were set up to counter defending with two banks of four then looking to play outlet passes in behind the Brazil midfield to spark counters. The most impressive aspect of Brazil's performance was their ability to immediately press the ball when they lost possession high up the pitch and break up counters before they even started.

In possession Brazil's two fullbacks Marcelo and Dani Alves would push forward to provide width. Luis Gustavo would drop in between center backs David Luiz and Thiago Silva to form a back three, similar to the way Sergio Busquets plays at Barcelona. Had Japan been able to find quick outlet passes in behind the Brazil midfield, Brazil's center backs and Luis Gustavo would have been stretched at the back. However, the attacking midfielders and fullbacks did a fantastic job closing down the ball and making tactical fouls when necessary to prevent the counter attack.

On the rare occasions Brazil Japan were able to break quickly in behind the Brazil midfield, Thiago Silva and David Luiz were able to use their quickness and athleticism to slow them down. Brazil will get numbers forward and play high up the pitch so the athleticism of their center backs will be crucial in ensuring the opposition doesn't get in behind them on the break.

Tactical Analysis: Bayern Munich 4-0 Barcelona

Bayern Munich stunned Barcelona with a memorable 4-0 win in a dominant performance at the Allianz Arena that leaves the Bavarian side with one foot in the Champions League final. That Barca ended the game with as many attempts as Bayern had goals is an indicator of just how much Jupp Heynckes' side controlled proceedings.

Bayern (4-2-3-1): Lahm, Boateng, Dante, Alaba
                             Javi Martinez, Schweinsteiger
                                  Robben, Muller, Ribery
                                               Gomez

Barcelona (4-3-3): Dani Alves, Bartra, Pique, Alba
                                               Busquets
                                            Xavi, Iniesta
                                     Pedro, Messi, Sanchez

Prior to the match, Barcelona's official website had posted that the team had reached 300 consecutive games in which they had over 50% possession. Much had been made about whether Bayern, second in Europe behind Barca in terms of possession per game, would try to compete in midfield, press high up the field and possess the ball.

As it turned out, they took a more reactive approach, allowing Barca to have possession in their own half, then pressing the ball relentlessly when it crossed the midfield line. In his analysis for ESPN following the game, Robbie Mustoe commented on how compact Bayern were from front to back, preventing the likes of Messi and Iniesta from finding the pockets of space between the seams where they operate so effectively. He was spot on- this was the key tactical feature of the game.

Bayern defended in two banks of four with Tomas Muller and Mario Gomez playing higher up the field and applying pressure to Barca's center backs and deepest midfielder Sergio Busquets. Any time Xavi Hernandez or Andres Iniesta would drop in front of Bayern's midfield four to collect the ball, one Bayern midfielder would immediately step out and apply intense pressure on the ball. Typically Bastian Schweinsteiger performed this role while Javi Martinez stayed deeper to check runs from Messi and Iniesta into the gaps. The pressure meant Xavi and Iniesta were unable to turn and enjoy the time on the ball to pick out a penetrating pass forward.

In order to keep the space Barca had to operate in compact, the Bayern defense played a high line. Often the space between the back four and midfield four was no more than 10 yards. Messi is at his most dangerous when he's able to collect the ball in the space between the opposition center backs and center midfielders and turn and dribble. However, Bayern's high line meant these spaces weren't available for him. When he dropped off Boateng and Dante and drifted into midfield, generally Javi Martinez was there to deny the entry pass into his feet. The high line likely explains Bayern's decision to start Jerome Boateng alongside Dante at center back rather than Daniel Van Buyten. Boateng is quicker and therefore more able to recover defensively when balls are played in behind the back four.

Bayern's back four was never really made to sweat their high line because of Barca's formation. With Messi operating as a false 9 and drifting back into midfield, the Catalans never really offered a threat behind Bayern's back four. Often without a direct opponent to defend, Dante and Boateng were able to sit in, see Barca's attacks developing in front of them and react accordingly by stepping into passing lanes. The inclusion of David Villa at center forward would have given Barca a vertical threat and forced the Bayern center backs into more difficult decisions regarding their positioning. Messi could have then played a very narrow position on the right. Barca used that formation against in their second leg demolition of AC Milan and it caused Milan center back Philippe Mexes all sorts of troubles. He was continually forced into deciding whether to leave Villa and step to Messi or allow Messi to get on the ball and dribble.

In attack, Bayern looked to counter quickly into the channels when they retained possession. With Alba and Dani Alves pushing forward to provide width in attack for Barcelona, there was space in behind them on the wings for Bayern to play quick outlet passes into. Muller did an excellent job drifting into these wide areas from his center attacking midfield position to spring counters. Ribery and Robben would also look to dart in behind the Barca fullbacks on the break. Bayern also looked to exploit their aerial superiority by getting crosses into the back post from set pieces and open play. Their first two goals both came from winning an initial ball at the back post and knocking it back across the middle for easy finishes.

Jupp Heynckes is deserving of a great deal of credit for this dominant performance. He showed his tactical flexibility, conceding possession to Barca and adopting a counterattacking style Bayern have rarely played this season. In so doing he has all but assured his side will be playing in their second consecutive Champions League final.

Tactical Analysis: Chelsea 3-0 Fulham

Chelsea cruised to a comfortable 3-0 over a tame Fulham side at Craven Cottage to overtake Arsenal for third place. David Luiz opened the scoring with a blistering effort from 40 yards out in the 30th minute before John Terry scored with his head either side of halftime. It was an efficient performance from the away side, if not an especially mesmerizing one.

Chelsea lined up with Ivanovic, Luiz, Terry and Bertrand across the back four in the Blues' 4-2-3-1. Lampard and Ramires occupied the holding roles while Mata played in his normal central attacking midfield position. Hazard and Moses played on the flanks.

Fulham played a 4-4-1. Reither, Senderos, Hangeland and Riise made up the back four. Enoh and Karagounis played in the middle of midfield with Bryan Ruiz on the right wing and Emanuelson on the left. Berbatov played in the hole off of center forward Petric.

The Blues struggled to carve out any meaningful possession in the attacking third in the opening half hour. Fulham defended in two deep banks of four with Berbatov just in front of the midfield four applying pressure to either Ramires or Lampard, depending on who dropped deepest. Fulham's deep, compact shape made it difficult for the likes of Mata, Hazard and Torres to find space between the seams. As a result Chelsea completed plenty of passes in the final third in the first 30 minutes (more than half the passes they completed in the final third occurred in the opening half hour) but they were balls played horizontally in front of the Fulham defense that weren't especially dangerous.


With Chelsea struggling to find gaps in the Cottagers' defense, the home side would have been happy to take their chances allowing Luiz to shoot speculatively from 40 yards out. However, they were made to pay for their deep defending. With Berbatov picking up Chelsea's deepest midfielder, Petric was left to defend Terry and Luiz 1 v. 2. This allowed the Brazilian to advance into Chelsea's attacking half with time and space on the ball. On 30 minutes he took advantage, collecting a pass from Eden Hazard before unleashing an absolute pile driver into the top corner. Had Fulham defended higher up the pitch he wouldn't have been in a position to take the shot. Of course, defending higher may have also led to the more frightening situations of Chelsea finding space between the lines or in behind the back four.

Chelsea doubled their lead 13 minutes later through John Terry. The Blues' captain had stayed up after Fulham failed to fully clear the danger from a Chelsea corner. The ball ultimately came to Mata on the left sideline and the Spaniard whipped in a perfect cross for Terry to nod home at the back post. The defending from Fulham was poor. Terry was able to slip between Reither and Senderos at the back post. Senderos perhaps could have done more to win the header but he wasn't helped by his right back who should have done better to track the run. Chelsea were in a comfortable 2-0 position without ever really getting out of first gear in the opening half.

Offensively for Fulham, Berbatov looked for space in between the Chelsea lines but for the most part Lampard and Ramires did a good job tracking his movement and denying passes into his feet. As a result he began to drop into deeper areas to get on the ball and the gap between Petric and the rest of the Fulham squad became bigger.

Commentator Ian Wright criticized Petric throughout the match for not making the proper runs back towards the ball but I disagreed. Had Petric continually checked back into midfield for the ball Fulham would have lacked any type of threat behind the Chelsea back four. By staying on the shoulders of Chelsea's center backs, Petric was looking to stretch the opposition and create space in the gaps for Berbatov. Had he continually checked back into midfield for the ball he would have been moving into the same spaces Berbatov was trying to occupy and Fulham would have lacked any threat of a ball played behind the Chelsea defense. The Blues tend to be comfortable defending when they're able to keep everything in front of them. They have much more trouble with balls played in behind.

Fulham's problem going forward seemed to be an inability to get enough players around the ball in the attacking third to create dangerous passing sequences. They were disjointed in the final third and lacked the movement and final ball to break down Chelsea.

In the end it wasn't a particularly exciting match. Fulham never looked like mounting a comeback and with the game secured Chelsea were happy to cruise away with three valuable points


Tactical Analysis (Brief): Arsenal 0-0 Everton

 Arsenal and Everton drew 0-0 at the Emirates this evening, a result that likely wouldn't satisfy either side as they chase a top four finish.

Although the game was lively and entertaining, it wasn't particularly interesting from a tactical perspective. Both sides have consistent systems they rarely stray away from and that was the case today.

Everton played their usual 4-4-1-1 formation. Leon Osman missed out for the first time in the league this season with an injury. He was replaced in the lineup by Ross Barkley who played in the advanced midfield role normally occupied by Marouane Fellani. Fellaini dropped in alongside Darron Gibson in a deeper midfield role- a spot he has stated he is most comfortable playing.

Arsenal made two changes to the side that beat Norwich 3-1 at the weekend. Theo Walcott replaced Gervinho on the right flank and Vermaelen was dropped for Per Mertesacker. Jack Wilshere played in his usual position off the center forward while Santi Cazorla was used on the left.

The opening half was a chippy one and neither side really developed any sort of offensive rhythm, evidenced by the fact we didn't see a shot on goal until Barkley's forced Wojech Szczesny into a save in the 39th minute.

Everton defended in two banks of four with Barkley and Anichebe staying higher up the pitch. Barkley looked to deny passes from Arsenal's center backs into Arteta, forcing Ramsey to also drop into deep areas to provide Koscielny and Mertesacker with a pass forward. When Ramsey received passes in front of the Everton midfield four, Fellaini would quickly step out and pressure him, forcing him into quick decisions.

Arsenal's attacking midfield three was quite fluid, as is often the case when Cazorla and Wilshere are in the same lineup. Both players often drifted to the right side of the field looking to create overloads for Leon Osman and Steven Peinaar. The graphic below of Arsenal's first half passes in the attacking third shows how focused their attack was down the right side in the first half. The graphic also shows Cazorla's attacking third passes in the first half. The number of those passes that occurred on the right side of the pitch is surprising for a player lining up as a left midfielder.


The game opened up a bit in the second half and Arsenal were the more dangerous of the two sides. The mostly ineffective Wilshere was replaced by Alex Oxlade-Chamberlain and Walcott was replaced by Lukas Podolski on 68 minutes. Cazorla moved into the middle with Podolski to his left and Oxlade-Chamberlain to his right. The Spaniard tends to be much more effective playing through the middle where he has fewer defensive responsibilities and can get on the ball more often between the seams. The personnel change and shift in positions nearly had an immediate impact. On 78 minutes Podolski recovered possession deep in Arsenal's defensive third and played a smart outlet ball to Cazorla who had drifted into a dangerous area behind the Everton midfielders to spring an Arsenal counter. Cazorla found Oxlade-Chamberlain breaking down the right edge of the penalty area unmarked. Oxlade-Chamberlain could have taken a shot himself but instead opted to slip the ball across the six for Giroud. The ball was played behind the French forward however and ended up in Tim Howard's grateful hands.

Although Fellaini unsurprisingly didn't have the same offensive impact we're use to seeing when he plays in the #10 role, he was excellent occupying a defensive midfield position and was arguably the game's best player. He was consistently perfectly positioned to slow down Arsenal counter attacks and did a fine job both tracking bursts forward from Ramsey and providing cover on the right side where Arsenal continually looked to attack. He had 6 successful tackles, more than any other player in the game, and 4 interceptions, the third most of any player. He also completed more passes than any Everton player with 51.

Klinsmann must convey clear tactical plan to inexperienced US side

After Brian Strauss reported Monday in Sporting News that certain anonymous members of the US Men's National Team had called into question Jurgen Klinsmann's leadership and coaching methods, the buildup to this evening's World Cup qualifier has commenced with a rather ominous sense of doubt among the American soccer community.

Since then, recently named captain Clint Dempsey and national team veteran Michael Bradley have both spoken out against players speaking to the media anonymously about internal team issues. Both have described the situation as "embarrassing" but are looking to move past it and have been adamant the reports shouldn't have a negative impact on the team's performance.

Bradley told ESPN's Roger Bennett, "To win big games we simply need as many guys to have big games as possible. Injuries, articles, who's here, who's not... at 8 o'clock tomorrow none of that counts."

It's an attitude I'm sure every player that steps on the field for the US tonight will share. Commitment and pride in the shirt are never things you feel you have to worry about with a US side.

What's concerning to me though is the alleged frustration of the players who spoke with Strauss at the lack of tactical preparedness of the side going into games. Strauss reported that one player told him, "(Klinsmann) just threw guys out there and played." Another player (or possibly the same player- again, we have no names) said, "(Klinsmann) didn't really say how we were going to play."

It's important to note that we don't know if these statements are representative of how a majority of the team feels or are just the frustrations of a lone player or two. But based on how disjointed the team looked in San Pedro Sula, it's not out of the question to believe we really are going into qualifiers without a clear understanding of how we will play.

It was maddeningly frustrating watching our front three of Dempsey, Jozy Altidore and Eddie Johnson sort of half press the Honduras back four while the midfield three sat deeper, allowing acres of space between the two lines of three for Honduras to comfortably play the ball in to. It all suggested a team not on the same wavelength.

With the number of inexperienced players expected to feature this evening, particularly in the back four, it's absolutely imperative the US has a well thought out tactical plan and that every player knows his individual role. With the US's six listed defenders totaling only 12 qualifying caps between them, organization and team shape will be vital if we're to emerge with three points.

Notes:
Despite the discontent felt by factions of US supporters over the current form of the national team, we have an amazingly supportive fan base and need not fear our own supporters turning on the team at any point in tonight's game. The atmosphere will be terrific and should give our young side a major psychological boost. 

Prediction
I'm generally a horribly pessimistic fan but I just have a feeling the team is going to use all the negativity surrounding it at the moment as an opportunity to come together and make a big, positive statement tonight. The new guys will make the most of their chance, the veterans will provide the needed leadership. 3-1 US!

Three at the back for City wrong decision against Everton

I tweeted Saturday during Everton's 2-0 win over Man City how surprised I was Roberto Mancini opted for a narrow 3-4-2-1 formation against an Everton side that attacks primarily down the wings and wanted to mention it here.

Plenty has already been written about Mancini's decision- Richard Jolly wrote an interesting piece on it at Soccernet- so I'll be brief.

Mancini has experimented with three at the back on a few occasions this year with little success. This is a formation primarily used by Italian sides in modern football so it's not a huge surprise City's Italian manager would look to use the formation from time to time.

Three at the back tends to be best suited for when the opposition is playing with two forwards. Two of the center backs can stick tight with the opposition forwards and the third can provide cover in behind. Athletic Bilbao manager Marcelo Bielsa nearly always plays with one more center back than the opposition has forwards so there is always a spare man to provide cover (in other words three center backs against two forwards, two center backs against one forward). Everton only plays with one forward which meant City's three center backs, Zabaleta, Kolo Toure and Nastasic, were all in relatively narrow areas with only one direct opposition- Victor Anichebe. One center back could stick tight with Anichebe, another could provide cover but the third wasn't needed and meant City were outmanned elsewhere- in this case on the wings.

Everton are a team that are very good attacking from wide areas. Only Reading attacks through the middle less than the Toffees. Mirallas and Peinaar tuck in field from their wide midfield positions and open up space on the wings for the fullbacks to overlap into. Baines is of course a very good attacking fullback but on Saturday Everton also had Seamus Coleman on the other side- another quick fullback that likes to get forward. City's wingbacks Kolarov and Milner were left to defend Everton's wide midfielders and outside backs 1 v. 2. Time and again Everton were able to use their man advantage on the wings to advance the ball forward and take City's wingbacks out of the picture. It was little surprise when Leon Osman's opener came from a ball from Coleman after he'd advanced unmarked down the wing and Mancini quickly switched to four at the back.

It was surprising to see Mancini go with such a narrow lineup against a team that loves to attack from the wings. Footage from the game appeared to show Mancini and David Platt arguing on the sideline- you wonder how much of that had to do with the formation.


3 Keys to Barca comeback

Barca become the first team to overcome a 2-0 first leg away defeat in the Champions League knockout stages, advancing through to the quarterfinals with a 4-0 win over Milan at the Nou Camp.

A pair of first half goals from Lionel Messi evened the tie at 2-2 on aggregate before David Villa tucked home the winner in the 55th minute. Jordi Alba put the tie beyond doubt with a fourth in stoppage time. Here are three key factors that contributed to Barca's historic comeback.

1. David Villa replaces Fabregas in starting XI
Barcelona struggled to create meaningful scoring chances in the first leg defeat largely because they lacked a threat behind Milan's center back pairing of Philippe Mexes and Cristian Zapata. In that game, Messi was used in his normal roaming center forward position but mainly stayed just to the right of the center of the pitch in Mexes' zone. Fabregas was given a free role in the middle and mainly looked to find space in between the lines towards the left. Andres Iniesta was therefore used on the left wing.

There were two problems with this lineup. Iniesta likes to cut inside when he plays on the left. With Fabregas occupying a narrow left-sided position, the two often seemed to get in the way of one another when Iniesta cut in. The second problem also stemmed from the inclusion of Fabregas. He maintained a fairly deep position, never looking to make runs in behind the Milan center backs. As he always does when playing center forward, Messi continually looked to drop in the space between Milan's center backs and midfield to collect the ball between the lines. However, because Barca didn't have a player more advanced than Messi looking to make runs in behind, Mexes was able to stay tight on the back of Messi when he looked to drop between the lines to collect the ball, knowing Zapata was the spare man behind him and could provide cover for any runs that came from midfield. Messi was quiet and Barca only had one shot on target.


The decision to drop Fabregas and replace him with Villa last night meant a bit of lineup reshuffling and a change in tactics for Jordi Roura. Villa was employed at center forward. Messi played a very narrow right sided position, Iniesta switched from wide on the left to a central attacking midfield spot and Pedro switched from a wide right to a wide left position. Althought Villa was relatively quiet before providing the goal that would see Barca through, his inclusion as the most advanced attacker was vital in opening space for Messi to receive the ball between the lines. Villa offered a threat behind the Milan center backs and stayed on the shoulder of Mexes. Mexes could therefore no longer step forward between the lines to close down Messi. To do so would have meant leaving Villa free in the area or relying on Zapata to slide over to pick him up- which would have opened up acres of space on the right side of Milan's box. Messi sat just behind Montolivo on the left side of Milan's three man center midfield and in front of Mexes and had the space to collect the ball and run at defenders. His finishers were out of this world but Villa's inclusion had a lot to do with why he was so much more dangerous than at the San Siro.

2. Adriano replaces Pedro in the 84th
When David Villa tucked home Barca's third, Milan right back Ignazio Abate became much braver with his positioning as the Italian side were forced to chase a goal that would put them through. Between Villa's goal and the introduction of Adriano, Abate was time and again given the space to overlap down the right wing unmarked as Jordi Alba was occupied defending Kevin Prince Boateng in narrower areas. He sent in some decent low hit balls across the face of goal and one was nearly converted (by Boateng if I remember correctly). Barca were on the back foot, defending deeper and it looked for a time that Milan would get a number of chances in front of goal in the final minutes off of balls whipped in from Abate. However, Roura brought in Adriano to offer protection in front of Alba and track the forward runs of Abate. The Milan right back was unable to get in space on the wing after the change and didn't get a ball in the box for the remainder of the game.

3. Niang's miss
Who knows how the game would have played out had Niang put away the 1 v. 1 chance against Victor Valdes that struck the post but the psychological impact on both teams would have been massive had he leveled the score there. As it turned out Messi would even the tie at two just a minute later. Barca could smell blood and from there it seemed inevitable they'd finish the job.

Tactical Analysis: Real Madrid 2-1 Manchester United (3-2 ag)

Sir Alex Ferguson's controversial decisions to start Ryan Giggs and Nani at right and left midfield respectively and bench Wayne Rooney looked to be paying dividends as Manchester United went into the locker room level with Real Madrid at 0-0 and looking the more dangerous of the two sides.

Madrid had created little in the opening 45 minutes. Ronaldo was uncharacteristically quiet and United looked dangerous every time they broke forward on the counter.

Ferguson opted for a 4-4-2, employing Danny Welbeck alongside Robin Van Persie up top. It was expected Tom Cleverley would replace the injured Phil Jones and play on the right side of center midfield to provide Rafael with defensive help on Ronaldo. However, it was Carrick who was fielded more towards the right with Cleverley on the left side of central midfield. Rafael, Ferdinand, Vidic and Evra lined up across the back.

Jose Mourinho's side lined up just as they had in the first leg with the exception of Higuain in for Benzema at forward.

United defended fairly deep with two banks of four. Welbeck dropped in behind Van Persie and tracked Xabi Alonso, denying him from receiving passes from Verane and Sergio Ramos. United's defensive lines of four were compact but it was still surprising that Ozil, usually fantastic at finding pockets of space in between the seams, was having so much trouble receiving the ball in behind Cleverley and Carrick.

With Welbeck denying Xabi Alonso the opportunity to get on the ball and pick out forward passes from deep in midfield, Madrid's more advanced attackers dropped deeper and deeper to get on the ball. On separate occasions Ozil, Di Maria and Higuain dropped well behind United's midfield four to get on the ball. It was a testament to Ferguson's tactics and United's organization that those three gifted attackers were collecting the ball 45 yards from goal where they are obviously far less dangerous.

On the right side of the United defense, Giggs played deep and dropped in to help Rafael on Ronaldo whenever he could. Every time Rafael advanced forward when United were in possession, either Giggs or one of the center midfielders dropped in to fill the defensive hole in an effort to deny Ronaldo the space to counter.

Offensively, United looked to counter rapidly. Once they regained possession, Welbeck would sprint past Xabi Alonso and into the channels to spring counters. They looked to create overloads in wide areas and send crosses into the box.

Second Half
Although United's opener was largely due to an individual error from Varane, it highlighted their ability to make dangerous runs in behind the Madrid midfield and advance the ball forward at pace. Rafael broke forward down the right before finding Welbeck's late surging run into the box. Eventually the ball broke for Nani whose low cross was deflected by Ramos into his own net.

Nani's 56th minute red card turned the game on its head. United were forced to switch to a 4-4-1. Welbeck went wide left and Van Persie played alone up top. Recognizing he didn't need four at the back to deal only with Van Persie, Mourinho replaced right back Arbeloa with Luka Modric and switched to a 3-4-3. Madrid therefore had a 4 v. 2 advantage in the middle of midfield. Welbeck and Giggs tucked narrow to the inside to offer help in the central areas, conceding the left channel entirely to Coentrao.

Ferguson's men continued to defend in banks of four but, crucially, they no longer had Welbeck in the middle of the pitch to defend Madrid's deepest midfielder. Modric dropped deep alongside Xabi Alonso and both were given the time and space to pick out forward passes between gaps in the United midfield four. This allowed the likes of Kaka (who had replaced the injured Di Maria in the first half), Ozil, Ronaldo and Higuain to stay in more advanced areas and create overloads with the United back four.

The introduction of Modric was a smart if not obvious substitution for Mourinho to make after gaining a man advantage. With United's midfield retreating deeper and deeper the Croatian found the space just outside the 18 to unleash a fine strike for the equalizer. For the winner, he bisected the United midfield line with a ball through to Higuain. The Argentine would play a 1-2 with Ozil before driving a low ball across the face of goal for Ronaldo to tuck home.

Knowing United needed to score two goals to win the tie, Mourinho replaced Ozil with Pepe who slid in at right back. Higuain moved out to the right when Madrid were defending and Ronaldo stayed high up the pitch at center forward, knowing he'd have the space to run at Ferdinand and Vidic with United chasing the game. Mourinho's side began to defend quite deep and failed to control possession with their man advantage. They were on the back foot for most of the final 15 minutes and were only able to maintain their goal advantage due to a handful of fine saves from Diego Lopez.

Conclusion
Ferguson deserves credit for United's approach in this game. They were organized, compact and countered effectively. That United would have hung on and won were it not for Nani's red card was hardly a foregone conclusion but up to that point they had been the better side.

After the game Mourinho suggested the better team had lost. While he may well have simply been buttering up a club many expect him to manage when Ferguson retires, he doubtlessly would have been disappointed with his side's inability to create many genuine chances when the game was still 11 v. 11. Still, they deserve credit for getting the job done in a hostile atmosphere at Old Trafford.

Juventus 2-0 Celtic: Juve forwards exploit 2 v. 2 at the back

Juventus put in a vintage Italian performance in a 3-0 win over Celtic at Parkhead, sitting deep and organizing themselves defensively to deal with wave after wave of Celtic's frenetic attack and finishing their few forays into the attacking third with magnificent efficiency. While many an observer of this game will argue Celtic battered their Italian opposition and were unfortunate to lose in the manner they did, the Italians were prepared for this type of game and deserve loads of credit for executing their system and making it difficult for Celtic to break them down in the final third.

Celtic missed a golden chance in the first half when Ambrose, included in the starting 11 despite playing in the final of the ANC Sunday, headed straight at Buffon from 6 yards out. Aside from that, Juventus were rarely stretched at the back to the point of defending desperately- they were compact, organized and able to deal with crosses into the area.

Juventus were without Kwadwo Asamoah who was deemed unfit after playing for Ghana in the ANC third place game Saturday. He was replaced at left wing back by Federico Peluso. Vucinic and Matri partnered up front- Quagliarella, Giovinco and Anelka all had places on the bench. Elsewhere the side was as expected in their usual 3-5-2.

Neil Lennon opted for an interesting, narrow 4-3-2-1 'Christmas tree' formation. Lustig, Ambrose, Wilson and Izaguirre lined up across the back. Brown, Wanyama and Mulgrew formed a central midfield three. Mulgrew and Wanyama tended to stay deeper while Brown was given license to get into more advanced areas on the right. James Forrest and Kris Commons played narrow just in behind Gary Hooper and then would look to make runs out into the channels behind Juve's wing backs.

Neil Lennon's tinkering with his formation was a brave one but made sense given his side's intent on pressing high up the pitch. The 4-3-2-1 shape meant Juventus didn't have a spare man anywhere on the pitch when Celtic pressed and therefore made it very difficult to play out of the back. Commons and Forrest pushed on to the outside center backs Caceres and Barzagli and Hooper pressed Bonucci. Brown tracked Pirlo as he dropped in to try to collect the ball of his center backs, which left Wanyama and Mulgrew to mark Marchisio and Vidal 2 v. 2. Celtic's outside backs Lustig and Izaguirre pushed high up the pitch on to Juve's wing backs. Ambrose and Mulgrew were therefore responsible for defending Matri and Vucinic 2 v. 2 at the back.

Without a spare central defender at the back, Celtic's success was always going to depend on whether Wilson and Ambrose could win their individual battles with the Juve forwards. Against Chelsea and Shakhtar Donetsk in the group stages Juventus showed how devastating the movement of their two forwards can be against two center defenders. One forward will typically drop into midfield, forcing one of the opposition center backs to follow him into midfield and thereby opening up space for either a diagonal run from the other forward or a burst in behind from midfield by one of the shuttling midfielders Vidal or Marchisio.

With Celtic's tireless pressing denying Juve the time and space on the ball to build any patient attacks, the Italians frequently looked to play balls over the top to their forwards, confident that eventually Matri or Vucinic could win their individual battle and go through on goal. They'd have been pleasantly surprised at just how quickly the strategy came to fruition. Peluso played a simple ball over the top to Matri in the third minute. The Juve forward shrugged Ambrose aside and slotted a shot past Fraser Forster and across the goal line before it could be cleared away.

Juve's second goal highlighted the ability of their forwards to open up space for their shuttling midfielders to make runs in behind the back four. Ambrose and Wilson were again tight on Matri and Vucinic respectively. Matri checked for the ball back into midfield, forcing Ambrose to follow his run and leaving acres of space to the right of Wilson. Marchisio darted past Brown into that space and Matri provided him with a clever flick that the midfielder dutifully dispatched. You can see a screen shot of the build up to the goal below. Marchisio sees Matri making his run into midfield and immediately begins his run in behind as Peluso plays the ball into Matri.


At 2-0 the tie looked done and dusted. When Ambrose was caught in possession in the 83rd, allowing Juve to tack on a third, all doubt was erased as to Celtic's fate in the final 16.

Note: I didn't quite find the time to analyze the Juventus defense versus Celtic attack- obviously quite an important feature of the game given 40% of the game took place in Juve's defensive third. Hopefully I'll have time in the next couple days to revisit this post and add more on that.

Liverpool miss Sturridge's vertical threat in loss to WBA

West Brom produced an unlikely 2-0 victory over Liverpool at Anfield despite taking 20 fewer shots and being outpossessed 59% to 41%. The home side missed a slew of decent opportunities before Gareth McAuley's header put the Baggies ahead on 81 minutes, including Ben Foster's penalty save on Steven Gerrard in the 77th.

Despite controlling the balance of play and managing to force Foster into a couple of fine saves, Liverpool lacked a bit of industry in the final third, largely owing to the absence of Daniel Sturridge to a thigh problem.

Luis Suarez took up the center forward position recently occupied by Sturridge while Jonjo Shelvey played in the hole behind him. Jordan Henderson was used as a left sided attacker and Stewart Downing played on the right wing. As he so often does when lined up as the main striker, Luis Suarez would drop off the opposition center backs and collect the ball between the lines. He's tremendous at drifting into defensive seams, turning and running at the back four. However, without Sturridge's pace, Liverpool lacked anyone making runs in behind the West Brom center backs for balls to be played through. When Suarez collected the ball between the lines, no one made the type of interior run in behind that might threaten Jonas Olsson and McAuley. As a result, one center back could step to Suarez while the other sat in to provide cover.

Sturridge often tends to remain high up the pitch on the shoulder of one center back. When Suarez plays in the hole behind him and manages to get the ball in the seams it forces the free opposition center back to step out to him and opens space for Sturridge to make a diagonal run into the space opened up by the center back moving out to Suarez. Without a vertical option in behind the defense, Liverpool often shuffled the ball wide to the right where Downing and Glen Johnson looked to combine and get crosses in the box. The two combined for 17 crosses, with Downing alone crossing 13 times. Several of Downing's balls in were excellent but without a physical #9 like Andy Carroll in the side, getting the ball wide and crossing it into the box is never likely to be an effective strategy for Liverpool. Olsson and McAuley are more comfortable dealing with high balls into the area than with pacey forwards running in behind them. Only two of Downing and Johnson's 17 crosses found a Liverpool player, despite a number of them being quality balls in.

Liverpool produced some decent football at times and will feel unfortunate to have failed to take anything from a game in which West Brom produced virtually nothing offensively for the first 80 minutes. However, the absence of Sturridge's pace meant they were often forced to attack down the wings and send 50-50 balls into the box- a difficult strategy when you're playing without an actual number nine. It was no surprise then that they produced some of their best chances, including Luis Suarez winning the penalty, when Fabio Borini came on at striker and Suarez dropped into the withdrawn role. Sturridge is a more suitable center forward than Borini however and Brendan Rodgers will be keen to have him back in action. It's incredible that Liverpool have still failed to manage a win against a side in the top 10.

Klinsmann gets second half adjustments wrong

The United States' World Cup qualifying campaign got off to a troubling start in San Pedro Sula as Honduras overcame an early Clint Dempsey goal to emerge 2-1 winners. Despite fielding an offensive 4-3-3 formation, Jurgen Klinsmann's side were cautious in the first half and created few quality goalscoring chances throughout the 90 minutes.

4-3-3
Klinsmann surprisingly left veteran and team captain Carlos Bocanegra out of the back four, opting instead for a center back pairing of Geoff Cameron and Omar Gonzalez. With Timmy Chandler and Fabian Johnson taking up the fullback positions, the back four was comprised of four players taking part in their first qualifying campaign. It was a brave decision on the part of Klinsmann to go with youth over experience- and Bocanegra's replacement Omar Gonzalez was one of the US's better players- but we're left to wonder whether Bocanegra would have provided the organization at the back to prevent Jerry Bengston's second half winner.

Danny Williams sat in midfield just in front of the back four. Michael Bradley and Jermaine Jones played as shuttling midfielders higher up the pitch.

Jozy Altidore was given the start at center forward. Clint Dempsey occupied a narrow position on the right and Eddie Johnson played a bit wider on the left.

The US started the game cautiously, with the midfield dropping fairly deep and allowing Honduras to to circulate the ball around the back. When Honduras had the ball deep in their own half, Dempsey and Johnson would push up alongside Altidore so that the US defended with a forward bank of 3 in front of a midfield bank of 3 in front of the back four. Strangely, the front 3 didn't press Honduras's back four and instead only offered token pressure. With plenty of time on the ball, the Honduran back four were easily able to advance the ball past the forward three. At this point, Dempsey and Eddie Johnson would drop in alongside Jones and Bradley to form a midfield bank of four. Williams dropped in to fill the gap between the defensive and midfield banks of four- making the US defensive shape more or less a deep 4-1-4-1. That the US didn't press wasn't a surprise. In an away qualifier Klinsmann was always going to be cautious and the 90 degree temperature would have made pressing unsustainable. However, it was a bit strange Dempsey and Johnson didn't immediately drop off into the midfield when the US lost possession.

The deep 4-1-4-1 shape meant Altidore was often left isolated up front. Honduras pressed when the US won the ball back, A combination of Honduras's pressing and some untidy passing from the US made it difficult to possess the ball out of the back and advance up the pitch with short passes. As a result, the US were frequently forced play long into Altidore and hope he could retain possession long enough for reinforcements to join in the attack. When the US were able to keep the ball, Dempsey drifted centrally from the right just in behind Altidore while Johnson stayed wider on the left. They looked most dangerous when Altidore checked back to collect the ball in between the lines of Honduras's 4-4-2. This forced one of the Honduran center backs to step out with him, leaving a hole in the center of the Honduras defense for the US to play balls in behind for Dempsey and Johnson making runs from the outside.

Honduras's opener came from a spectacular overhead kick from Juan Garcia but the corner kick that ultimately led to the goal was a result of Honduras's pressing and a lapse of concentration from Chandler who had a difficult afternoon. Chandler failed to clear his lines inside his own box, allowing Carlos Costly to nick possession. Gonzalez made a fine last ditch tackle on Costly but Garcia scored on the resulting corner.

Diamond 4-4-2
The US set out in the second half in a what would typically be described as a diamond 4-4-2 but what in reality was more 4-2-2-2. Bradley dropped deep alongside Williams and looked to collect the ball from Cameron and Gonzalez and link passes forward to Dempsey and Jones who were playing narrow higher up the field. Eddie Johnson played alongside Altidore as a center forward pairing. Bradley was given the deeper role because he's a more creative passer than Williams- the US needed a more creative player in that role to link defense to the four more advanced attackers.

Presumably Klinsmann made the tactical switch to enable the US to control possession by playing with four midfielders in the center of the field. Honduras had 57% possession in the first half and Klinsmann likely wanted to take the game to them more in the second half. While the switch did result in the US keeping the ball better in midfield, the lack of any wide players allowed plenty of space for Honduras's midfielders to run into when they regained possession.

Flat 4-4-2
Maurice Edu replaced Williams in a like for like sub on 58 minutes. Sacha Kljestan was brought on for Eddie Johnson a minute later, prompting another tactical change from Klinsmann. Kljestan played wide on the left, Jones went to right midfield and Dempsey moved up front alongside Altidore in a 4-4-2. Graham Zusi, a player used to being employed on the right wing for the US, replaced Jones in the 68th minute. The US defended in two banks of four- Edu and Bradley were side by side- while Altidore and Dempsey stayed high up the field. The switch meant the US no longer had the extra center midfielder to fill in the space between the two banks of four- the position Danny Williams had played in the first half.

Two things were almost immediately noticeable when Klinsmann made the switch. Without the extra center midfielder, Honduras began to find space to collect the ball in the gap between Bradley-Edu and Gonzalez-Cameron, leaving the US back four dangerously exposed. The absence of a third center midfielder also meant there was a huge gap in the middle of the field between Bradley and Edu and Dempsey and Altidore when the US were on the ball. With Edu and Bradley deep and Dempsey and Altidore high up the field, they had no one to fill the space in between and provide a link from midfield to attack. After falling behind 2-1, the US couldn't regain possession and when they did they struggled to keep it long enough to create anything meaningful. The olé chants that came from the home crowd as their side easily passed the ball around the US midfield in the closing moments of regulation time were a frustrating reminder of Klinsmann's frequently inability to get his tactics and personnel decisions right in important games.

Arsenal 2-2 Liverpool: Rodgers scraps possession philosophy for counterattacking approach

Brendan Rodgers adopted an uncharacteristic counterattacking approach in an intriguing 2-2 draw against Arsenal at the Emirates. Liverpool finished the game with just 38% possession, by far their lowest total in a league game under Rodgers, and only the fourth time they've been out-possessed this season. The strategy looked as though it had worked perfectly when Jordan Henderson put the Reds 2-0 ahead in the 60th minute but Arsenal began exploiting pockets of space either side of Lucas Leiva who was sitting just in front of the Liverpool back four. Both the Gunner's goals resulted from collecting the ball in the area between Lucas, left back Glenn Johnson and center back Daniel Agger.

With the exception of Pepe Reina replacing Brad Jones in goal, Liverpool fielded the same side that defeated Norwich 5-0 in their last league outing.

Arsenal made no changes to the side that beat West Ham 5-1 a week ago.
 

The theme of the game was established early and didn't change throughout the 90 minutes- Arsenal pressed high up the pitch and looked to regain possession quickly, Liverpool sat deep, soaked up pressure and looked to play on the break.

Defensively, Liverpool used a 4-1-4-1 formation. Henderson and Steven Gerrard pressured Jack Wilshere and Aaron Ramsey in possession while Lucas sat just in front of the back tracking the movement of Santi Cazorla. The strategy was to not allow Ramsey and Wilshere to get goal side of Gerrard and Henderson where Lucas would be forced to leave Cazorla and step to ball. Downing and Suarez tracked the forward runs of Gibbs and Sagna.

Offensively, Liverpool looked to counter through Suarez and Downing breaking in behind Arsenal's outside backs and through Henderson darting into space behind Wilshere and Ramsey and in front of the Arsenal center backs. Effectively, what was 4-1-4-1 in defense became 4-2-3-1 when Liverpool were in possession with Lucas and Gerrard rarely joining forward. The player influence graphic below shows Lucas's and Gerrard's average positions were actually as deep as Agger's over the 90 minutes.


When Liverpool found an outlet ball to Suarez, Henderson or Downing, they'd look to play the ball through to Sturridge behind the Arsenal center backs. Suarez's opener was more a result of a comedy of defensive errors from Arsenal than anything tactical but Liverpool did create some very good scoring chances off of counterattacks. Shortly after taking the lead Downing released Suarez in behind Sagna down the left flank after Liverpool had regained possession. Suarez chested and played a wonderful volleyed through ball behind the defense to Sturridge but he put his effort wide. Later in the half Downing broke into the middle of the pitch on the counter and played Henderson in behind the defense towards the edge of the box. Henderson chipped over after Szczesny left his line but the move highlighted Liverpool's effectiveness on the break.

Second Half
The second half continued in much the same way as the first. Arsenal continued to boss possession in midfield but they increased their tempo in possession and become more vertical with their passing. Liverpool were clearly straining a little more defensively early in the half as Arsenal combined with more passing combinations higher up the field. A main contributing factor to Arsenal's increased threat in the attacking half was that they began to exploit the space either side of Lucas between Liverpool's defensive and midfield banks of four. Cazorla drifted from the middle into these areas and was then able to look for gaps between the center back and fullback to slip balls through. On the right, Walcott tucked inside, leaving Lucas and Johnson to communicate whether Johnson would track him inside or Lucas would shift over. Arsenal were beginning to find pockets of space between the lines they hadn't in the first half. With the Gunners seemingly on the ascendency, Henderson's goal on the hour mark from more blundering Arsenal defending came as a bit of surprise. Mertesacker and Andre Santos, brought on to replace the injured Gibbs in the first half, were the main culprits this time as both allowed the Liverpool midfielder to beat them too easily.

However, Arsenal's response was emphatic as they struck twice in three minutes to draw the score level. As they had begun to do early in the half, Arsenal exploited the space in front of Agger and Johnson and to the left of Lucas for both goals. For the first goal Walcott was able to cut in field from the right, forcing Lucas to slide over to provide help and commit a foul. Giroud scored from the resulting kick. On the second goal Cazorla drifted unmarked into this zone and was able to play a decisive ball for Giroud whose layoff Walcott finished in style. Jose Enrique was introduced on the left wing to provide added defensive cover there after the Gunners had equalized, with Suarez moving to forward and Sturridge coming off.

Arsenal's energetic second half pressing prevented Liverpool from finding the outlet passes to spring counters they had in the second half. 10 of Arsenal's 13 interceptions came in Liverpool's defensive half. Fatigue set in for Suarez, Henderson and Downing as the half wore on and they weren't able to break into space behind Arsenal's midfield as they had in the opening period.


It was surprising to see Rodgers take such a pragmatic approach and allow Arsenal to take the game to them. His likely reasoning however seems understandable- in Wilshere and Ramsey, Arsenal had two deeper lying midfielders that like to get into more advanced areas and aren't used to the responsibility of breaking up counterattacks. He thought he'd be able to exploit space in behind these two on the break and indeed he was right- had Sturridge's and Henderson's finishing been a bit more clinical in the first half, Liverpool may have put this one to bed. That they completed just 54 passes in the attacking third, by far their lowest total of the season, is evidence they were prepared to play the bulk of this game inside their own half. While Rodgers has been praised for his belief in his possession-based system, some have suggested he may be a bit tactically inflexible. Today showed he is at times willing to adjust his tactics.

The tempo of Arsenal's passing and movement was excellent in the second half. The second goal was wonderfully worked and they deserve a great deal of credit for showing the patience in their system to come back. An enjoyable game overall and probably a fair result in the end.

Redknapp's defensive 4-1-4-1 denies space in seams, frustrates City

Click for larger image
QPR put in a disciplined performance to secure a valuable point in a 0-0 draw with Manchester City at Loftus Road. The defending champions saw plenty of the ball, finishing the game with 69% of the possession, yet were frustrated by a compact Rangers defense in the final third.

With Matija Nastasic and Vincent Kompany both unavailable with injuries and Kolo Toure away at the African Nations Cup, Joleon Lescott was City's only available center back. Roberto Mancini therefore had the option of playing Gael Clichy and Pablo Zabaleta either side of Lescott in a back three or dropping Javi Garcia to center back. Manchester City haven't looked particularly comfortable when they've used a back three this season so Mancini opted for the latter. James Milner dropped alongside Gareth Barry in the middle of midfield and Samir Nasri played on the right.

Harry Redknapp played a 4-5-1. Stephane M'Bia, Shaun Derry and Esteban Granero played in midfield with Granero the most advanced of the three. Adel Taarabt was responsible for tracking Zabaleta down the left flank when City were in possession but broke centrally just in behind Loic Remy when QPR were on the ball. Jamie Mackie wasn't even on the bench amid rumors he'll be headed to Stoke so Fabio da Silva played on the right side of midfield.

Redknapp has a reputation for not being terribly concerned with tactics but QPR's approach this evening illustrated he's more an able tactician than he lets on. He was understandably concerned with the ability of Aguero, Dzeko, Tevez and Nasri to find pockets of space in between the seams of defenses and therefore set out to mitigate space between the lines with a compact defensive shape. QPR would then look to break quickly on the counter. Sitting deep and countering is a strategy plenty of teams have attempted to use against Manchester City, however the positioning Redknapp had his players take was slightly different than most.

Most teams looking to defend deep and then play on the counter will drop the wide midfielders alongside two holding midfielders defensively to form a bank of four. An attacking center midfielder and the striker will then play higher up the pitch tracking either the opposition holding midfielders or center backs. The defensive shape then is effectively a 4-4-1-1. The problem here is that defending in two flat banks of four creates, a defensive one and a midfield one, creates space between the lines for opposition playmakers to drift into and collect the ball.

Click for larger image
Rather than having Derry and M'Bia play side by side defensively and leaving Granero higher up the pitch, Redknapp had Granero drop alongside M'bia to form a midfield bank of four. Derry then dropped off and sat just in front of his two center backs, checking any run a City player tried to make between the seams. Rather than 4-4-1-1, QPR's defensive shape was 4-1-4-1. The strategy worked well defensively. QPR allowed Barry and Milner to drop in behind the midfield four to collect the ball. Neither of the City holding midfielders are particularly creative passers and both played mostly horizontal balls in this area. Higher up the pitch, City's four attacking players struggled to find space and were closed down quickly when they got on the ball.

Click for larger image
Another key factor to QPR's defensive performance was the work Taarabt and Fabio did tracking City's outside backs when they looked to make forward runs down the flanks. Nasri and particularly David Silva like to play narrow from their wide starting positions, forcing the opposition outside backs in field and leaving space down the flanks for Zabaleta and Clichy to overlap into. Taarabt and Fabio both put in disciplined shifts, rarely losing track of City's fullbacks when they broke forward.

The obvious problem with defending in the 4-1-4-1 formation, as opposed to 4-4-1-1, is that when possession is won back you don't have a central attacking midfielder drifting into space behind the opposition holding midfielders to spring counter attacks. As a result the loan striker can become isolated and is forced to hold the ball up long enough for his midfielders to break forward. This was at times the case for QPR today- Remy was frequently left to chase balls knocked in the corners for him. However, Redknapp did set up a fairly effective strategy for counterattacking. When QPR won the ball back, Taarabt would look to quickly break in field from the left behind Barry and Milner. When he got possession in these areas Remy would sit on the shoulder of Garcia or Lescott and look to use his pace to get in behind. Much has been said about Taarabt's attitude and work rate but he worked tirelessly today combining his well known skill with endless running. He nearly created a goal in the first half with a ball to Remy in behind Garcia and nearly scored himself after a brilliant individual run but was denied by an impressive Joe Hart save.

What's behind Big Sam's bizarre Arsenal squad selection?

Those associated with West Ham United will be keen to dismiss Wednesday night's heavy 5-1 defeat to Arsenal as a bad day at the office against a team that, when at their best, can produce some sublime football. To a certain extent it would be fair for Sam Allardyce's side not to look too deeply into this one. After taking a first half lead, the Hammers found themselves trailing 2-1 early in the second half to two very good goals from Lukas Podolski and Olivier Giroud. From there their midfielders were forced to become more adventurous going forward, leaving the back four exposed to Arsenal counterattacks. The Gunners took full advantage, scoring three goals, all assisted by Lukas Podolski, in the span of four minutes.

However, the result could be rather more ominous than Hammers fans would like to believe as West Ham fight to retain their top flight status in the final 15 games of the league. Allardyce's side have won just 1 of their last 8 league games. Only Aston Villa and Norwich have collected fewer points over the last 6 games.

Allardyce surprisingly left Mohamed Diame, Matthew Jarvis and Joe Cole out of the starting eleven. Diame's exclusion was particularly surprising. He scored a fantastic goal against Arsenal in the reverse fixture and was dominant in West Ham's 3-1 win over Chelsea where he used his physical strength to overpower Chelsea's technically gifted yet diminutive attacking midfielders. Against an Arsenal midfield comprised of Jack Wilsere, Santi Cazorla, and Aaron Ramsey, all players under 155 lbs, his physical strength and powerful running could have caused similar problems. His exclusion led to speculation he was on his way to Arsenal but Allardyce has since said he'll stay in East London.

Segments of West Ham supporters have suggested Allardyce didn't expect his side to get anything out of this game, regardless of who he started, and therefore opted to protect his best players from injury to ensure their availability for more winnable upcoming fixtures against Fulham, Swansea and Villa. Whether or not there is any validity in this claim I'm unsure- Allardyce would certainly never admit to taking up this strategy. But few would argue Allardyce put out 11 players best equipped to get a result at the Emirates. If this was indeed a well-calculated long-run strategic move by Allardyce to reduce his chances of winning one very difficult game in order to improve chances of collecting future vital points, I can sympathize. He doesn't have the deepest squad and it's far more important his side retain their top flight status than compete well in one league match in January.

However, Arsenal was hardly the only difficult fixture remaining for West Ham. The Hammers still have 6 of the league's current top 7 teams left to play. Four of those game are on the road- Chelsea, Liverpool, Manchester City and Everton. They also have Manchester United and Tottenham at home. They can ill-afford to collect just a point or two from those six contests if they wish to avoid a nervy last few weeks of the season. Big Sam will certainly have to contest those games with a stronger side than the one he field Wednesday night.

If instead Allardyce's reasons for sitting Diame, Joe Cole and Jarvis were tactical, I'd be curious to hear how he would have ideally expected the game to go. While you can understand his decision to defend deep with a midfield bank of 5 in front of the back four from a defensive sense, it's difficult to determine what he expected his side to do when they won the ball back. Normally teams that sit back look to break quickly on the counter when they retain possession (West Brom have done this well most of the season). West Ham however are not a counterattacking side. According to whoscored.com, they've yet to score on the counter this season. With ten players in their own defensive third of the pitch it was easy for Arsenal to press when West Ham won the ball back. The Hammers only option was to lump the ball forward to Cole, who was completely isolated up front. Arsenal inevitably got the ball back quickly and put West Ham on the back foot again. The Gunners finished the game with 69% possession and 36% of the game took place in West Ham's defensive third.

What two months ago looked would be a comfortable league campaign for West Ham now appears anything but. If they're to ensure a second consecutive year in the top flight, it'll be important Allardyce gets his squad rotation right. Consecutive wins over Fulham, Swansea and Villa and no one will remember Big Sam's bizarre squad selection Wednesday evening.

Preview: West Ham vs. Arsenal

Click to view larger image
Arsenal will look to go within 4 points of Spurs in the race for the final Champions League spot as they host West Ham in another London derby this evening- a game that was rescheduled due to the Boxing Day tube strike and is therefore each teams' game in hand. They couldn't ask for a much more favorable opponent at the moment as the Hammers have struggled away from home all season. Only Newcastle, QPR and Reading have collected fewer points on their travels than West Ham and they've failed to score in their last four away league games. They've managed just 5 goals away from Upton Park, the worst away goals record in the Premier League.

Arsenal will be without holding midfielders Mikel Arteta and Francis Coquelin to injury. The absences mean that Jack Wilshere will almost certainly drop in to a deeper midfield position alongside Abou Diaby after playing higher up the pitch in an attacking midfield role the last two games. Cazorla will take his place behind the forward after spending the last two games on the left wing. Lukas Podolski has recovered from illness and will likely play on the left. Theo Walcott will likely continue on the right with Olivier Giroud at center forward; however, Alex Oxlade-Chamberlain has recovered from illness so Wenger has the option of playing him on the right with Walcott at striker.

Sam Allardyce will be without James Collins who remains sidelined with a hamstring injury. James Tomkins will take his place. Marouane Chamakh is ineligible to play against his parent club so Carlton Cole will return to the lineup at striker.

Arsenal Approach
Unsurprisingly, Arsenal dominated with 69% possession in their 3-1 win in the reverse fixture at Upton Park in October. They'll again enjoy the lion's share of possession this evening. The key will be whether they can translate that possession into goalscoring chances against a compact and physically imposing West Ham defense.

West Ham's back four isn't especially athletic or pacey. Walcott in particular will have a big speed advantage over Joey O'Brien so the Gunners may well look to play through balls between O'Brien and Winston Reid for Walcott to run in behind. Against Chelsea Walcott tucked inside from the right wing and played high up the pitch, almost as a second forward, looking for balls played behind the defense. West Ham will almost certainly keep a deeper line than Chelsea did but I'd expect Walcott to again play high up the pitch and look for opportunities to make runs inside behind the defense. 

It'll be interesting to see where and how often Arsenal choose to press. The Hammers aren't especially comfortable passing the ball in midfield- they have the third lowest pass completion rate in the Premier League at 75%. They like to get the ball into the attacking third quickly by playing long balls into Carlton Cole and then getting the ball wide for crosses to be played back in the box. If Arsenal press and play a high line they'll both force West Ham to control the ball in a compact space in their own half and take Carlton Cole away from goal, reducing West Ham's chances to get the ball into the attacking third by knocking it long to the big striker. Cole has a bit of pace but not enough to worry Vermaelen with balls played over the top of a high defensive line. If the Gunners instead drop into banks of four it'll invite West Ham to play direct balls into the box where they're very good at winning second balls.

West Ham Approach
West Ham will work hard in midfield to prevent Arsenal's skillful midfielders from getting into any kind of a passing rhythm. They did excellently in the second half of their 3-1 win over Chelsea to get tight on Chelsea's diminutive attacking midfielders and physically impose themselves through the middle of the pitch- they'll have to repeat the energy levels and organization shown in that game if they're to have a chance this evening.

Defensively, they'll keep a deeper line to prevent the likes of Walcott and Podolski getting in behind them. They'll look to force Arsenal to patiently build attacks from the back and restrict the spaces for Cazorla and Wilshere to get on the ball between the lines.

Arsenal aren't the most physical side and the Hammers did cause them some problems in the reverse game by getting balls into the box and winning knock downs. They'll again look to get the ball to the wings and play crosses towards the back post. They'll bring the center backs forward for any free kicks in the attacking half and play the ball high into the box. Set pieces will be offer their best chances of scoring.

 Arsene Wenger press conference

Tactical Analysis: Everton 0-0 Southampton

Click for larger image
Southampton earned a point in Mauricio Pochettino's first game in charge following the sacking of Nigel Adkins. It was a less dour contest than the 0-0 scoreline suggests but there was a profound lack of quality in the final third from both teams, summed up by Nikica Jelavic's second half whiff from 10 yards out.

Southampton were much the better side in the first half but weren't clinical enough in front of goal as they failed to convert a host of decent opportunities. Everton created the better chances in the second half but didn't do enough to deserve the win.

Pochettino recalled Gaston Ramirez and Rickie Lambert to the starting 11 meaning Jay Rodriguez and Steven Davis, starters in the 2-2 midweek draw with Chelsea, were left on the substitutes bench. David Moyes' only change to the side that drew 0-0 with Swansea was to replace Victor Anichebe with Steven Naismith at right midfield.

First Half
The most interesting tactical feature of the first half was Southampton's pressing and their defensive positioning against Everton's favored left flank.

The Saints' four most advanced players Puncheon, Ramirez, Del Prado and Lambert looked to quickly close down Neville, Osman, Jagielka and Distin in Everton's defensive half. You could hear Pochettino through the television mics urging his players to press high up the field. The strategy made sense- the Neville-Osman midfield combination isn't especially fluid and too often there was a large gap between the two and Fellaini. As a result, Everton struggled to link play with its more advanced players through the middle. Without being afforded the time and space to play comfortably between their center backs and holding midfielders, Everton's only passing option up the field was often a long ball from the back towards Fellaini. The Saints' pressing allowed them to nick possession in Everton's half and spring dangerous attacking moves. The graphic below shows passes received by Fellaini in the opening half, many of which came from long balls, and Southampton's first half interceptions.


At times this season Everton have used long balls into Fellaini to great effect. He's able to use his size to hold off opposition defenders and flick balls on for the striker or wingers making narrow runs in behind. This strategy was largely responsible for the Toffees season-opening win over Manchester United, when the Belgian used his physical advantage to bully Michael Carrick in the center of the park (due to injuries Carrick was playing out of position at center back that evening). However, against a side sitting towards the bottom of the table, Moyes surely wouldn't have expected his side to be so outplayed in the center of the pitch.

That Everton's deficiencies in the center of the pitch were so noticeable is attributable to how effectively Southampton defended Peinaar and Baines down the left channel. The Toffees rarely rely on their central midfielders to provide the link between defense and offense- instead they advance the ball into the attacking third through the combination play of Baines and Peinaar on the left. Peinaar frequently tucks inside from the left, forcing the opposition right back in field with him and allowing space for Baines to overlap near the touchline and whip in crosses.

Southampton employed a clever defensive approach that denied Baines opportunities to overlap into space. Rather than having the right back Nathaniel Clyne track Peinaar in field, thereby opening space for Baines to overlap down the wing, Jack Cork shifted to his right from center midfield to pick up Peinaar when he came in field. This allowed Clyne to sit deeper and deny any passes into Baines high up the field. As a result, Baines was forced to receive the ball in much deeper areas than he's used to in the first half, denying him the opportunity to get in positions to apply his trademark crosses. He didn't complete a pass in the attacking third in the first half and managed just one cross from open play from a deep position (the other two crosses in the graphic below were a corner and an Everton free kick in the middle of the pitch near the halfway line).


Rickie Lambert lacks the pace to get in behind defenses. Everton therefore played a high defensive line to keep him away from the box where his size and strength can be put to greater use. However, their pressing and efficient use of the channels enabled them to create some decent opportunities. They frequently looked for Lambert peeling off to the back post to knock the ball back across the six.

Second half
The game began to shift towards David Moyes' side after he was forced to make a 58th minute substitution for Seamus Coleman after the right back suffered an injury. Moyes brought on Anichebe to replace Coleman; Neville dropped to right back, Fellaini dropped to a deeper midfield role alongside Osman and Anichebe went up top alongside Jelavic in a 4-4-2. Fellaini's switch to a deeper role, which he views as his best position, immediately made Everton more fluid in midfield, with the Belgian offering more attacking thrust than Neville. After a poor outing Jelavic was replaced in the 67th minute by Kevin Mirallas- making his first appearance since Dec. 9 after being sidelined by injury. Everton moved back into more of a 4-2-3-1 with Mirallas playing off of Anichebe. The move further increased Everton's fluidity in midfield and the tempo of their play noticeably grew. Mirallas's movement in between the lines was good- however his lack of match sharpness showed as he missed a good opportunity after controlling the ball well and misplaced a few passes.

Southampton's press was less effective in the second half. In the opening 45 minutes they won 7 tackles and 9 interceptions in Everton's defensive half. In the second half they managed 4 tackles and 5 interceptions in Everton's defensive half. As a result, they were unable to spring the same types of quick attacks they created in the first half and failed to register a shot on goal in the second 45 minutes.

Conclusion
Southampton were stronger in the first half; Everton were better in the second. Both sides had opportunities to win the game but both lacked composure in front of goal. In the end it was probably a fair result.

Pochettino will likely be the more pleased of the two managers. His side were well organized and showed good energy levels to press for the majority of the game. More clinical finishing would have given his team a massive three points, but a difficult point to a top five side should be applauded.

Moyes will rue another missed opportunity at 3 points. He'd have viewed this as a good chance to cut into Tottenham's lead in the race for fourth. It's his sides 11th draw of the season, tied with Stoke for most in the Premier League.

Wilshere excels in advanced midfield role

When Arsene Wenger's lineup for Arsenal's FA Cup replay with Swansea revealed Jack Wilshere would likely be playing as the most advanced midfielder, with Santi Cazorla shifting to the left wing, I was admittedly skeptical of the effectiveness of the change. I realize it's a shift some Arsenal fans have been calling for for some time- many believe Wilshere's best position is the #10 role and Cazorla excelled mostly as a winger prior to joining Arsenal.

However, I've always been impressed with Cazorla's clever movement and ability to find space between the opposition defense and midfield when he plays centrally off a main striker. That Wilshere is already a very good player with loads of potential is clear, but I thought the Gunners would miss Cazorla's close control and passing vision in crowded spaces around the box. Wilshere, I thought, was the archetypal box-to-box midfielder, strong in the tackle, energetic, able to beat opponents with his dribbling and possessing a wide range of passes. Playing him off of the striker, I assumed,

Wilshere injected a directness and pace into Arsenal attacks they don't possess when Cazorla plays attacking midfield. Time and again last night he was able to get the ball in the final third, turn and use his pace and skill to advance beyond Swansea's two holding midfielders. This would force one of Swansea's center backs to step to him and leave space for balls to be slotted through to Giroud, Walcott and Cazorla. A combination of poor finishing, bad luck and last ditch Swansea defending kept Arsenal off the scoreboard for 86 minutes (before Wilshere himself broke the deadlock) but Wilshere was creating good goalscoring chances seemingly at will.

Cazorla plays patiently as the #10, keeping hold of the ball and waiting for angles in which he can use his excellent vision to provide defense splitting passes. He sets a patient tempo to the Gunner's buildup play, allowing them to get numbers forward and play intricate passing combinations around the penalty area. At times this style works excellently but it can also allow the opposition time to recover into deep, compact defensive positions where they can prevent gaps from opening up for Arsenal to play balls in behind.

Wilshere's style is more explosive- he looks to receive the ball, beat a man and slip a teammate through on goal. With Wilshere as the #10, Arsenal's play in the attacking third is much more vertical and much faster. His first instinct when he gets on the ball is to face goal and run towards it. Anyone who has watched Lionel Messi knows that a central attacker who constantly looks to run towards goal at pace is a terrifying prospect. Although it would be ludicrous to compare Wilshere to the Ballon D'or winner at this stage in his career, he brings that same narrow-minded desire to get at the opponents goal Messi brings to Barcelona.


Of course this was just one game against a distracted opponent that was not at full strength. Against certain opponents Cazorla may well still be the better option at the #10 role. However, Wilshere's ability to play that position well will offer Arsenal a different option in that area of the field at a time when Cazorla's form has dropped over recent weeks. Since registering a hat trick and an assist in the Gunner's 5-2 win in December over Reading, he has just one assist and no goals in the last six games. The option of playing Wilshere higher up the field and Cazorla on a wing will allow Arsenal to alter it's approach in the final third and make them a less predictable opponent.