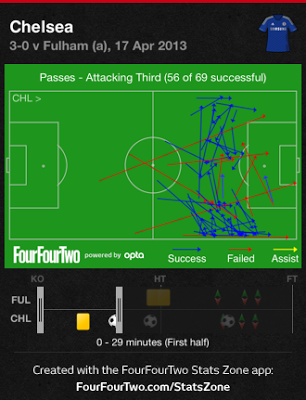
In the opening 45 minutes of Chelsea's 2-0 home win Saturday over Fulham, Jose Mourinho's side looked predictable and short on ideas. Under Martin Jol, Fulham set out to defend deep in compact banks of four and play on the counter, a strategy that will be taken by the bulk of opposing sides that will visit Stamford Bridge this season.
Jol's side deserves credit for their first half performance. Center midfielders Scott Parker and Steve Sidwell were disciplined and stayed tight to their center backs, allowing little space in between the lines where Chelsea's gifted attacking midfielders thrive.
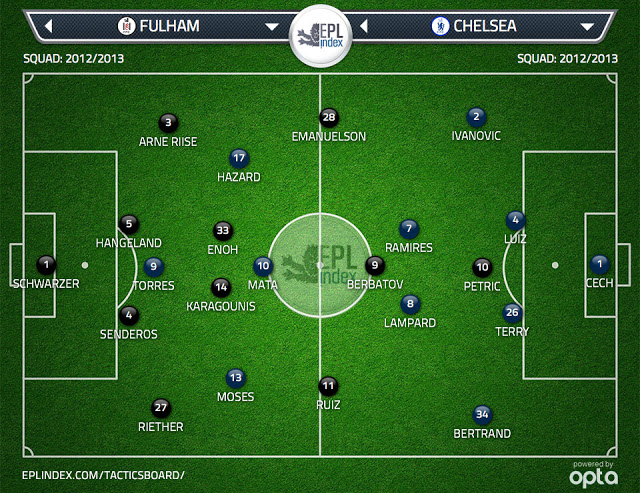
However, Chelsea's overreliance on cutting back in towards the middle of the pitch when they got the ball in wide areas made Fulham's defensive duties too easy. Time and again Eden Hazard and Andre Schurrle received the ball in wide positions and looked to cut inside rather than beat their defender to the end line and hit a ball across the face of goal. Mourinho has always liked his wide players to be able to cut into the middle and shoot which is why he tends to to use right footed players on the left wing and left footed players on the right wing. In the first half on Saturday Hazard, Schurrle and Oscar rotated between the three attacking midfield positions but all three looked to bring the ball inside when they received it on the flanks.
While having players that can cut inside and either have a shot or combine for short passing combinations is often quite useful, it tends to be a more effective strategy when the game is open and there is space in the middle of the pitch for wide players to cut into. With Fulham defending deep and quite narrow, there simply wasn't this space for Hazard and particularly Schurrle to drift into. Every time they attempted to cut inside Parker and Sidwell were there to meet them and force a speculative short pass in a very tight area.
In the second half Chelsea didn't rotate the attacking midfield three. Schurrle played on the left, Hazard the right and Oscar through the middle. Both Schurrle and Hazard maintained much wider positions than they had in the first half. Schurrle in particular hugged the left touch line throughout the second half. By stretching the play laterally, Chelsea forced Fulham to defend the width of the pitch and created wider gaps in their defensive and midfield lines of four.
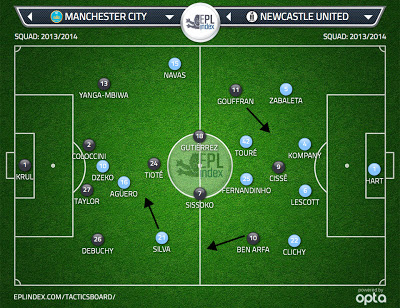
Schurrle's wide positioning forced Fulham right back Sascha Reither into a decision- if he drifted wide towards Schurrle he became disconnected from his center back Brede Hangeland and left space in behind him for Samuel Eto'o to drift into. If he stayed tight with Hangeland it meant leaving Schurrle with space in the channel. On Chelsea's opening goal, Reither opted for the second option, staying tight with Hangeland to help out on Eto'o. As a result, Hazard was able to play a simple pass to an unmarked Schurrle on the left channel (shown below). For the first time in the game Schurrle gets to the end line rather than cutting inside and strikes a ball towards the front post. Fulham keeper David Stockdale should have dealt with it before Oscar was able to tuck it home. Still, Chelsea's use of width had left Fulham more stretched defensively than they'd been at any point in the first half.
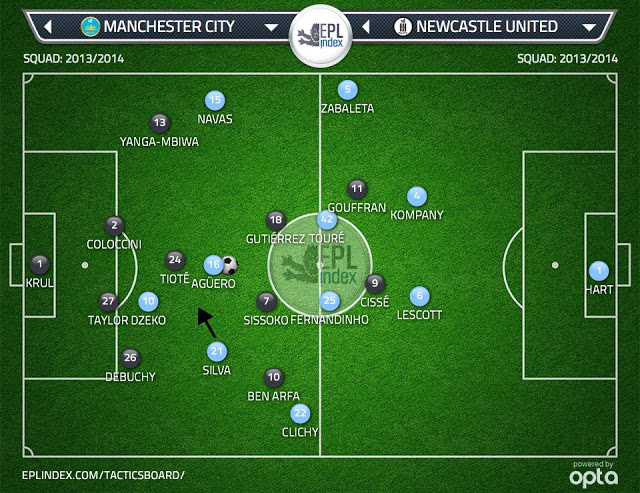
A few minutes later Reither was again forced into a decision on where to position himself when Schurrle drifted to the touch line. This time he moved into a wider position to get tighter to the German winger. As a result, Eto'o (just to the right of the screen grab shown below) was able to run into the space behind Reither down the left channel and collect a long pass from Mikel. The move only resulted in a scuffed Chelsea shot but the Blues were suddenly finding more pockets of space in the final third as they began stretching Fulham laterally.
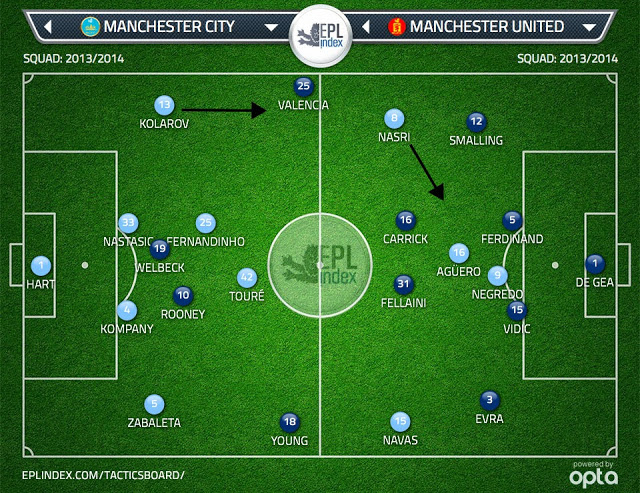
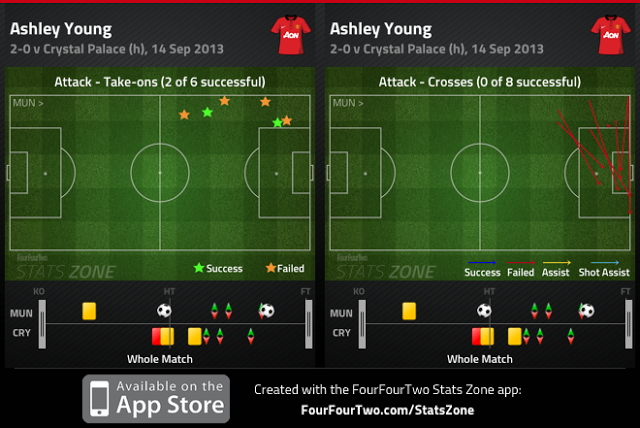
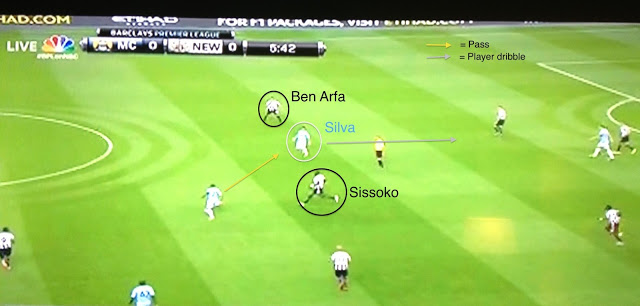
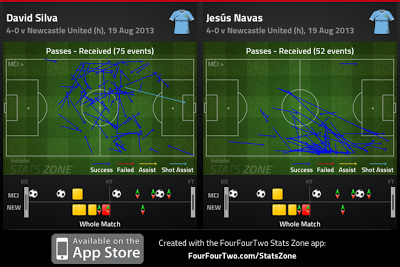
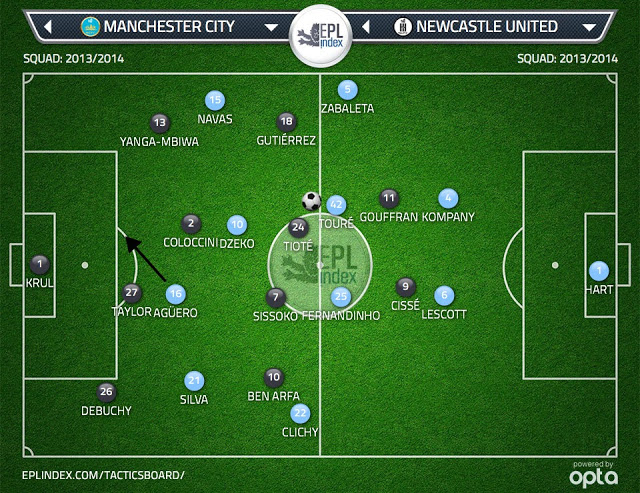
I don't mean to advocate that wide midfielders should always stay in the channels and look to get to the end line to hit crosses into the box. Yesterday I posted on how Manchester United's use of two out and out wingers in Ashley Young and Antonio Valencia made them far too predictable and unable to create chances through the middle in their heavy derby defeat Sunday to Manchester City. Rather I'm suggesting that variety and balance are the keys to creating scoring chances. Manchester City provide a good example of attacking balance in their derby win. Nasri tucked inside to provide 3 v. 2 overloads for City in central areas while Jesus Navas stayed wide on the right to provide width. Chelsea seemed closer to finding that balance in the second half against Fulham but still clearly have work to do.
Jol's side deserves credit for their first half performance. Center midfielders Scott Parker and Steve Sidwell were disciplined and stayed tight to their center backs, allowing little space in between the lines where Chelsea's gifted attacking midfielders thrive.
However, Chelsea's overreliance on cutting back in towards the middle of the pitch when they got the ball in wide areas made Fulham's defensive duties too easy. Time and again Eden Hazard and Andre Schurrle received the ball in wide positions and looked to cut inside rather than beat their defender to the end line and hit a ball across the face of goal. Mourinho has always liked his wide players to be able to cut into the middle and shoot which is why he tends to to use right footed players on the left wing and left footed players on the right wing. In the first half on Saturday Hazard, Schurrle and Oscar rotated between the three attacking midfield positions but all three looked to bring the ball inside when they received it on the flanks.
While having players that can cut inside and either have a shot or combine for short passing combinations is often quite useful, it tends to be a more effective strategy when the game is open and there is space in the middle of the pitch for wide players to cut into. With Fulham defending deep and quite narrow, there simply wasn't this space for Hazard and particularly Schurrle to drift into. Every time they attempted to cut inside Parker and Sidwell were there to meet them and force a speculative short pass in a very tight area.
In the second half Chelsea didn't rotate the attacking midfield three. Schurrle played on the left, Hazard the right and Oscar through the middle. Both Schurrle and Hazard maintained much wider positions than they had in the first half. Schurrle in particular hugged the left touch line throughout the second half. By stretching the play laterally, Chelsea forced Fulham to defend the width of the pitch and created wider gaps in their defensive and midfield lines of four.
Schurrle's wide positioning forced Fulham right back Sascha Reither into a decision- if he drifted wide towards Schurrle he became disconnected from his center back Brede Hangeland and left space in behind him for Samuel Eto'o to drift into. If he stayed tight with Hangeland it meant leaving Schurrle with space in the channel. On Chelsea's opening goal, Reither opted for the second option, staying tight with Hangeland to help out on Eto'o. As a result, Hazard was able to play a simple pass to an unmarked Schurrle on the left channel (shown below). For the first time in the game Schurrle gets to the end line rather than cutting inside and strikes a ball towards the front post. Fulham keeper David Stockdale should have dealt with it before Oscar was able to tuck it home. Still, Chelsea's use of width had left Fulham more stretched defensively than they'd been at any point in the first half.
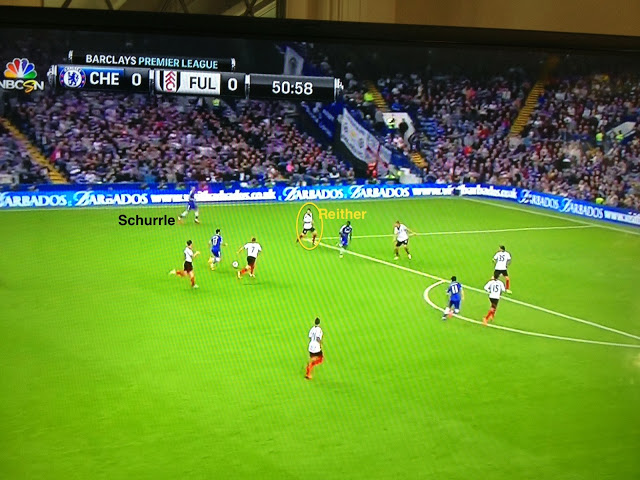 |
| Reither helps with Eto'o, allowing Schurrle space down the channel |
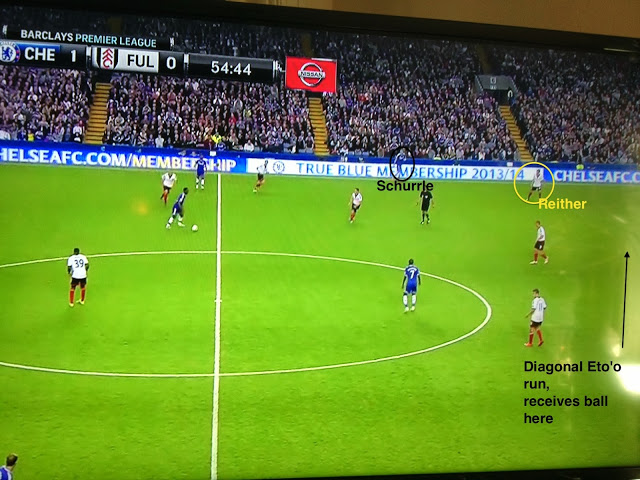 |
| This time Reither stays tighter to Schurrle on touchline, allows Eto'o space to drift in behind and receive long pass from Mikel |