Tactical Analysis: Everton 0-0 Southampton

Click for larger image
Southampton earned a point in Mauricio Pochettino's first game in charge following the sacking of Nigel Adkins. It was a less dour contest than the 0-0 scoreline suggests but there was a profound lack of quality in the final third from both teams, summed up by Nikica Jelavic's second half whiff from 10 yards out.

Southampton were much the better side in the first half but weren't clinical enough in front of goal as they failed to convert a host of decent opportunities. Everton created the better chances in the second half but didn't do enough to deserve the win.

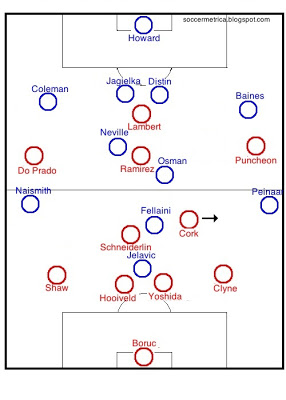
Pochettino recalled Gaston Ramirez and Rickie Lambert to the starting 11 meaning Jay Rodriguez and Steven Davis, starters in the 2-2 midweek draw with Chelsea, were left on the substitutes bench. David Moyes' only change to the side that drew 0-0 with Swansea was to replace Victor Anichebe with Steven Naismith at right midfield.

First Half
The most interesting tactical feature of the first half was Southampton's pressing and their defensive positioning against Everton's favored left flank.

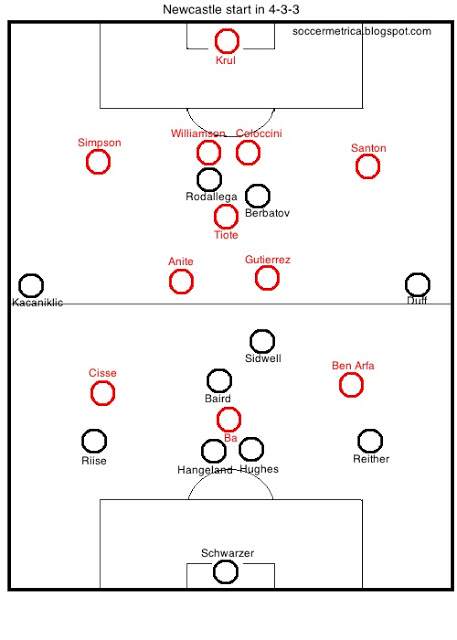
The Saints' four most advanced players Puncheon, Ramirez, Del Prado and Lambert looked to quickly close down Neville, Osman, Jagielka and Distin in Everton's defensive half. You could hear Pochettino through the television mics urging his players to press high up the field. The strategy made sense- the Neville-Osman midfield combination isn't especially fluid and too often there was a large gap between the two and Fellaini. As a result, Everton struggled to link play with its more advanced players through the middle. Without being afforded the time and space to play comfortably between their center backs and holding midfielders, Everton's only passing option up the field was often a long ball from the back towards Fellaini. The Saints' pressing allowed them to nick possession in Everton's half and spring dangerous attacking moves. The graphic below shows passes received by Fellaini in the opening half, many of which came from long balls, and Southampton's first half interceptions.


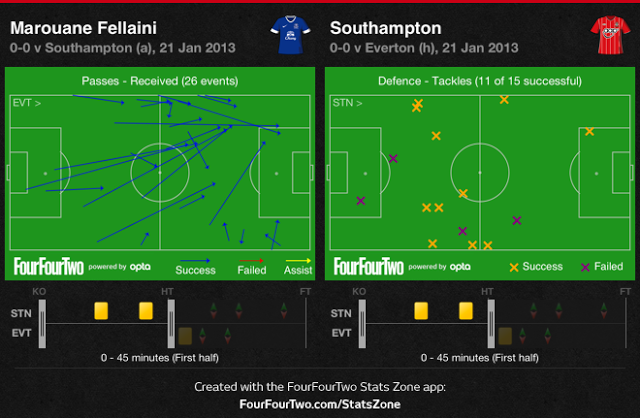
At times this season Everton have used long balls into Fellaini to great effect. He's able to use his size to hold off opposition defenders and flick balls on for the striker or wingers making narrow runs in behind. This strategy was largely responsible for the Toffees season-opening win over Manchester United, when the Belgian used his physical advantage to bully Michael Carrick in the center of the park (due to injuries Carrick was playing out of position at center back that evening). However, against a side sitting towards the bottom of the table, Moyes surely wouldn't have expected his side to be so outplayed in the center of the pitch.

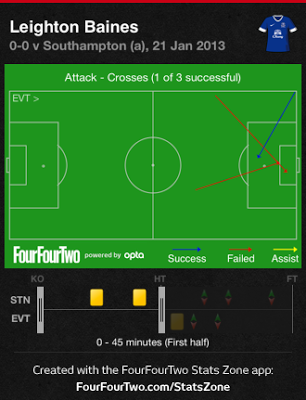
That Everton's deficiencies in the center of the pitch were so noticeable is attributable to how effectively Southampton defended Peinaar and Baines down the left channel. The Toffees rarely rely on their central midfielders to provide the link between defense and offense- instead they advance the ball into the attacking third through the combination play of Baines and Peinaar on the left. Peinaar frequently tucks inside from the left, forcing the opposition right back in field with him and allowing space for Baines to overlap near the touchline and whip in crosses.

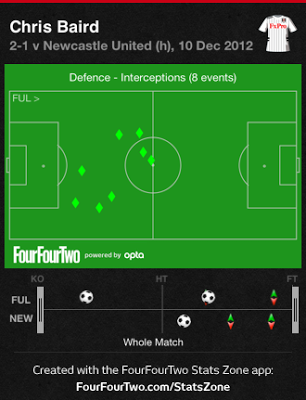
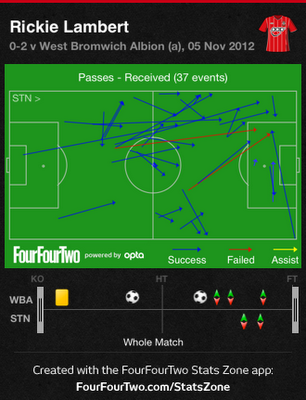
Southampton employed a clever defensive approach that denied Baines opportunities to overlap into space. Rather than having the right back Nathaniel Clyne track Peinaar in field, thereby opening space for Baines to overlap down the wing, Jack Cork shifted to his right from center midfield to pick up Peinaar when he came in field. This allowed Clyne to sit deeper and deny any passes into Baines high up the field. As a result, Baines was forced to receive the ball in much deeper areas than he's used to in the first half, denying him the opportunity to get in positions to apply his trademark crosses. He didn't complete a pass in the attacking third in the first half and managed just one cross from open play from a deep position (the other two crosses in the graphic below were a corner and an Everton free kick in the middle of the pitch near the halfway line).


Rickie Lambert lacks the pace to get in behind defenses. Everton therefore played a high defensive line to keep him away from the box where his size and strength can be put to greater use. However, their pressing and efficient use of the channels enabled them to create some decent opportunities. They frequently looked for Lambert peeling off to the back post to knock the ball back across the six.

Second half
The game began to shift towards David Moyes' side after he was forced to make a 58th minute substitution for Seamus Coleman after the right back suffered an injury. Moyes brought on Anichebe to replace Coleman; Neville dropped to right back, Fellaini dropped to a deeper midfield role alongside Osman and Anichebe went up top alongside Jelavic in a 4-4-2. Fellaini's switch to a deeper role, which he views as his best position, immediately made Everton more fluid in midfield, with the Belgian offering more attacking thrust than Neville. After a poor outing Jelavic was replaced in the 67th minute by Kevin Mirallas- making his first appearance since Dec. 9 after being sidelined by injury. Everton moved back into more of a 4-2-3-1 with Mirallas playing off of Anichebe. The move further increased Everton's fluidity in midfield and the tempo of their play noticeably grew. Mirallas's movement in between the lines was good- however his lack of match sharpness showed as he missed a good opportunity after controlling the ball well and misplaced a few passes.

Southampton's press was less effective in the second half. In the opening 45 minutes they won 7 tackles and 9 interceptions in Everton's defensive half. In the second half they managed 4 tackles and 5 interceptions in Everton's defensive half. As a result, they were unable to spring the same types of quick attacks they created in the first half and failed to register a shot on goal in the second 45 minutes.

Conclusion
Southampton were stronger in the first half; Everton were better in the second. Both sides had opportunities to win the game but both lacked composure in front of goal. In the end it was probably a fair result.

Pochettino will likely be the more pleased of the two managers. His side were well organized and showed good energy levels to press for the majority of the game. More clinical finishing would have given his team a massive three points, but a difficult point to a top five side should be applauded.

Moyes will rue another missed opportunity at 3 points. He'd have viewed this as a good chance to cut into Tottenham's lead in the race for fourth. It's his sides 11th draw of the season, tied with Stoke for most in the Premier League.

Tactical Analysis: Swansea 2-0 Chelsea

Two dreadful errors from Branislav Ivanovic gifted Michu and Danny Graham goals as Swansea emerged 2-0 winners in the first leg of the League Cup semifinal. Chelsea had 64% of the possession and 24 shots to Swansea's 5. Despite dominating the run of play, Rafa Benitez's side were left frustrated by Swansea's deep, compact defending. They were guilty of squandering some decent chances in the first half but created few meaningful opportunities in the second after Swansea had gone a goal up.

Both coaches selected strong starting lineups. Benitez selected Oscar on the right over Victor Moses and Fernando Torres was given the start at forward over Demba Ba.

Michael Laudrup started Michu at center forward with Jonathan De Guzman operating as the attacking center midfielder.

Swansea's approach was cautious from the outset, defending deep with all 11 men behind the ball. Routledge and Hernandez dropped either side of Ki and Britton to form a midfield bank of four. Michu dropped alongside De Guzman and the two picked up Chelsea's deeper lying midfielders Ramires and David Luiz. Ivanovic and Cahill were left free and given time on the ball.

In the opening stages Chelsea's three attacking midfielders were able to find space between the seams and create meaningful goalscoring opportunities with quick combinations around the 18. Mata was guilty of squandering two decent chances and Ramires probably should have made Swansea keeper Gerhard Tremmel work harder after he'd done well to burst into the box with a powerful dribbling move from midfield.

The Blues were most dangerous when they won the ball back in their defensive third and looked to transition forward quickly while Swansea were out of position. Once the Welsh side had time to recover into their defensive shape, Chelsea struggled to break them down.

As he tends to do, Torres continued to drop into the midfield and wide to the channels to get on the ball. No one seems to refer to him as a false 9 but in fact that's how he plays. While his movement into deeper and wide positions offers Chelsea an extra forward passing option and allows them to create overloads, it also leaves no one higher up the pitch to trouble the opposition center backs. They can simply sit in and pick up any runs into the box by Chelsea's attacking midfield trio (I wrote about this in detail on Monday).

As the second half wore on Swansea continued sitting deep and left De Guzman and Michu to try to hold the ball up and create an attacking threat on their own. Azpilicueta and Cole pushed forward and looked to overlap Oscar and Hazard as Chelsea chased on equalizer. However, Hernandez and Routledge diligently tracked the Chelsea outside backs. As a result, Chelsea often looked to attack through the middle- David Luiz and Ramires played higher up the pitch as the game wore on- however, Swansea were too compact and too deep for Chelsea to find any gaps to slip balls in behind.

Substitutions
Laudrup brought on Dwight Tiendalli, a fullback, for Wayne Routledge in the 62nd minute. Tiendalli slid in at right back, Angel Rangel pushed forward to right midfield, and Hernandez moved to left midfield. The substitution was made to shore up the right side of Laudrup's defense and prevent Cole and Hazard from creating overloads down that sideline. Throughout the first half Hazard and Cole had combined well to get into dangerous positions down the left. Rangel, a right back used to getting up and down the sideline, tracked the movement of Ashley Cole while Triendalli stuck with Hazard. Cole was unable to make overlapping runs into space following the substitution.

Chelsea introduced Frank Lampard for Ramires in the 71st. In the 81st and 83rd minutes he brought on Ba and Marko Marin for Torres and Oscar, substitutions he should have made earlier. Prior to Ba and Marin coming on Chelsea's attacks were far too narrow- their combination passing was never going to break down such a crowded defense and they needed to become more direct by getting the ball wide and hitting crosses. Ba's aerial threat and physical strength provided the more direct threat Chelsea needed in the final third. Within seconds of his introduction he dangerously flicked a long ball from Ivanovic goalward and moments later got on the end of cross from Marin. It was particularly surprising Benitez waited so long to bring on Ba given Swansea's center backs Chico Flores and Ashley Williams have difficulties against more physically imposing forwards.

Laudrup made his final substitution in the 83rd minute, bringing on Danny Graham for Michu. Graham pounced on Ivanovic's blind back pass to put the game away in the second minute of added time.

Conclusion
Swansea defended deep and were well organized at the back, particularly in the second half. They created little but deserve credit for keeping a full strength Chelsea squad off the score sheet at Stamford Bridge.

The game could have ended differently for Chelsea had they taken one of their early chances but as the game wore on and they were forced to break through a packed defense they were short on ideas. Their attacks were too narrow and prior to the introduction of Ba they lacked someone with the physical presence in the box to get a scrappy goal.


Review: Arsenal 7-3 Newcastle

Theo Walcott bagged a hat trick as Arsenal hit Newcastle with four unanswered goals in the final 20 minutes to give the Gunners a wild 7-3 win. Had Olivier Giroud's late header off the woodwork been a few inches lower, it would have tied the record of 11 for most goals in a Premier League match (Portsmouth beat Reading 7-4 in September of 2007).

It was a match that typified the first half of the 2012-2013 Barclay's Premier League season- plenty of action and drama but desperately lacking in convincing team performances and tactical intelligence. That 10 goals were produced was a shock given the rather dismal performance of both sides in the first 45 minutes- the scoreline is more a reflection of silly mistakes and perhaps fatigue than any scintillating team display. With both teams fielding three man central midfields and getting numbers behind the ball defensively, neither side was able to dominate the midfield in the opening 45 minutes and the game was played at a remarkably slow pace by Premier League standards.

Team tactics played virtually no role in the game and there was very little tactical development over the course of 90 minutes. There was some fine finishing on display, with Walcott in particular deserving of praise for an excellent performance, but lapses in concentration on defense were largely responsible for the bulk of goals. With the scoreline at 3-3, all 6 goals could be blamed on silly errors (footytube highlights here):

  • 1-0 Arsenal. Danny Simpson pushes forward from his right fullback position to join a Newcastle attack. The Magpies lose possession. Arsenal look to counter quickly through Podolski who had burst into the space behind Simpson. Cazorla hits a pass behind Podolski forcing him to turn around and put his back to goal to retrieve the ball. This allows Simpson time to recover. But rather than pressing Podolski and forcing him to go backwards, he continues to retreat towards his own goal, allowing the German winger the space to turn, lift his head and slot a through ball to Walcott.
  • 1-1. Bacary Sagna makes a silly foul on Papiss Cisse in a dangerous area just outside the box.
  • 2-1 Arsenal. A horribly underthrown throw in from Danny Simpson falls to the head of Podolski- he's able to play his header forward to Cazorla whose pass to Oxlade-Chamberlain is finished off well by the Arsenal teenager. I realize it sounds like I'm looking for someone to blame pinning the goal on a throw in but watch the highlights at 2:18: it really is a dreadful throw in that gets nowhere near a Newcastle player.
  • 2-2. Sylvain Marveaux is 40 yards from goal when Obertan collects the ball on the left wing in the build up to Newcastle's second goal. He makes a casual run towards the back post as Obertan dribbles at Sagna. Not a single Arsenal player notices his run in the entire sequence and he's allowed to tap in the simplest of goals unmarked at the back post.
  • 3-2 Arsenal. Tiote is carelessly nicked of possession by Wilshere in midfield leading to an Arsenal counter that ends in Podolski's tap in header. Wilshere did excellently to close in on the Ivorian midfielder but Tiote got his first touch stuck under his feet leaving him unable to get rid of the ball before Wilshere could pounce.
  • 3-3. Marveaux bursts forward with the ball from midfield. Sagna and Wilshere have the chance to double team for Arsenal at the 18. The two fail to communicate and both back off allowing Marveaux to pick his head up and play a clever ball to Ba at the back post with the outside of his foot. Gibbs was guilty of ball watching and switching off on Ba.
Arsenal's fourth was the first goal of the game that had more to do with the team shape of the attacking team than mistakes by the defensive team. Throughout the second half Podolski had been tucking inside on the left, forcing Danny Simpson to track him into the middle of the box and leaving space for Gibbs to overlap in the channel.  On the fourth, Podolski mad a run into the center of the box. Simpson followed and Gibbs dutifully made the overlapping run into space and provided the cut back for Walcott to smash home.

Arsenal's fifth, sixth and seventh goals came when the game had become very open. That Walcott had a hand in all three was no surprise. His pace and ability to run in behind defense is suited for open games, something he stated himself in the post match interview. He turned provider for Olivier Giroud for the fifth and sixth goals and finished off his hat trick in style with a slaloming run into the box for the seventh.


Tactical Analysis: Arsenal 1-0 Wigan Athletic

A 60th minute Mikel Arteta penalty after Theo Walcott had been clipped by Jean Beausejour in the box gave Arsenal a 1-0 win over Wigan. On the balance of play Arsenal may have been fortunate to emerge with the three points and that was largely because Roberto Martinez got his tactics spot on while Arsene Wenger made a questionable substitution that nearly cost the Gunners. A defensive mistake from  Beausejour and poor delivery from wide areas proved costly for Wigan

Wigan started in their normal 3-4-3. Martinez didn't have any of his first choice center backs available so dropped James McCarthy back from midfield to play at the center of the back three. David Jones played alongside James McArthur in the center of midfield.

Wenger stuck with the same lineup he used in Monday evening's 5-2 win at Reading. Theo Walcott was employed at center forward while Alex Oxlade-Chamberlain played wide on the right.

The most interesting tactical feature of the game was Wigan's use of their back three. Because Arsenal were in a 4-2-3-1, Wigan had a 3 v. 1 advantage in the center of defense and therefore had two spare center backs. The two man advantage at the back also meant they were short a man in the center of midfield. To even the numbers in the midfield, McCarthy stepped into the midfield in front of the "outside" center backs Boyce and Figueroa and man marked Santi Cazorla. Wigan still had a spare man at center defense- Boyce and Figueroa were 2 v. 1 with Walcott in deeper areas. Wigan's wing backs picked up Arsenal's wide forwards. In effect, defensively Wigan were playing with a back four of Stam, Boyce, Figueroa and Beausejour with McCarthy playing a holding midfield role tracking Cazorla between the seams. Then when Wigan won possession Beausejour and Stam would push high up the pitch from their wing back positions and McCarthy would drop between Figueroa and Boyce to form a back three. This is very similar to the way Barcelona play with McCarthy playing the Sergio Busquets role.

The strategy worked to stifle Cazorla's offensive contribution. He played the pass that led to Walcott being awarded the penalty but aside from that he had a relatively quiet afternoon with McCarthy constantly tracking his movement.

Offensively, Wigan tried to overload Arsenal in wide areas with their wing backs and wide forwards looking to get Arsenal's fullbacks in 1 v. 2 situations. With Arsenal's wide forwards often failing to track Beausejour and Stam defensively, the two Wigan wing backs were often able to get the ball in space on the flanks. However, their delivery from wide areas was poor all afternoon.

Wenger made the game's first substitution on 75 minutes, replacing Podolski with Coquelin. Cazorla moved to the left and Coquelin played in the middle of midfield. I assume Wenger made the substitution to give the Gunners some extra bite in the middle of the pitch but Wigan were mainly threatening from the wings- it was a poor decision from Wenger and one that nearly proved costly. Cazorla is not good at tracking runners defensively and helping his fullbacks. Within minutes of making the change Stam had blown past Cazorla and received the ball in space down the right wing. Again his final delivery was poor but Wenger's decision to move Cazorla to the left nearly cost Arsenal. Finally, in the 90th minute he brought on Koscielny for Cazorla to provide Gibbs with some protection on the left. It was a substitution he should have made immediately when he had taken off Podolski.

That Wigan lost was no fault of Martinez who got his tactics spot on and frustrated Arsenal defensively for large parts of the game while threatening down the wings. However, they lacked the final delivery needed and still could use a center forward that is lethal in front of goal.

Tactical Analysis: Juventus 1-0 Cagliari (Coppa Italia)

Giovinco pounced on a Cagliari defensive mistake to give Juventus a 1-0 win that sees them through to the quarterfinals of the Coppa Italia in manager Antonio Conte's first home game since serving his match fixing suspension. Juventus were the better side but it was fitting the goal came from a mistake: apart from an early spell in which the bianconeri looked threatening this was a drab encounter.

Both sides rested a number of their regular first team players. Cagliari played a 4-2-3-1 while Juventus were in their usual 3-5-2. The starting lineups are in the diagram on the left.

The midfield match up was fairly straight forward- Cagliari's holding midfielders Ekdal and Erikkson matched up with Juventus's shuttling center midfielders Vidal and Padoin respectively and Cepellini, Cagliari's attacking midfielder, matched up with Juventus's holding midfielder Pogba.

In the central attacking zones, Juve's forwards matched up 2 v. 2 with the Cagliari center backs meaning the visiting team didn't have a spare center back to provide cover. At the other end, Juventus had three center backs to Cagliari's one forward.

There were three important tactical features to this game: (1) Cagliari's early decision to leave Pogba unmarked in midfield and their subsequent adjustment dropping Cepellini in to defend him, (2) the movement of Juventus's two forwards, and (3) Cagliari's inability to take advantage of their numerical advantage on the flanks.

Pogba
In the opening 20-25 minutes Cagliari made the decision to leave Pogba unmarked as the deepest player in Juventus's midfield triangle rather than dropping Cepellini in to defend him. Eriksson picked up Podoin, Ekdal picked up Vidal and Pogba was left to sit in space behind on his own. Presumably Cagliari head coach Ivo Pulga did this to allow Cepellini to drift in space behind Pogba and provide an out ball for counter attacks when they regained possession. Pogba doesn't have the same passing vision as Andrea Pirlo, the man he replaced in the lineup, and therefore Pulga wasn't overly concerned about him picking apart his defense with penetrating forward passes. But while Pogba didn't provide any devastating defense-splitting pass, he was doing an excellent job of funneling passes forward and dictating the tempo of the game. Juventus created more genuine scoring chances in the opening spell when Pogba was left unmarked than they did the remainder of the game.

Pulga eventually made the decision to drop Cepellini in to defend Pogba when Juve were in possession. Juventus's midfield passing immediately become much slower. Without the option of playing the ball to their unmarked holding midfielder, the bianconeri were frequently forced to play direct balls from the back three to the two forwards.

The negative side to this switch for Cagliari was that with Cepellini dropping in deep to defend, their loan forward Mauricio Pinilli was left isolated higher up the field when they won the ball back.

Movement of Juve Forwards
Because Cagliari were in a flat back four and Juventus used two center forwards, both center backs had to mark a forward. There was no spare center back to provide defensive cover. Against teams that play a flat four, Juventus consistently use the same strategy for their forwards' movement. One will make a run back into the midfield, forcing one of the opposition center backs to track him. The other will then make a diagonal run into the space that opens up a result. In the 8th minute Bendtner made the run into midfield with Rossettini following him from his center back position. Giovinco made the diagonal run into space and was put through on goal but missed his chance. He was put through on goal in the same fashion later in the half but was flagged for offsides.


Wide Areas
Cagliari's numerical advantage came on the flanks. With Juve's two wing backs their only players positioned in a wide area, Cagliari had a 2 v. 1 advantage on each flank. However, in order to make use of that advantage they needed their fullbacks to get forward and join in the attack to overload the Juve wing backs. This never happened because they were unable to keep possession long enough for Murro and Perico to get forward from their fullbacks positions.

Defensively, Cagliari kept their wide forwards Ribeiro and Ibarbo high up the pitch, opting to use Murro and Perico to mark Isla and De Ceglie. However, Juventus began to overload Murro. Padoin (who had switched to right-sided center mid after an injury to Vidal) and Giovinco would float towards Isla on the right channel, leaving Murro to defend 1 v. 2. Juve's goal came when they were able to overload Murro. Isla received a cross field ball that forced Murro to the touchline to defend him. Padoin floated towards Isla unmarked, received a ball near the corner of the 18 and slipped it into the box for Giovinco. The pass to Giovinco was initially intercepted by Rossettini but he failed to clear it before Giovinco could win the tackle and score. It was a scrappy goal but developed because Juventus were able to overload Murro on the right.


Tactical Analysis: Fulham 2-1 Newcastle

Hugo Rodallega's second half header gave Fulham a 2-1 win over Newcastle after two earlier deflected goals from Steve Sidwell and Hatem Ben Arfa had put the two teams level at 1-1.

Ben Arfa returned from injury for the Magpies and started the game as the left-sided attacking player in a 4-3-3. Jonas Gutierrez and Vurnon Anita played in front of Chiek Tiote in the middle of midfield and Papiss Cisse was again used as a right forward. Alan Pardew's defense was as expected.

Martin Jol selected Rodallega over Mladen Petric to pair with Berbatov at forward in Fulham's 4-4-2.

The tactical development of the game can be broken into three phases that were brought about by tactical and personnel changes from Pardew. In the first phase Newcastle started the game in a 4-3-3 yet were getting dominated in terms of possession despite having an extra midfielder and created few goalscoring opportunities of their own. In the second phase Pardew switched to a 4-4-2 with Ba and Cisse paired up top after Ba had become isolated in the 4-3-3. In the third phase Newcastle were chasing an equalizer and brought on Shola Ameobi to replace Ben Arfa and moved to what was basically three center forwards and began hitting everything long into the box for Ameobi, Ba and Cisse.

Newcastle start in 4-3-3
Newcastle's 4-3-3 meant they had a man advantage in midfield yet they were dominated in this zone. Offensively, Anita was usually picked up by Baird while Sidwell looked after Guttierez. With Berbatov and Rodallega generally staying high up the pitch for Fulham, Tiote was left free in deeper positions in midfield. However, the Ivorian is obviously more combative ball winner than creative passer in his holding midfield role and failed to play any penetrating passes into the final third when he got on the ball. His primary concern was maintaining a position where he could help his center backs slow down Fulham counterattacks when Newcastle lost possession. This was understandable but it also meant Newcastle's extra man in midfield didn't give them an advantage in the final third.

Baird and Sidwell did an excellent job for Fulham sitting in front of the back four and reading passing lanes and intercepting passes. Baird had 8 interceptions, more than twice as many as any player on the field.


Pardew is desperately missing the creativity of Yohan Cabaye in an advanced midfield position. Anita did well circulating the ball but isn't an especially dynamic player and Gutierrez is better on the left wing where he can run at defenders and whip in crosses. Without Cabaye's creative passing in midfield, Newcastle continue to struggle to link the midfield with Ba and have too often resorted to knocking longballs towards the Senegalese forward (this table I produced last week shows Newcastle plays a larger percentage of longballs than any other team).

Fulham's attack largely revolved around two strategies. Firstly,  Dimitar Berbatov dropped off into midfield to collect the ball and direct the Cottagers' moves forward. Secondly, with Newcastle's fullbacks getting into advanced positions, Fulham looked to counter attack down the channels with Rodallega often floating out wide to receive direct passes and break forward quickly. Berbatov did an excellent job getting his two wingers involved early on. Rodallega played more advanced and looked to create overloads for Newcastle's fullbacks by floating into the channels. Sidwell sprinted forward from midfield to join the attack. Fulham's first goal came when Rodallega drifted behind Santon on the right wing, forcing Coloccini out of central defense to follow him all the way to the right touchline. Rodallega slipped a pass towards the end line through to Duff who was able to cut the ball back and find Sidwell at the top of the box for the finish.

Pardew switches to 4-4-2
With Newcastle struggling to get players close enough to Ba for him to have a meaningful passing option, Pardew switched to a 4-4-2 around the 28th minute. Cisse moved alongside Ba up top. Ben Arfa switched to his more comfortable right midfield position and Gutierrez moved from the middle to his natural place on the left wing. Anita played in advance of Tiote in the middle of midfield.

Much has been made about the fact Ba and Cisse have never scored in the same game when both were on the pitch. However, the move to two up top seemed to make sense given Ba had been so isolated in the opening 28 minutes. Newcastle may have been concerned about becoming even more direct with only Anita and Tiote in the middle of midfield. However, Ben Arfa crucially began to tuck into the middle of the pitch from his right-sided position, playing almost as a #10, while Danny Simpson advanced from right back to provide width. Ben Arfa's movement into the middle gave Baird and Sidwell another defensive responsibility. They now had to track the movement of both Ben Arfa moving infield and Anita shuffling forward, meaning one of them was no longer spare to track runs of either Cisse or Ba back into midfield. As a result, Ba began to find space to drop off in between the seams, receive passes, turn and play through balls for Cisse in behind the defense. and the game became very even. A move in which Ba dropped off in front of the Newcastle center backs and slipped Cisse through on goal highlighted the Magpies new offensive potency (though Cisse had strayed into an offsides position and had hit the woodwork anyway). Ben Arfa was excellent providing the link between Newcastle's defense and the two forwards and was Newcastle's key player in the second half. His goal took a fortunate deflection but came when he had tucked inside and received a pass from Simpson on the right.

While Newcastle looked more dangerous after moving to a 4-4-2, Ba and Cisse still seem uncomfortable playing together as a center forward pair. Whereas Berbatov and Rodellega played 17 passes to one another, Ba and Cisse combined for just 5.

Fulham continued to try to counter into the flanks. Martin Jol made what would prove to be a key substitution in the 63rd minute, bringing on Ashkan Dejagah to replace Kacaniklic. Duff switched to the left and Dejagah occupied the right wing. With his first touches of the game, Dejagah was brought down on the right at the edge of the penalty area. Rodallega powerfully headed home the resulting Duff free kick.

Ben Arfa replaced
Trailing 2-1, Pardew replaced Ben Arfa with Shola Ameobi in the 71st, a move that presumably came down to a lack of match fitness for the Frenchman given he had been Newcastle's brightest player. Ameobi moved into the center of what was basically a center forward three for Newcastle with Ba slightly to the left and Cisse slightly to the right. Gutierrez stayed wide on the left while Simpson played very high up the pitch on the right as more of a right midfielder (Newcastle were basically in a flat 3-4-3). They looked to get the ball wide to Gutierrez and Simpson to play early crosses in towards the back post for the three towering forwards to attack. You wont witness a clearer example of route 1 football in a top flight European league. Hangeland and Hughes defended admirably at the center of the Fulham defense. Newcastle attempted 10 crosses after Ameobi's introduction but only one was successful.


Conclusion
Fulham's counterattacks were impressive. The combination of Berbatov's skillful buildup play and Rodallega's hard running worked to great effect. Newcastle were most dangerous when Ben Arfa drifted in space in the middle of the pitch and used his creativity to link with the forwards. Without a creative passer in the middle of midfield they become too direct. Pardew will therefore be desperate to have Cabaye back in the side.

Preview: Arsenal vs. West Brom


West Brom and Arsenal will look to get back to winning ways when they meet at the Emirates Saturday afternoon. Arsene Wenger's side are winless in their last three league games and sit 10th in the table, their worst start to a season in 18 years. Steve Clarke's Baggies have lost their last two but have had more to celebrate this season- despite the recent defeats West Brom are off to their best start to a Premier League campaign. They find themselves 5th in the table, level on 26 points with fourth place Spurs and 3rd place Chelsea. 

Wenger will have to deal with several injuries to first team regulars. Laurent Koscielny, Theo Walcott and Lukas Podolski will all be sidelined while Bacary Sagna is also doubtful. Carl Jenkinson will replace Sagna at right back. Aaron Ramsey may be given the start on the right in the absence of Walcott with Alex Oxlade-Chamberain expected to fill in for Podolski on the left. Wenger also has Tomas Rosicky and Gervinho available. He could opt to play Rosicky on a wing or in the hole behind Giroud and push Cazorla wide.

Boaz Myhill will fill in for the Baggies at goalkeeper for Ben Foster who is recovery from groin surgery.
 
A Clash of Styles
This game will showcase a clash of two very different playing styles. Arsenal build attacks patiently from the back, move forward as a unit and retain possession. West Brom defend deep and look to counter rapidly. Arsenal lead the league in possession, averaging 59.9% per game while West Brom are fourth from bottom with 43.5% per game.

Expect West Brom to drop their wide midfielders Odemwingie and Gera alongside Yacob and Mulumbu in defense to create a second bank of four. Jenkinson and Gibbs will join in the attack for Arsenal from their outside back positions, pushing Odemwingie and Gera further towards their own goal. Ramsey will likely tuck inside from his right midfield position, creating space for Jenkinson to overlap. Jack Wilshere will push forward towards Cazorla in possession and look to link defense to offense. The Gunners will look to create short combinations of passes around the penalty area and find gaps in West Brom's back four to slip the ball through. They need to do a better job of turning possession into genuine goal scoring chances. During their current three game winless streak their opponents have taken more shots on target in each game despite Arsenal winning the possession battle in all three games and completing more passes in the final third.

With Jenkinson and Gibbs pushing forward, West Brom will look to quickly counter in the space behind the two Arsenal outside backs when they regain possession. Shane Long will likely float into these wide channels to provide one option for an out ball. Gera and Odemwingie will also try to quickly break in behind Jenkinson and Gibbs. It'll be Morrison's job to quickly transition forward in the middle of the pitch and link with Long. With Wilshere moving in to more advanced positions in possession, Arteta will be responsible for slowing down counterattacks, particularly by denying Morrison opportunities to get on the ball in space. The Spaniard's positioning was incredibly poor on Swansea's opening goal last weekend when he completely switched off on attacking midfielder Michu and left him unmarked just in front of the Arsenal back four.

The screenshot below shows Arteta 15 yards to the left of Michu, moving into an area Arsenal already had well covered. Chico is able to clip a pass into Michu, forcing Vermaelen to step to ball and leave space in behind him. Michu plays a simple on-two with Luke Moore, breaks past the Dutch center back and coolly finishes the breakaway. Had Arteta been in the correct position in front of the back four, Vermaelen who have never had to step out, allowing space behind him for Michu to run into (in fact Michu wouldn't have even received the ball). Arteta will have to do a better job tracking Morrison when West Brom look to break.


Central Midfield Zone
As mentioned above, defensively West Brom will likely drop their wide midfielders Gera and Odemwingie alongside holding midfielders Yacob and Mulumbu to create a midfield bank of four. Against Chelsea's 4-2-3-1, Shane Long dropped alongside James Morrison to pick up Chelsea's two holding midfielders, Mikel and Romeu on that day, and left the center backs unmarked. Both Mikel and Romeu like to sit in front of the back four and circulate the ball sideways; neither are particularly strong at linking defense and attack either with their dribbling or forward passing. Their reluctance to push forward meant Long and Morrison could defend them fairly easily while still remaining high up the pitch in good counter attacking positions when West Brom regained possession. It also meant West Brom had a spare holding midfielder so Chelsea's attacking central midfielder (both Hazard and Sturridge played there for the Blues) was outnumbered. West Brom had a spare center back as well so in the central attacking zones Chelsea were outnumbered 2 v. 4. As a result, the Blues lacked a vertical passing option and were forced to play the ball sideways.

Arsenal will pair Jack Wilshere alongside Mikel Arteta at center midfield. Wilshere is more of a box-to-box midfielder than either Mikel or Romeu and will push higher up the pitch and do a better job of linking defense to offense. The Baggies will therefore have to decide if they want Morrison to track the forward movement of Wilshere so that they have a spare holding midfielder and can defend the dangerous Santi Cazorla 2 v. 1 higher up the pitch. If they do that Long will drop in and sit on Arteta. The danger for West Brom of playing like this is that they could get pushed too deep defensively and not have an out ball when they retain possession. Therefore I'd expect Morrison to pick up Arteta, leaving a 2 v. 2 match up higher up the field between Cazorla-Wilshere and Yacob-Mulumbu.

Arteta's role circulating the ball and dictating the tempo of the game is crucial for Arsenal. Team's that have kept him off the ball have had success against the Gunners- their ball movement becomes far too slow without his involvement. He averages 88 completed passes per game, second in the Premier League only to Michael Carrick. In games he's completed fewer than 80 passes Arsenal are averaging only 0.75 points per game (1 win, 3 losses, 3 draws) and 0.57 goals per game. In games he's completed more than 80 passes they're averaging 1.63 points per game (3 wins, 1 loss, 3 draws) and 2.5 goals per game. Clarke will therefore likely put an emphasis on using some combination of Morrison and Long to keep Arteta off the ball and prevent Arsenal from getting in any type of rhythm in possession.

Tactical Analysis: Juventus 1-0 Shakhtar Donetsk

Juventus emerged with a surprisingly comfortable 1-0 win in Ukraine over Shakhtar Donetsk to overtake their opponents for first place in group E and send Chelsea crashing out of the competition despite their 6-1 win over Nordsjealland.


Formations
There were no big surprises in the formation or starters for either side. Massimo Carrera (Antonio Conte) selected Giovinco over Quagliarelli to partner Vucinic up top. Eduardo started in place of the suspended Luiz Adriano at forward for Shakhtar. Juventus played their usual 3-5-2; Shakhtar played their usual 4-2-3-1.


Wide Play
One of the biggest tactical surprises was just how high up the pitch Juventus's wing backs were willing to move when in possession, particularly Lichtensteiner on the right. In my preview to this game I said I expected Lichtensteiner and Asamoah to stay a bit deeper in more of a defensive 5-3-2 since Juventus only needed a point to qualify. My thinking was that by having the two wing backs sit deeper, Juventus wouldn't open up space down the wings for Willian and Teixeira to counter into. But their more adventurous positioning turned out to be a great move from Conte. It forced Willian and Teixeira to drop deep into their own half alongside Shakhtar's holding midfielders, forming a second bank of four, and left Eduardo isolated against the three Juventus center backs when Shakhtar won possession back.

The positioning of Shakhtar's holding midfielders Fernandinho and Stepanenko played an important role in allowing Juventus to create overloads down the right flank. Fernandinho was positioned in his normal spot towards the right side in the center of midfield. Defensively he was responsible for tracking Pogba. Stepanenko sat in front of the back four and tracked the runs of Vucinic and Giovinco back into midfield. I noted in my preview to the game Juventus like Vucinic to make runs back into midfield, pulling one center back along with him and opening up space for Giovinco to make runs in behind. You can therefore understand what Shakhtar were thinking placing Stepanenko just in front of the center backs- he could track Vucinic's runs into midfield, allowing Kutcher and Rakitskiy to retain their shape in the center of defense. However, this also left Vidal unmarked for Juventus at right center midfield. He was able to freely push forward, forcing left back Rat to pick him up when he got the ball. This opened up space for Lichtensteiner to make overlapping runs around the outside (see diagram above). For Juventus's goal it was Vucinic and not Vidal who had shuffled right forcing Rat to close down on him but the idea was the same. It allowed Lichtensteiner the space to get around the outside and cross for Giovinco to finish. 

Juve's 3 v. 1 Advantage at the Back
The fact Juventus's three center backs were only occupied with one Shakhtar center forward played a key role in the game. It meant Eduardo was always going to struggle to get on the ball and that there were no gaps in the center of the Juventus defense to play balls in behind. Having two spare center backs also proved crucial in dealing with Willian and Fernandinho when they were able to dribble past Juventus's three central midfielders. When the two talented Brazilians were able to break behind the Juventus midfield, one of the two spare center backs was able to close them down. This still left Juventus with one center back to man mark Eduardo and another spare center back to provide cover. The box was simply too crowded for Shakhtar to create much down the middle.

Giovinco and Vucinic Movement
Because Juventus were playing with two forwards in Vucinic and Giovinco, it was 2 v. 2 at the back for Shakhtar's center backs Rakitskiy and Kutcher. When Shakhtar lost possession, one of the two Juventus forwards would float to space in the channels left open when Rat and Srna pushed forward to join in the attack. Juventus would hit long balls into this space on the counter, forcing one of Shakhtar's center backs into a wide area to close down the ball. This created huge gaps between the Shakhtar center backs for either the other forward or Vidal and Pogba to run into. In the first half Vucinic collected a long ball in space on the right, forcing Rakitskiy wide to close him down. This left Giovinco in space at the edge of the box but he put his excellent chance wide.

Conclusion
Juventus's movement was clever all over the field. 3-5-2 can be quite an effective formation to play against 4-2-3-1 and today's game demonstrated this perfectly. Shakhtar had no spare center back to provide cover and their center forward was outnumbered around the penalty box 1 to 3. Shakhtar's advantage should have been their unmarked fullbacks but neither Srna nor Rat were particularly effective moving forward. When they were able to get the ball in space on the wings, there were too many Juventus bodies in the box to provide a decisive delivery. Juventus were deserving winners.


Tactical Preview: Juventus vs. Shakhtar

Juventus's Champions League fate will be decided tonight as they head to Donetsk needing only a draw with Shakhtar to secure qualification into the knockout stage. A Juventus loss and a Chelsea win over Nordsjaelland in group E's other fixture will put the Blues through. Shakhtar have already wrapped up qualification.

Starting Lineups
Shakhtar will likely set out in their usual 4-2-3-1 formation. Juventus will be in their normal 3-5-2.

Antonio Conte's side will be aided by the suspension of Shakhtar center forward Luiz Adriano after he was suspended by UEFA for an unsporting goal he scored against Nordsjaelland. Former Arsenal striker Eduardo is expected to replace him. Tomas Hubschman is a doubt with a hamstring injury and will likely be replaced by Taras Stepanenko.

Paul Pogba is expected to fill in for the suspended Claudio Marchisio for Juventus and Conte will have to select two of Mirko Vucinic, Fabio Quagliarelli or Sebastian Giovinco to fill the two forward positions.

Shakhtar Fullbacks Unmarked
Needing only a draw in a difficult away environment Conte will likely ask his wing backs Kwadwo Asamoah and Stephan Lichtensteiner to be conservative with their positioning, staying fairly close to the back three in more of a 5-3-2 than a 3-5-2. The two will drop in to pick up Willian and Teixeira on the flanks, leaving Chiellini, Bonucci and Barzagli compact centrally to defend runs into the box. This means Shakhtar's outside backs Srna and Rat should be unmarked when they advance forward. Juventus will allow them to receive the ball on the flanks and focus their attention on crowding the box and winning balls played into the penalty area. Rat and Srna are both decent going forward but it will be interesting to see how adventurous they are with their positioning going forward- when they advance high up the field it will open space for Quagliarelli or Giovinco to float into and spring counters.

3 v.1 Advantage for Juventus at the Back
Juventus will have three center backs to deal with Shakhtar's loan center forward Eduardo. They had the same numerical advantage at the back against Chelsea, who like Shaktar play a 4-2-3-1, and it worked to their advantage. With three center backs Fernando Torres didn't have space to move laterally and collect the ball in the channels. Instead he had to check back into the midfield, taking him away from goal. Three central defenders will also make it difficult for Shakhtar to press. Shakhtar's three forwards can press the three center backs but they run the risk of leaving Asamoah and Lichtensteiner in space on the wings. To effectively press Shakhtar will need to stay quite compact and hold a very high line, leaving them vulnerable to balls played over the top from the back.

If instead Willian and Teixeira drop back and defend Lichtensteiner and Asamoah, as Chelsea did, this leaves Eduardo to defend the three center backs. In this case Bonucci, Barzagli and Chiellini will be able to comfortably play out from the back.

No Spare Center Back for Shakhtar
Juventus's use of two forwards means Shakhtar will not have a spare center back to provide cover. Against Chelsea, Juventus tried to draw one center back out of position by having Vucinic make runs into midfield. Giovinco (and later in the game Quaglierelli) would then make a diagonal run into space left open by the center back stepping out. Quaglierelli ultimately got the equalizer in this manner. The lack of a spare center back also means that Shakhtar's midfielders Fernandinho and Stepanenko will have to diligently track the forward runs of Pogba and Vital. If they allow Pogba or Vidal to get on the ball in behind them, one of their center backs will be forced to leave a forward unmarked and step to ball.

Conclusion
Expect Juventus to defend deep in a more of a 5-3-2 and try to escape with the point they need. They'll concede the wings to Shakhtar's fullbacks and look to crowd the penalty area to prevent any good chances in the box. Offensively, they'll look to spring counters through Quagliarelli or Giovinco floating to the flanks into space left open by the advancing Shakhtar fullbacks.

Tactical Analysis: Newcastle 2-0 Wigan

Maynor Figueroa's 12th minute red card for a last ditch tackle on Papiss Cisse was the key factor in Wigan's 3-0 loss at Newcastle. Ba scored the resulting penalty to put the Magpies up 1-0 and from there they were relatively comfortable for the remainder of the game.

Prior to Figueroa's sending off the game looked like it would provide an interesting tactical battle. When these teams met at the end of April last season, Alan Pardew's side were at a loss for how to defend Roberto Martinez's unconventional 3-4-3 formation and were soundly beaten 4-0. Wigan's 3-4-3 employs two wing backs and two wide forwards. They look to push the wing backs up towards the wide forwards and overload the opposition full back in wide areas (see post below). In the 4-0 defeat Pardew played a 4-3-3 with three central midfielders. Wigan's wing backs (Emmerson Boyce and Jean Beausejour on that day) pushed beyond Newcastle's wide forwards when in possession, creating 2 v. 1 situations with the wide forwards on the flanks in the attacking third. Newcastle's three central midfielders were unable to shift to wider areas and pick up Boyce and Beausejour and Wigan therefore dominated play on the wings.

Given how thoroughly outplayed Pardew's team was in that fixture, it was surprising to see him once again line up in a 4-3-3 for today's game. He must have certainly thought the extra man in the center of the park would allow his side to boss possession down the middle but would have also been concerned the formation would once again give Wigan's wing backs Beausejour and Ronnie Stam space down the wings. To combat this threat Pardew played Jonas Gutierrez fairly deep on the left. The Argentine operated more as a left midfielder than forward and dropped deep to track the runs of Stam when Wigan were in possession. Cisse played narrower and more advanced on the right, looking to get close to Ba. Early on when the game was still 11 v. 11, Wigan looked like they might once again enjoy some success down the left with Cisse failing to track the runs forward of Beausejour.


The red card and resulting penalty changed the entire complexion of the game. In the first few minutes following Figueroa's sending off, Wigan didn't change anything and tried to play a back two of Gary Caldwell and Boyce with Beausejour and Stam continuing on as wing backs in what was effectively a 2-4-3. Martinez was trying to bring on holding midfielder James McArthur for Jordi Gomez but before he could make that sub Ba had added a second after a galloping run forward from Davide Santon whose well struck shot Ali Al-Habsi only parried into the path of Ba.

With the introduction of McArthur, Beausejour was dropped back alongside Caldwell and Boyce to form a back three. David Jones moved to left midfield while McArthur slotted in alongside James McCarthy in the center of midfield. Aroune Kone and Franco di Santo played as forwards in what was now a 3-4-2. Without two wide forwards, Wigan no longer had the ability to create the overloads in wide areas their game is based around. Newcastle had plenty of bodies to deal with any threat down the middle of the field and although Wigan showed some decent passing displays in the second half, the Magpies' goal never really look threatened.


Newcastle certainly enjoyed the extra man in midfield, comfortably controlling possession in that area and at times springing attacks from some excellent dribbling by Sylvain Marveaux. The second half was a rather quiet affair. Pardew's side sat a little deeper and had plenty of bodies in the middle of the field when Wigan tried to cross. Stam and Kone were at times able to work passing combinations and find space to cross down the right but with Di Santo the only target in the box they never really looked like scoring.

Thoughts, tactical analysis: USA 2-2 Russia

I've been left scratching my head after the US's 2-2 draw with Russia as to how my assessment of the USMNT performance could differ so much from American soccer journalists and pundits. The overwhelming sentiment on Twitter and from game commentator Taylor Twellman has been that the US back four was poor and that the draw hides what were serious deficiencies in this evening's performance, particularly at the back.

I'm hardly an eternal USMNT optimist and am willing to accept we stole a draw we hardly deserved. But I can't get on board with the idea this was an overwhelmingly bad performance from the US and one that hints at an ominous World Cup qualifying campaign ahead. Consider the context in which this game was played. Russia's entire starting lineup consisted of domestic-based players meaning they obviously faced far less travel time. This is a big deal in a midweek game in which players are forced to play for their club teams at the weekend and then immediately hop on a plane to join their national teams. The travel is exhausting, particularly on the back of a weekend game. The bulk of the US team today consisted of players based in Western Europe but also included MLS and Mexican league players- the travel was extensive for all involved.

Travel time aside let's also consider the opponent. Russia currently sit 9th in the FIFA World Rankings and in Fabio Capello they are led by a manager who has won multiple domestic titles in Spain and Italy and hoisted the Champions League trophy as manager of AC Milan. He's unbeaten in his first six games with Russia. They've gotten off to a perfect 4-0 start in their UEFA World Cup qualifying group including a win over Cristiano Ronaldo's Portugal. This was no feeble opponent the US were up against. Away from home it was always going to be an extremely difficult fixture to get a result from.

Defense
The US back four has come under the harshest criticism from American soccer journalists after the draw. US Soccer Daily (@USsoccerDaily) tweeted after the game, "Big questions in the back." SI's Grant Wahl echoed that sentiment stating "questions about the U.S. back line will remain." Twellman continued to reiterate throughout the broadcast that Tim Howard was the only thing preventing the score from being 4-1 or 5-1 to Russia.

That the US had a few problems defensively was clear. Howard indeed had to make key stops and Russia certainly created more dangerous goal scoring opportunities. However, the bulk of the defensive issues occurred high up the field with the US midfield and forwards and I'd argue the back four was more impressive today than they had been against Antigua and Barbuda or Guatemala.

The US played a 4-3-3 with Danny Williams in midfield just in front of the back four and Michael Bradley and Jermaine Jones in front of him playing as more box to box midfielders. Jozy Altidore played center forward and was flanked by Joshua Gatt and Herculez Gomez on the outsides. The US's five most advanced players (Altidore, Gatt, Gomez, Jones and Bradley) rarely seemed to be on the same page as to whether they were going to press the ball high up the field or collectively drop deep. Often half seemed to be pressingg while the other half were dropping so that the US defense was stretched vertically when they needed to be compact to make the field small for Russia. This opened up big pockets of space in the middle of midfield for Russia to collect the ball in and run towards the back four.

Another big problem for the US defensively, particularly in the middle of the second half, occurred when the US gave the ball away after the center midfield triangle of Williams, Jones and Bradley all advanced forward to support the three forwards. This created a big pocket of space between Williams and center backs Clarence Goodsen and Geoff Cameron for Russia to play an outlet ball into and counter, leaving the back four exposed. Too often it was lackluster defensive shape or cheap giveaways from the midfield and forwards that left the back four scrambling to stop Russian players whose movement off the ball had eluded the US midfield. Given the difficult situations the back four were frequently put under, I thought they did a decent job slowing down the Russian attack. Yes Tim Howard had to make some good stops but that's nearly always going to be the case against strong sides like Russia away from home. It's telling that the only Russian goals came from a silly giveaway by Danny Williams and another mental error when Maurice Edu and Goodsen switched off on a quick Russia restart. In the run of play the back four looked up for the challenge and it was the defensive shape of the midfielders and forwards that was the biggest defensive concern.

Attack
One of the concerns with a 4-3-3 is that, unlike a 4-2-3-1, there is no attacking central midfield player that plays just off the striker to connect midfield and attack. In the first half, Russia's willingness to get numbers behind the ball forced Jones and Bradley to check back deep to receive the ball. With Gomez and Gatt both operating in wider areas there was a large gap between the midfield center midfield three and Altidore. Therefore the only way to advance the ball forward was either through long balls into Altidore or hopeful balls over the top into the corner for Gomez or, more often, Gatt. The problem with the long passes hit into Altidore was that when he was able to control them and the hold the ball, he was isolated and there was no one for him to lay the ball off to.

In the second half the US did a better job of linking midfield and attack by getting players into the space between the Russian center backs and center midfielders. Gatt and Gomez at times both tucked inside into these pockets of space but most often it was Jones linking defense to offense with his powerful bursts forward from midfield. Jones' decision-making and game awareness can be frustrating but his work rate and ability to advance past opposition center midfields both off the ball and with the dribble make him a handful to deal with. Although he's not in the same class as Yaya Toure or Abou Diaby, he possesses the same trait that makes these two so difficult for the opposition to deal with- the ability to singlehandedly link to defense to offense by bypassing the opposition central midfield with powerful vertical runs. Michael Bradley has received all the plaudits for his play in midfield but it was Jones ability to usher the ball into the attacking third that allowed the US to play higher up the pitch and enabled Bradley to get in positions where he could use his creativity and quality on the ball. Jones deserves more credit for what was one of his stronger games in recent memory for the US.

4-3-3 vs 4-2-3-1
4-3-3 formations like the one used by the US today use one deep lying holding midfielder with two other midfielders that do more shuttling up and down the field. 4-2-3-1 formations use two holding midfielders (one tends to advance higher up the field when in possession) and one attacking midfielder that sits off of the center forward. 4-3-3's can be especially vulnerable to counterattacks, particularly when a team likes to get its outside backs forward. When a team in a 4-3-3 loses possession it's often left with only its one holding midfielder and two center backs to slow down the counter. It's impossible for the holding midfielder to cover the entire width of the pitch so opposition players easily move into space either side of him to receive the ball where they can then turn and run at the center backs. The extra holding midfielder in a 4-2-3-1 makes it easier to defend the width of the pitch on the counter- with two players rather than one in front of the center backs it makes it more difficult for the opposition to slide into pockets of space in the midfield and turn.

With Danny Williams operating as the loan holder in a 4-3-3, Russia were able to frequently collect outlet passes on either side of him and counter when the US lost possession. Had this been a competitive fixture against a side as strong as Russia, Jurgen Klinsmann would have almost certainly opted for two holding midfielders (4-2-3-1 or 4-4-1-1) rather than just the one to mitigate the threat of counterattacks. However, he almost certainly opted for the 4-3-3 with preparation for next year's crucial World Cup qualifiers in mind. With the exception of Mexico, the US's opponents in the CONCACAF hexagonal will get numbers behind the ball and defend deep. It makes little sense for Klinsmann to use two holding midfielders in these games where it will be important the US to get bodies forward to trouble crowded opposition defenses. Today's game was therefore probably one example where Klinsmann played a lineup with future opponents in mind rather than creating a reactive lineup to the opponent at hand.

Tactical analysis: Arsenal 2-2 Schalke


After going two goals behind in the first half, Schalke came back to pick up a deserved point against Arsenal at Veltins Arena.

Both managers played their normal 4-2-3-1 formations. Arsene Wenger gave Theo Walcott the start over Aaron Ramsey on the right. Andre Santos had a miserable night at left back when Schalke beat Arsenal 2-0 a fortnight ago so Wenger shuffled Thomas Vermaelen to left back and brought in Laurent Koscielny to play along side Per Mertersacker in the center of defense.

The only change Huub Stevens made to his team from the last time these sides met was swapping Marco Hoger with Jermaine Jones.

Early Moments
In the opening 15 minutes of the game both teams got players behind the ball defensively rather than pressing. Both back fours pushed forward towards the bank of midfielders, keeping the space the opposition had to play in very compact. The two sets of holding midfielders sat close in front of the back four and checked runs into that area. It appeared both managers were concerned about giving the opposition center attacking midfielder space in between the seams. This makes sense. Both Santi Cazorla and Lewis Holtby are clever at finding pockets of space and have the ability to pick out decisive penetrating passes. It also wasn't all that surprising both teams had set up to counter. Away from home Arsenal didn't want to open themselves up too much in the early stages and expose themselves to counters. Schalke are terrific at breaking forward quickly through Holtby, Ibrahim Afellay and Jefferson Farfan and constantly looked dangerous on the counter when the teams met in London.


It was also apparent in the early stages that Arsenal were placing responsibility on Lucas Podolski and Walcott to drop in defensively and provide help to Vermaelen and Bacary Sagna. Schalke like to get their outside backs forward and when these teams last met a fortnight ago, Podolski did a poor job tracking Uchida when he advanced forward from right back. This left Andre Santos, a left back not known for his defensive qualities, exposed to overloads with Uchida and Farfan. Farfan had found it easy to get around Santos and cut in towards the near post all evening and Schalke created a number of dangerous chances from the right. With Podolski and Walcott recovering to help defensively this time around, Farfan and Afellay did not enjoy the same amount of space on the flanks early on they had at the Emirates.

Arsenal go 2-0 up
Arsenal went up 2-0 inside half an hour without ever looking especially threatening. The opener on 16 minutes came from a comedy of errors- Neustadter's failed back header put Giroud through on goal only for the Frenchman to get his attempt on goal horribly wrong; his blushes spared however when the ball fell kindly for the trailing Walcott. Schalke were then forced to replace Uchida at right back on 25 minutes, bringing in Hoger, a midfielder by trade. Hoger's defensive weaknesses were exposed immediately. Within a minute of his introduction he was beaten easily by Podolski on the left who played in an expert cross to the front post for Giroud to head home. Neither goal was particularly indicative of an overarching tactical battle that had been emerging- the first was simply a bad mistake from Neustadter, the second poor defending from Hoger coupled with a training ground cross and finish combination from Podolski and Giroud. It should be noted however that Arsenal's second started with a move that saw Jack Wilshere receive a pass level with the Schalke back four, highlighting his ability to play as a box-to-box midfielder and join in the attack around the penalty area.

The early goals did however change the tactics for the remainder of the game. At 2-0 up away from home, Walcott and Podolski began dropping even deeper to provide defensive cover. With Schalke now forced to chase the game, they began to push the outside backs Fuchs and Hoger higher up the field. In defense, Arsenal set up in a 4-4-1-1 with Walcott and Podolski picking up Fuchs and Hoger. Everything seemed to be going right for the Gunners. Their more defensive shape prevented Schalke from doing what they do best- counter attack. When they won possession back they looked to find Cazorla in pockets of space in front of the center backs where he could turn and start counterattacks. Walcott and Podolski tried use their pace to advanced past Fuchs and Hoger down the channels, leaving the Schalke center backs scrambling to defend the width of the pitch. Arsenal didn't get many opportunities to counter but their defensive shape was forcing Schalke to play the ball horizontally in midfield and the German side didn't look particularly threatening.

Schalke's opener in first half stoppage time was such a blow because it came at a time when Arsenal were defending rather comfortably and on a move in which it appeared they were set to execute their plan and launch a counter through Cazorla. Arteta won the ball off Schalke at his own 18 and found Cazorla in space between the Schalke midfield and center backs. The Spaniard lost his footing however (he did several times throughout the night) and Schalke recovered the ball with the Arsenal defense out of shape. Holtby received a waist high pass at the edge of the 18 that he laid down brilliantly for Huntelaar to tuck home. Defending a one goal lead was never going to be an easy task for Arsenal in the second half.

Second Half
Schalke were very adventurous with the positioning of their outside backs to start the second half. Podolski and Walcott continued to drop in deep but Fuchs and Hoger would still at times advance past them. Afellay and Farfan were dangerous when they got on the ball and cut inside, creating room for overlapping runs from the outside backs. Schalke's equalizer came when Walcott had drifted infield to help defend the middle of the park. The ball went wide to an unmarked Fuchs. Sagna felt the need to close him down quickly (maybe not the best option as Fuchs was still 45 yards from goal), leaving empty space down the left channel for Afellay to run into. Mertesacker elected not to leave his position in the box and instead allowed Afellay to pick his head up and fire a cross into the box. It found Hotby who headed it into the path of Farfan for the goal. Once again defending the channels had proved Arsenal's undoing.

After the equalizer both sides seemed content with the draw and the final 20 minutes were fairly uneventful.

Substitutions
Neither manager used his substitutions to alter the game. Stevens was forced into replacing his right back twice when Uchida and Hoger both went down to injury. Wenger didn't make a change until the 90th minute.

West Brom overload Southampton's left back, win comfortably

Peter Odemwingie kept Southampton firmly rooted to the bottom of the Premier League table with goals either side of halftime in West Brom's 2-0 win.

 Although Steve Clarke's West Brom side has consistently lined up in a 4-2-3-1 this season, he has rotated the four attacking players frequently. Today Shane Long was given the start ahead of Romelu Lukaku at forward, Odemwingie was on the right, Zoltan Gera behind Long in the middle and Graham Dorrans on the left.

Nigel Adkin's Southampton played what could be called either 4-2-3-1 or or 4-2-2-2 with Jay Rodriguez playing as a slightly withdrawn forward to the right of Rickie Lambert. Both Adam Lallana and Gaston Ramirez played fairly high up the pitch in their wide positions and both tended to float towards the middle to get on the ball.

West Brom right versus Southampton left
In the first half Adam Lallana stayed very high up the pitch when West Brom were in possession and did a poor job of tracking West Brom's Billy Jones when got forward to join the attack from his right back position. This left Danny Fox constantly overloaded at left back where he was forced to try to defend both Jones and Odemwingie. With one of the two always unmarked, Odemwingie and Jones were able to get the ball in dangerous attacking areas down the right. It was therefore unsurprising when Odemwingie's opener came from a move on the right. This time it was Youssuf Mulumbu who advanced to the right wing from his holding midfield position to overload Fox. Odemwingie drifted inside and received Mulumbu's pass with the time and space to get the ball out of his feet and shoot. His effort took a fortunate deflection on its way to beating Paulo Gazzaniga in the Southampton goal but the Saints could only blame themselves for giving Fox so little help.

Southampton's outside backs push forward
With both Lallana and Ramirez tucking inside from their wide midfield position, Fox and Nathaniel Clyne were encouraged to get forward to provide width from their outside back positions. The pair played especially high in the second half with Southampton chasing the game. This left plenty of space in behind them on the flanks for West Brom to counter into. The hosts were happy to sit deeper and invite the Southampton outside backs forward and then counter with long balls to the flanks for Shane Long when they won possession. Odemwingie's second goal came when Southampton gave the ball away cheaply in the attacking third after Clyne had once again advanced high up the field to help the attack. Long made a run to the space left vacated by Clyne and received a pass on the left wing. Jose Fonte was forced wide from his center back position to pick up Long, leaving Maya Yoshida as the only defender in the penalty area. Odemwingie and Gera both made fine bursting runs into the box and Long picked out Odemwingie with an inch perfect cross.

Southampton struggle for vertical threat
Throughout the second half West Brom were happy to sit deep and allow Southampton to have possession around the halfway line. Southampton circulated the ball well enough in this area but rarely were able to find a penetrating ball into the final third. The Saints out passed West Brom 414 to 300 yet they completed 14 fewer passes in the final third. Nigel Adkin's side simply didn't have the creativity and quality to create meaningful goal scoring opportunities against a crowded defense. Possession and sideways passing are fine but eventually the ball needs to get in the box, particularly when Rickie Lambert is your forward. Lambert is a classic big and strong British no. 9 and needs to get the ball in the penalty area where he can poach to be effective. He isn't nearly as effective when forced to drop into the midfield or drift wide to get on the ball (like more technically gifted forwards like Suarez and Van Persie). Yet he was rarely able to receive passes anywhere near the goal this evening. The graphic below shows where he received passes. Far too often he was forced to collect the ball deep or wide in the left channel.


Conclusion
West Brom once again did an excellent job of advancing the ball quickly on the break with meaningful forward passes. They have been outpossessed in 9 of their 10 Premier League games this season yet their organization and ability to play on the counter has made them a very difficult team to beat.

Things are looking increasingly bleak for Adkins and Southampton. They simply don't have the firepower going forward to get into shootouts with Premier League opposition. If they don't improve their dreadful defensive organization the slim hope they have of survival will be killed off by the new year. They're averaging 2.8 goals against per game and are on pace to concede an incredible 106 goals this campaign. Since the 2002-2003 season, the league's worst defensive team has avoided relegation only once- Bolton in 2006-2007. The ease with which West Brom overloaded their outside back made the seem naive and suggests Adkins and Southampton are out of their league.